Populate the CDA header
Contents
- Introduction.
- Create a new FillHeader() function.
- Add code to fill in the empty header attributes.
- Add code to fill in the empty header elements.
- Review FillHeader() results.
Introduction [top]
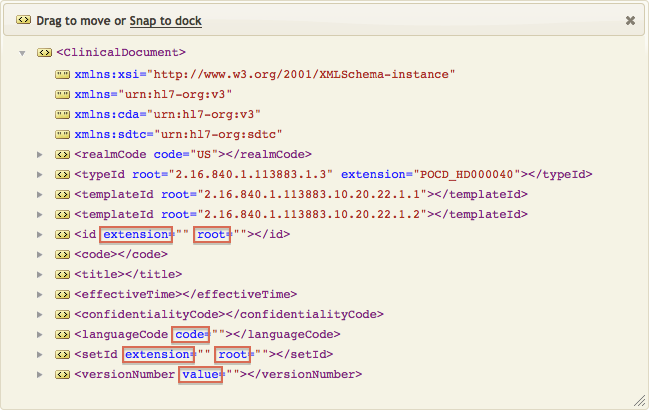
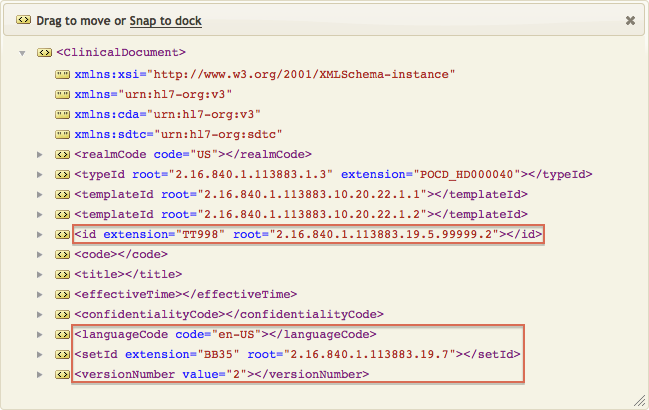
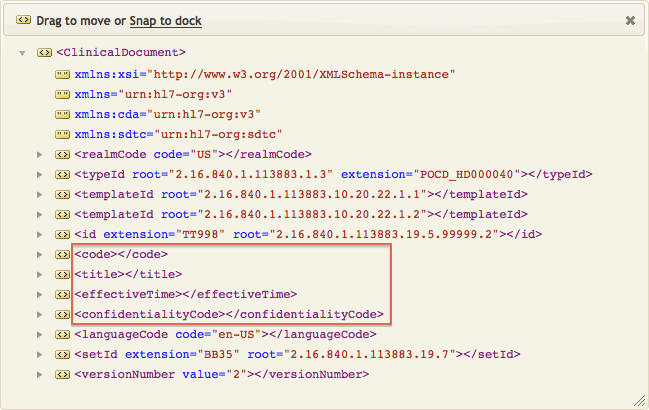
Although our CDA template contains all the mandatory attributes for a CDA header, the user-specific attributes and elements have been left blank:
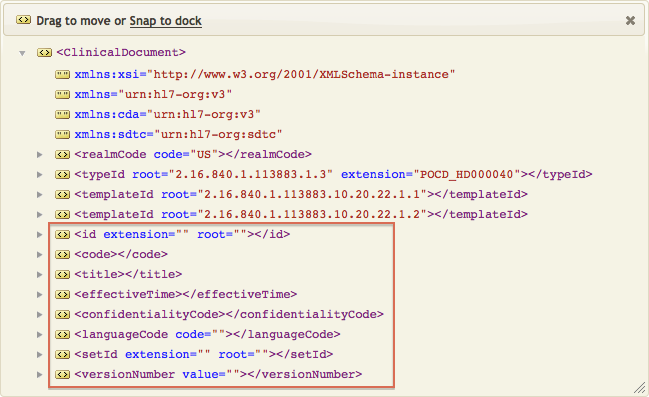
We need to fill these elements/attributes with the appropriate data. For the purposes of this tutorial, we are going to break this process down into several steps:
Create a new FillHeader() function [top]
In this step, we will create a function called FillHeader() that will eventually be responsible for filling in all our missing header information. Correctly building this type of “fill” function is at the core of our CDA process, so we will walk through it carefully.
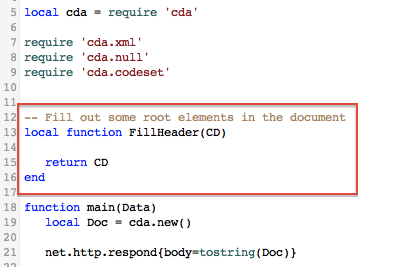
- To create the new
FillHeader()function, add the following lines above themain()function:
- To execute the new function, add the following lines to the
main()function:
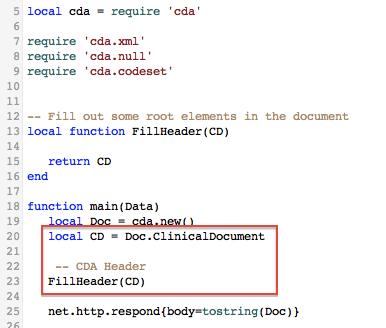
What’s with the local variable? We assigned the ‘Doc.ClinicalDocument’ element to the CD variable because this will make our code more concise whenever we call a “fill” function like FillHeader().
Here is a copy-and-paste version of the completed script, should you need it:
-- The main function is the first function called from Iguana.
-- The Data argument will contain the message to be processed.
-- Note: main() is the last function at the end of this code.

local cda = require 'cda'

require 'cda.xml'
require 'cda.null'
require 'cda.codeset'

-- Fill out some root elements in the document
local function FillHeader(CD)

   return CD
end

function main(Data)
   local Doc = cda.new()
   local CD = Doc.ClinicalDocument

    -- CDA Header
   FillHeader(CD)

   net.http.respond{body=tostring(Doc)}

      -- TEST CODE: write CDA to file (in Iguana install dir)
   if iguana.isTest() then
      -- unformatted xml
      local f = io.open('cda_xml.xml','w+')
      f:write(tostring(Doc))
      f:close()
      -- formatted with xsl stylesheet
      f = io.open('cda_web.xml','w+')
      f:write('\n')
      f:write(tostring(Doc))
      f:close()
   end

end
Add code to fill in the empty header attributes [top]
So far, we have an empty FillHeader() function. Let’s start building it up by adding code that will populate in our empty header attributes.
About Order
Before we start, let’s review an important concept: CDA elements and attributes are order sensitive. If we mess up the order, our resulting CDA document will fail NIST validation. That said, because these particular header fields already exist in the correct order (thanks to our underlying header template), we are able to populate them in any order we like. Understanding this concept will be particularly important later on in the tutorial, when we start adding new elements to our existing CDA structure. When we add new elements, they must be always be added in the correct order or our document will fail.
About Mapping
As we mentioned at the beginning of this tutorial, we are going to populate our CDA document by manually entering the data directly into the code. In most real-life scenarios, you will want to automate some of this process (or else you will be stuck hard-coding data for every patient/event and every different CDA document). To assist you with this, we are going to start including a handy table that lists not only the values required for the associated exercise, but how to fill out similar data automatically.
For example, this table lists the attributes we are about to update manually in our exercise below. We used the third column to provide tips on how you might perform this automatically:
| Attribute | Tutorial Data | Alternative Method |
|---|---|---|
| id.root | hard-coded string: ‘2.16.840.1.113883.19.5.99999.2’ | change/map/generate value |
| id.extension | hard-coded string: ‘TT998’ | map/generate value |
| setId.root | hard-coded string: ‘2.16.840.1.113883.19.7’ | change/map/generate value (optional attribute) |
| setId.extension | hard-coded string: ‘BB35’ | probably mapped or generated (optional attribute) |
| versionNumber.value | hard-coded number: 2 | change/map/generate value (optional attribute) |
| languageCode.code | lookup description: ‘English – US’, returns code: ‘en-US’ | change/map/generate description |
Look for this useful information throughout the tutorial!
Adding Code
Ready? Let’s start adding code the FillHeader() that will fill in the following empty attributes:
As you can see in the steps below, we recommend that you take advantage of Iguana’s auto-completion feature as it will make this process much faster/easier!
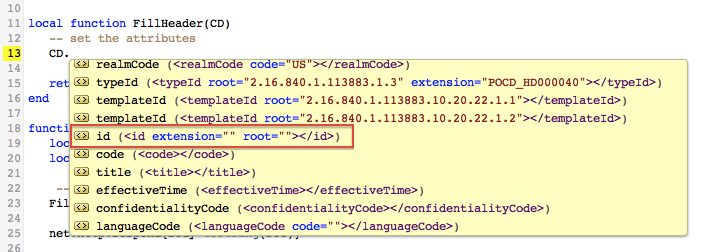
- Let’s tackle the missing ‘id’ attributes first. Start by typing “CD”, then use auto-completion to find the desired attributes:
- Manually enter the following values for the two ‘id’ attributes:
- id.root = ‘2.16.840.1.113883.19.5.99999.2’
- id.extension = ‘TT998’
- Follow the same simple process for the other hard-coded attributes, assigning the following values:
- setID.extension = ‘TT998’
- setID.root = ‘2.16.840.1.113883.19.7’
- setID.extension = ‘BB35’
- versionNumber.value = 2
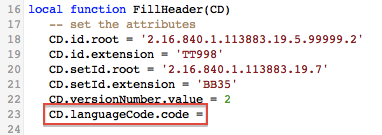
- Now let’s finish up by adding code for the last missing attribute, ‘languageCode’. Instead of manually entering this value, we are going to use one of the CDA API’s functions to look up the appropriate value. Start by typing “CD” and using auto-completion to build the following line of code:
- Using auto-completion to apply the correct syntax, we are going to call the ‘cda.codeset’ module and apply the appropriate lookup table. In this case, we want the value for ‘English – US’:
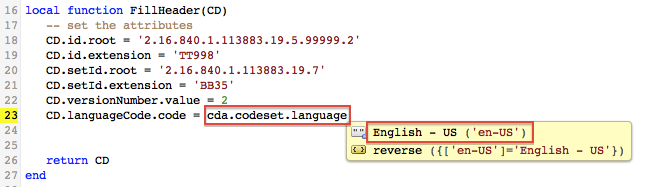
- As you can see in the annotations, the correct code is returned:
 We’ll go into more detail about the CDA API’s useful lookup feature on the next page in the tutorial.
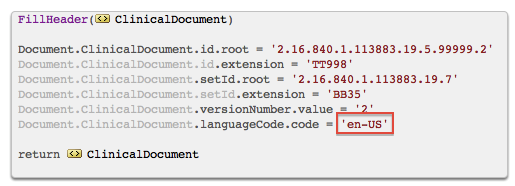
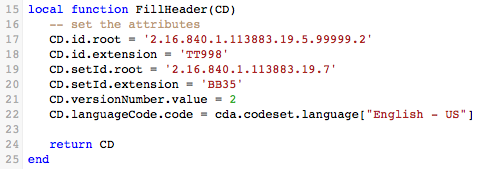
Finished! Your FillHeader() function should look like this:
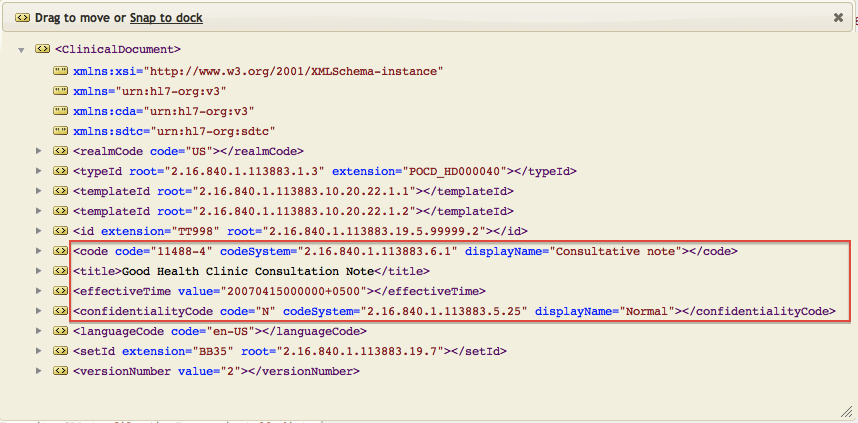
As you can see in the accompanying annotations, the missing header attributes are now populated:
Here is a copy-and-paste version of the FillHeader() function so far, should you need it:
-- Fill out some root elements in the document
-- all the values here are customer specific, you will
-- need to customise them to suit your requirements

local function FillHeader(CD)
   -- set the attributes
   CD.id.root = '2.16.840.1.113883.19.5.99999.2'
   CD.id.extension = 'TT998'
   CD.setId.root = '2.16.840.1.113883.19.7'
   CD.setId.extension = 'BB35'
   CD.versionNumber.value = 2
   CD.languageCode.code = cda.codeset.language['English - US']

   return CD
end
Add code to fill in the empty header elements [top]
Let’s keep building up the FillHeader() function with code that will populate our header’s empty elements.
About “Shortcuts”
Before we dive in, let’s take a step back and review another useful technique: using local variables to create function “shortcuts”.
In general, there are two ways to call a function: using Lua Object-Oriented (OO) style syntax, or using straight-up functional syntax. For example, we could apply something like the setText() function in two ways:

That said, we can improve performance considerably by storing our desired function in a local variable, then simply using that variable as a “shortcut” in the rest of our script:


Tip: Want to learn more about this technique? Check out “Lua Performance Tips” by Roberto Lerusalimschy for an explanation of why this practice is far more efficient.
Adding Code
Step 1: Add some useful shortcuts
For the purposes of this tutorial, we are going to add a couple of local variable “shortcuts” that represent some regularly-used functions. This will streamline our efforts later.
- Add the following lines of code to the top of your script:
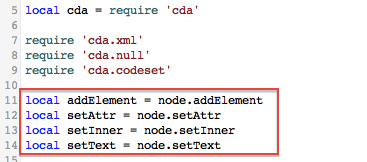 These create shortcuts for several commonly-used functions that you will often dip into when producing your own CDA documents.
 - Commit a milestone to save your work.
Here is a copy-and-paste version of this code, should you need it:
local addElement = node.addElement
local setAttr = node.setAttr
local setInner = node.setInner
local setText = node.setText
Step 2: Add the missing data
Now we are ready fill in the following empty element
| Element | Tutorial Data | Alternative Method |
|---|---|---|
| title | string: ‘Good Health Clinic Consultation Note’ | substitute your own title or map/generate |
| effectiveTime | string: ‘20070415000000+0500’ | probably mapped or generated |
| code | lookup description: ‘Consultative note’, returns code: ‘11488-4’ | change/map/generate description |
| confidentialityCode | lookup description: ‘Normal’, returns code: ‘N’ | change/map/generate description |
- Let’s start by populating the ‘title’ element. Because it is a text element, we will use the CDA API’s ‘cda.xml’ module. Among other useful features, this module includes the
node.setText()function. We’ve already created a shortcut for this function, so simply start typing “setText” and let auto-completion guide you through the rest: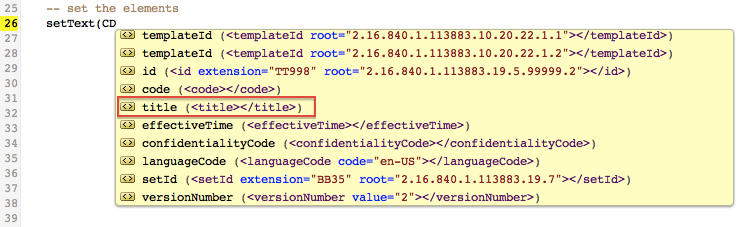 Here is the completed function:
Warning: When setting an element that only contains text, always use the
setText()function as it encodes special characters (e.g., <>&”) correctly. Do not usesetInner()because it does not encode special characters, and this will cause errors in the generated XML. You should only usesetInner()when you are setting a text element that contains either XML or HTML. - Let’s fill in the ‘effectiveTime’ element using the CDA API’s ‘cda.time’ module. Use auto-completion to check for available functions:
 As you can see above, there is both an “add” and “set” option. Because the element already exists, we will use the
 cda.time.setfunction to fill it out. The time zone defaults to UTC (GMT), to change zone you just add an increment/decrement, e.g., +500 for EST.Here is the completed function:
Note: Our “set” functions are smart. They will fill all the attributes in the element and automatically create any missing attributes. For more information on the available “set” functions, check out our CDA API Guide.
Tip: Originally we used the dateparse module for fuzzy date matching to recognize various common date formats. But later it was removed for performance reasons (it increases processing time by about 50%). Please contact us at support@interfaceware.com if you want more information.
- Now we are ready to fill in the ‘code’ element using the CDA API’s ‘cda.code’ module. In this example, we want to use the LOINC “Consultative Note” code. Again, because we are updating an existing (albeit empty) element, we will choose the “set” option:
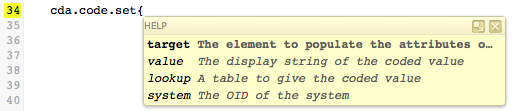
- Continue using auto-completion’s suggestions to assign the following values:
- target = CD.code
- system = LOINC
- value = “Consultative note”
- lookup = cda.codeset.loinc.reverse
- For ease of use, let’s split this code onto two lines so that its corresponding annotations won’t disappear off the screen. The final code should look like this:

- Finally, let’s repeat the last few steps to complete the ‘confidentialityCode’ element. This is another CDA-specific code datatype, so once again we will use auto-completion and
cda.code.setto assign the following values:- target = CD.confidentialityCode
- system = Confidentiality
- value = ‘Normal’
- lookup = cda.codeset.confidentiality.reverse
- Split the long line of code into two manageable lines, resulting in the following:

Finished! Now the FillHeader() function should look like this:
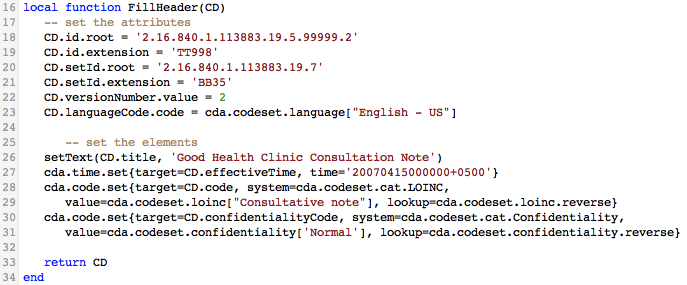
As you can see in the accompanying annotations, the missing elements are now filled in:
Here is a copy-and-paste version of the completed function, should you need it:
local function FillHeader(CD)
   -- set the attributes
   CD.id.root = '2.16.840.1.113883.19.5.99999.2'
   CD.id.extension = 'TT998'
   CD.setId.root = '2.16.840.1.113883.19.7'
   CD.setId.extension = 'BB35'
   CD.versionNumber.value = 2
   CD.languageCode.code = cda.codeset.language["English - US"]

      -- set the elements
   setText(CD.title, 'Good Health Clinic Consultation Note')
   cda.time.set{target=CD.effectiveTime, time='20070415000000+0500'}
   cda.code.set{target=CD.code, system=cda.codeset.cat.LOINC,
      value=cda.codeset.loinc["Consultative note"], lookup=cda.codeset.loinc.reverse}
   cda.code.set{target=CD.confidentialityCode, system=cda.codeset.cat.Confidentiality,
      value=cda.codeset.confidentiality['Normal'], lookup=cda.codeset.confidentiality.reverse}

   return CD
end
Reviewing “Lookup”
Before we go any further, let’s review some questions you might have about the lookup feature that several of the CDA API’s code-related modules implement:
Does the cda.code.set function really need to use a lookup table? Good question! Strictly speaking, we don’t need the ‘lookup’ parameter. Because we know the code system (‘system’) and the code description (‘value’), we actually have enough information to identify the lookup table. That said, the coding required to do this not trivial and, as it stands right now, we have not implemented this feature in our CDA API. We decided that passing the lookup table as the final parameter was an excellent compromise.
The ‘value’ parameter looks up the code using the ‘description’ parameter, and the ‘lookup’ parameter is a “lookup table”. How does that work? Yes it can be puzzling, but once you master this concept, you can repeat the same pattern for every code lookup you encounter!
In a nutshell:
- The ‘value’ parameter is simply a string containing the appropriate code value. For example, we used “11488-4” in this tutorial.
- The ‘lookup’ parameter contains the name of the table that we will use to identify the ‘description’ for the specified code.
In the original procedure, we used a lookup table to find the code simply because this is far more reliable than trying to remember codes like “11488-4” (particularly when you have the Iguana auto-completion to help you). As you can see in some sample code below, the value for displayName is the same in both cases:

So do all the “set” functions need a lookup parameter? No! A lookup parameter is only used with the four code-related “add” and “set” functions: cda.code.add, cda.code.set, cda.code.simple.add, and cda.code.simple.set.
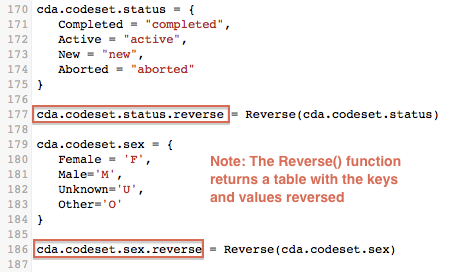
How do I know which lookup table to use? The answer is simple! Every code table (cda.codeset.xxx) has a corresponding “.reverse” lookup table (cda.codeset.xxx.reverse). You can see these in the cda.codeset module:
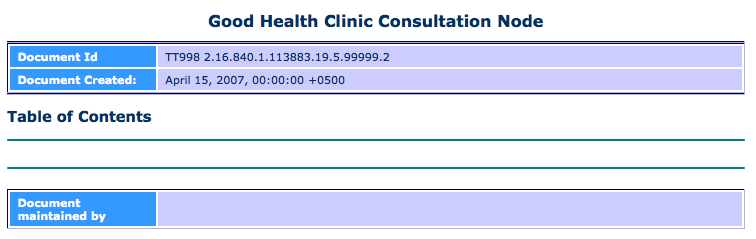
Review FillHeader() results [top]
Let’s have a look at what we’ve created! Simply browse to the Iguana install directory and open the cda_web.xml filein your web browser. You should see something like this:
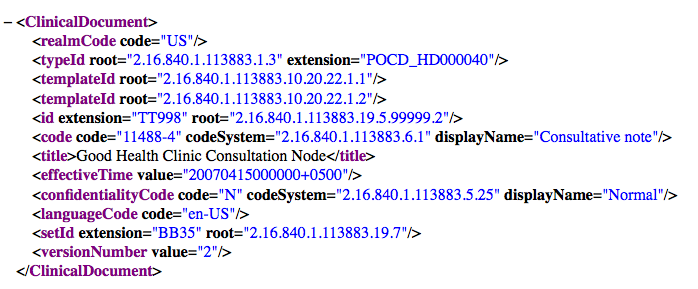
If you want to check out the raw XML (including the header’s new metadata), open the cda_xml.xml file:
Validate the CDA with NIST
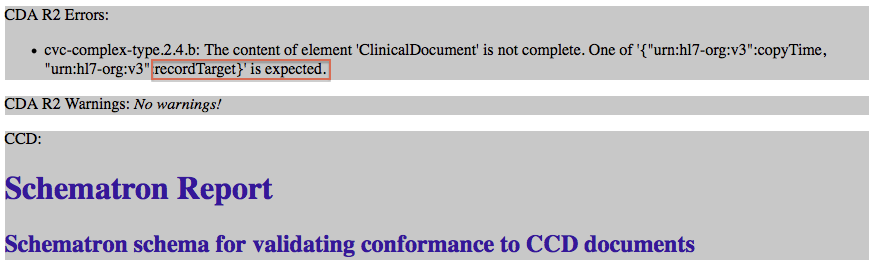
Now that we have filled out our CDA header’s empty attributes and elements, let’s use the NIST Validation Tool (or the Lantana validation tool) to check the cda_xml.xml file for errors.
As expected, the previous errors about empty attributes/elements are all gone! However, the NIST report says that the patient element (‘recordTarget’) is missing: