This section contains tips about installing Iguana.
If you ever encounter any problems with the installation or uninstallation of the Iguana service, you can easily install (or uninstall) the service from a command prompt.
To install the Iguana Service:
- Open the Command Prompt window.
- At the command prompt, type in iguana_service –install as shown below:
C:\Documents and Settings\Administrator>iguana_service --install
Installing service...
Service installed.
To uninstall the Iguana Service:
- Open the Command Prompt window.
- At the command prompt, type in iguana_service –uninstall as shown below:
C:Documents and SettingsAdministrator>iguana_service --uninstall
Uninstall the service...
Service uninstalled.
Mapped drives will only be accessible for the user that originally mapped the drive. This means that the Iguana service must log-in as that user to access that drive. In order to make mapped drives accessible for all users, you must change the Iguana Log On Properties for the Iguana service called iNTERFACEWARE Iguana.
To get the Iguana service to work with your network drive in Windows:
- Click Start > Settings > Control Panel > Administrative Tools > Services. The Services window appears.

- Right-click iNTERFACEWARE Iguana, and select Properties. The iNTERFACEWARE Iguana Properties window appears.

- In the iNTERFACEWARE Iguana Properties window, click the Log On tab.
- Under Log on as, select This account.
- In the This account field, type in the user name the Iguana service will log on as, or use the Browse button to select a user name from a list.
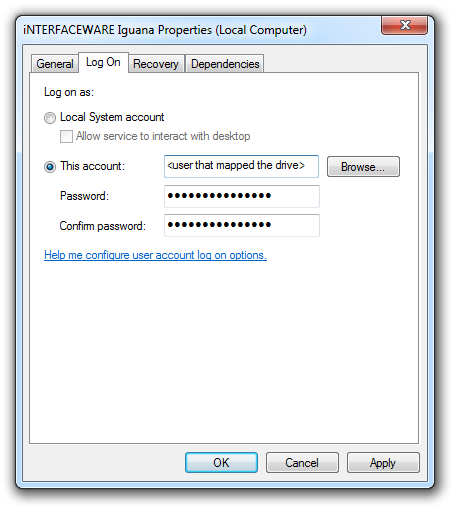
- In the Password and Confirm Password fields, type in the user name passwords.
- Click Apply to save your changes, and then click OK.
You must also change all of your VMD paths in Iguana to the network path name.
To determine what the network path name is for your shared network drive:
- Open the Command Prompt window.
- At the command prompt, type in the drive letter of your shared network drive.
- Then type in net use as shown below:
G:\>net use
New connections will not be remembered.

Status       Local     Remote                    Network

-------------------------------------------------------------------------------
OK           G:        \\server_name\directory   Microsoft Windows Network

The command completed successfully.
- In Iguana, replace all of the VMD path names with the network path name. In the example above, the network path name is \\server_name\directory.
Rob Ayer of Benchmark Revenue Management, one of our customers, kindly donated this script for Iguana. We have not tried using it in production ourselves, but provide it as a resource to any Linux customers we have.
It generally makes sense under Linux to run Iguana:
- Under a specific user ID rather than root. This is better for security.
- Make sure the $HOME environment variable is set for that user account since the source code control system Iguana uses will not function without this variable being set.
You may also be interested in looking at the best practices for manual installation.
#!/bin/sh

# chkconfig: - 90 15
# description: Iguana Service

# init file for iguana_service
# Author: Rob Ayer robayer@gmail.com

# Copyright (C) 2011 by Rob Ayer
# Permission is hereby granted, free of charge, to any person obtaining a copy
# of this software and associated documentation files (the "Software"), to deal
# in the Software without restriction, including without limitation the rights
# to use, copy, modify, merge, publish, distribute, sublicense, and/or sell
# copies of the Software, and to permit persons to whom the Software is
# furnished to do so, subject to the following conditions:

# The above copyright notice and this permission notice shall be included in
# all copies or substantial portions of the Software.

# THE SOFTWARE IS PROVIDED "AS IS", WITHOUT WARRANTY OF ANY KIND, EXPRESS OR
# IMPLIED, INCLUDING BUT NOT LIMITED TO THE WARRANTIES OF MERCHANTABILITY,
# FITNESS FOR A PARTICULAR PURPOSE AND NONINFRINGEMENT. IN NO EVENT SHALL THE
# AUTHORS OR COPYRIGHT HOLDERS BE LIABLE FOR ANY CLAIM, DAMAGES OR OTHER
# LIABILITY, WHETHER IN AN ACTION OF CONTRACT, TORT OR OTHERWISE, ARISING FROM,
# OUT OF OR IN CONNECTION WITH THE SOFTWARE OR THE USE OR OTHER DEALINGS IN
# THE SOFTWARE.

#
# Define system-specific variables here
#

# The root directory where the Iguana installation is located
IGUANA_ROOT=/usr/local/iguana

# The Iguana binary within the root directory
PROG=iguana_service

# The local system user to execute the binary as
# NOTE: If this local user is !=root then you will need to modify the web server
# port to something greater than 1024 so the service can bind and listen. This
# user must also have write permissions to the IGUANA_ROOT directory and files beneath
IGUANA_USER=iguana

# End system-specific variables

# The values are derived from the above definitions - do not modify them
IGUANA_BIN=${IGUANA_ROOT}/${PROG}
PIDFILE=${IGUANA_ROOT}/Iguana.pid

# test for root directory
[ ! -d ${IGUANA_ROOT} ] && echo "The directory ${IGUANA_ROOT} does not exist!" && exit 1

# Source function library
. /etc/rc.d/init.d/functions

RETVAL=0

start()
{
	echo -n $"Starting ${PROG}: "
	cd ${IGUANA_ROOT} # This allows for .pid creation in the same directory
	daemon --user=${IGUANA_USER} ${IGUANA_BIN}
	RETVAL=$?
	echo
	[ ${RETVAL} = 0 ] && touch ${PIDFILE}
	return ${RETVAL}
}

stop()
{
	echo -n $"Shutting down ${PROG}: "
	killproc ${IGUANA_BIN}
	RETVAL=$?
	echo
	rm -f ${PIDFILE}
	return ${RETVAL}
}

case "$1" in
	start)
		start
		;;
	stop)
		stop
		;;
	restart)
		stop
		start
		;;
	status)
		status ${PROG}
		RETVAL=$?
		;;
	*)
		echo $"Usage: $0 {start|stop|restart|status}"
		RETVAL=3
esac

exit ${RETVAL}