This section contains answers to common questions about deploying Iguana.
Iguana on Windows:
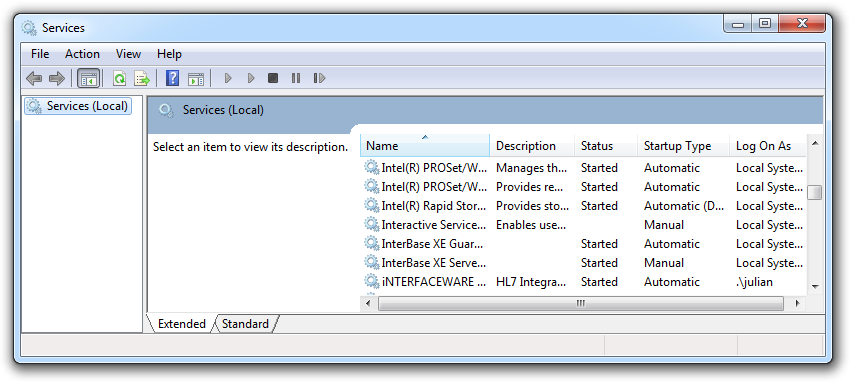
The Iguana service will be started automatically immediately following initial installation and is set to start automatically whenever the computer starts up. Still, it is important to know where the service is and how to stop and start it.
Note: The screenshots are from Windows 7. The screens will be slightly different if you are running a different operating system.
To start the Iguana service:
- Click Start > Control Panel > System and Security > Administrative Tools > Services. The Services window appears.

- Right-click iNTERFACEWARE Iguana, and click Start.
To stop the Iguana service:
- Click Start > Settings > Control Panel > Administrative Tools > Services. The Services window appears.
- Right-click iNTERFACEWARE Iguana, and click Stop. The status column of the service changes to Stopped.
Or you can stop and start the service from the command line using net stop iguana or net start iguana:

These parameters can vary depending on where you installed Iguana and if you did a manual install which means the name of the Iguana service could be different.
Warning! Do not change the system time on your computer while Iguana is running. This can adversely affect how messages and logged information are stored.
If you need to change the system time, stop Iguana, change the time, then restart Iguana.
Note: if you are using Windows Vista with Oracle version 10 or 11, you must change the default permissions given to the Iguana service before you can start it. See Using Windows Vista With Oracle Version 10 or 11 for more details.
Iguana on Unix, Linux or Mac OS X:
To start Iguana 4.0 or later as a Daemon:
./Iguana_service
If you are running Iguana on Unix, Linux or Mac OS X and you have used the iguana_service daemon to start Iguana, you must be careful when stopping Iguana.
If you want to stop Iguana by killing the process that is running it, you must stop the iguana_service parent process, not the iguana process that is spawned by iguana_service.
When iguana_service is killed, it exits immediately, and can be restarted in the normal way without problems.
If you are stopping the iguana_service daemon, and it is unable to stop during the time period specified in the service_kill_timeout field of the iguana_service.hdf configuration file, Iguana issues a SIGQUIT signal. This signal enables your system to generate a core dump.
If you want Iguana to issue a signal other than SIGQUIT, you can specify the signal that Iguana is to use. To do this, add the unix_kill_signal field to the iguana_service.hdf configuration file. This file is located in the directory in which Iguana is installed.
For example, if Iguana is to issue a SIGKILL signal, add the following:
unix_kill_signal=9
If you are having problems with one or more of your Iguana channels, you can start Iguana in safe mode. In safe mode, none of your channels are started automatically when Iguana is started.
To start Iguana in safe mode, open a command prompt window on Windows or a terminal window on Unix, Linux or Mac OS X, change to the Iguana install directory, and run Iguana with the --safe_mode option.
Windows:
cd C:\Program Files\iNTERFACEWAREiguana --run --safe_mode
Mac/Linux/Unix:
cd /Applications/iNTERFACEWARE-Iguana/./iguana --run --safe_mode
Note: If necessary substitute your own install directory above (step 1).
Tip: If Iguana detects a problem within one minute of startup and does not shut down cleanly, it will automatically restart in safe mode. This enables you to ensure that the channels that you have configured to start automatically are not the cause of this problem.
If you are diagnosing problems with Iguana, or want to check whether potential problems exist, you can run Iguana from the command line.
Windows:
cd C:\Program Files\iNTERFACEWAREiguana --runiguana --run --safe_mode(optionally add safe mode to prevent channels starting)- Use Ctrl+c to stop the server
Mac/Linux/Unix:
cd /Applications/iNTERFACEWARE-Iguana/./iguana --run./iguana --run --safe_mode(optionally add safe mode to prevent channels starting)- Use cmd+c to stop the server
Note: If necessary substitute your own install directory above (step 1).
Tip: When running Iguana from the command line it uses the current user permissions, not the permissions for admin or localsystem (or the service/daemon user).
If any of your code needs special access you will need to logon as a user with sufficient permissions, for example: The service/daemon user.
When you use iguana --run to start Iguana, it outputs several types of information, including:
| Sample Information | Description |
|---|---|
| IguanaConfiguration.xml | Iguana uses a new channel configuration file called IguanaConfiguration.xml in versions 4.0 and later. Iguana will automatically convert any existing Iguana configuration files into the new format. If there are any issues, Iguana will output them in the Command Prompt window. |
| Database Information (e.g. libmysql.dll, oci.dll, etc.) | Iguana tries to load the databases that are specified in your channel configuration. If certain databases are not present or supported, it provides an explanation (e.g. Oracle OCI support not present). |
| Server Information | Iguana outputs server information, including:
|
| Channel Status (Iguana 4.0 or later only) | Iguana 4.0 and later versions outputs the status of any channels that are automatically started when Iguana is started. |
| Log Index Files (Iguana 4.0 or later only) | Iguana 4.0 and later versions outputs information on the status of the log index files that are rebuilt. |
Yes you can place the configuration files in a separate directory.
Note: It is also also best practice to put the log files on a separate large and fast device.
For more information
- Manual installation Best Practices uses this to share executables for three instances (for easier upgrades)
- Working outside the install directory explains how to create a preconfigured install in this way
If you have any questions please contact us at support@interfaceware.com.
