- General Settings
- FTP Options
- Basic Options
- Message Options
- Downloading Files from an FTP Server
- FTPS Settings
- SFTP Settings
- Additional Options
- File Permission Problems in From File and To File Channel Components
General Settings
If you have specified From File as the source component for your channel, the Source tab is divided into three sections:
- The FTP Options section, which enables you to download files from an FTP server to your source directory
- The Basic Options section, which specifies basic configuration options for the From File source component
- The Message Options section, which enables you to specify the format of messages contained in input files
FTP Options [top]
The FTP Options section consists of a single check box:

Select the Download from FTP to source directory check box if you will be obtaining files from an FTP server. See Downloading Files From an FTP Server for more information on how to configure your Iguana channel to read files from an FTP server.
Tip: For greater control over ftp we recommend using a From Translator component and the net file transfer functions for ftp, ftps and sftp.
Basic Options [top]
The Basic Options section enables you to specify basic configuration options for the From File source component:
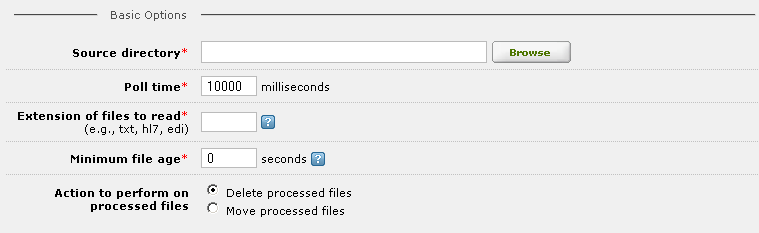
- In the Source directory field, type the path of the directory that contains the input files. This directory must exist.
- In the Poll time field, type the number of milliseconds Iguana should wait before checking for new files. This poll time must be at least 1000 milliseconds.
- In the Extension of files to read field, type the file extension of the input files, such as txt or hl7. To use multiple extensions, separate them with a comma, as in txt,hl7. To read all files in the input directory, type *. To use no file extension, type <none>.
- In the Minimum file age field, type the number of seconds that must have elapsed since an input file was last modified before it can be processed by the channel. If a file has been modified more recently than this, it is ignored. The default is 0 seconds, which means that all input files are processed immediately.
Note: This setting only affects files read out of the source directory, not files downloaded via FTP.
- From the Action to perform on processed files radio buttons, select Delete processed files if you want to delete the input files after they have been processed. Select Move processed files if you want to move input files into a directory after they have been processed.
If you select Move processed files, additional fields are displayed that enable you to specify where the processed files are to be moved:
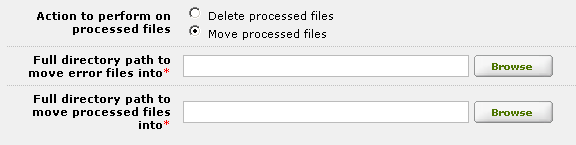
- In the Full directory path to move error files into field, type the path of the directory to move a file to if it is too large or contains invalid HL7 batch syntax as determined by the From File HL7 batch reading logic. The directory must already exist.
- In the Full directory path to move processed files into field, type the path of the directory to which files are moved if the message is processed successfully by the From File source component of the channel. Files are moved here even if an error occurs in the destination component. The directory must already exist.
Message Options [top]
The Message Options section enables you to specify the format of messages that are contained in input files:
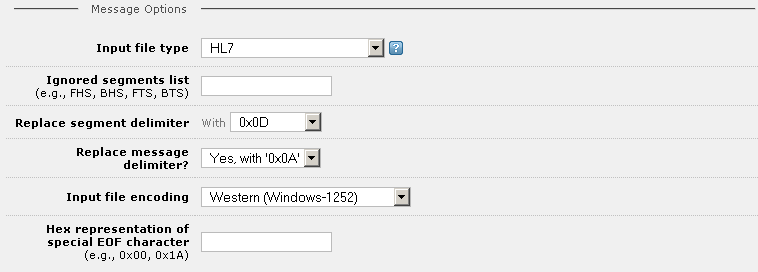
- From the Input file type list box, select the input file type. The table below lists the options available:
Input File Type Description HL7 An HL7 message. X12 A message in X12 format. Arbitrary Text A message in an arbitrary text format. Iguana assumes one message per input file, and treats the file as binary data. Custom Message Header An HL7 message whose first segment is not the MSH segment. If Input file type is set to Custom Message Header, the Custom Message Header field appears:
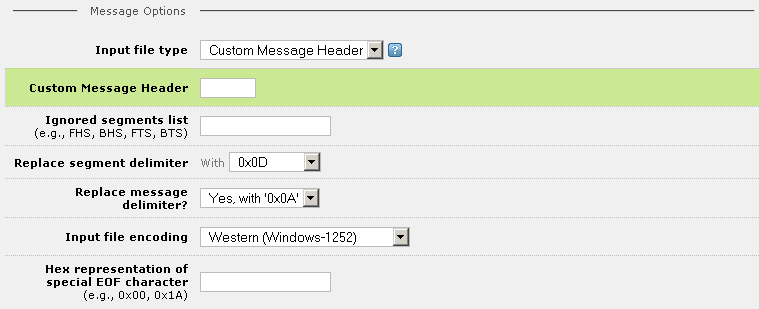
Simply type the message header that you want to use.
- In the Ignored segments list field, type a list of the batch segments (such as FHS, BHS, FTS and BTS) that are expected in the input messages. These batch segments will be ignored. Use commas to separate segment names.
Note: This field is not displayed if Input file type is Arbitrary Text.
- From the Replace segment delimiter list box, select the character(s) that will separate the message segments when messages are sent to the destination component of the channel. You can select 0x0D (carriage return), 0x0A (new line), or 0x0D 0x0A (carriage return and new line).
Note: This field is only displayed if Input file type is HL7 orCustom Message Header.
- From the Replace message delimiter? list box, select Yes, with ‘0x0A‘ if you want to replace the message delimiter character with 0x0A (new line), or No if you do not want to replace the message delimiter character. This character delimits the messages when they are sent to the destination component of the channel.
Note: This field is only displayed if Input file type is HL7 or Custom Message Header.
- From the Input file encoding list box, select the encoding that is used in the input file. On Windows, the default encoding is Western (Windows-1252). On Unix, Linux or Mac OS X, the default encoding is Western (ISO-8859-1). These two encodings are not significantly different.
- In the Hex representation of special EOF character field, type the hexadecimal representation of the character that represents the end of file when reading an input file. (For example, the EOF character might be 0x00 or 0x1a.) This character is ignored during parsing, and must be the last character in the file.
Note: If a file permission error occurs when the From File source component of a channel attempts to read a file, see File Permission Problems in From File and To File Channel Components for tips on how to solve this problem.
Downloading Files from an FTP Server [top]
Tip: For greater control over ftp we recommend using a From Translator component and the net file transfer functions for ftp, ftps and sftp.
When you have specified From File as the source component for a channel, you can indicate that the files that are received by this channel are obtained from an FTP server. To do this, select the Download from FTP to source directory check box.
When this check box is selected, additional fields appear that enable you to provide information about the FTP server from which the files are to be obtained:
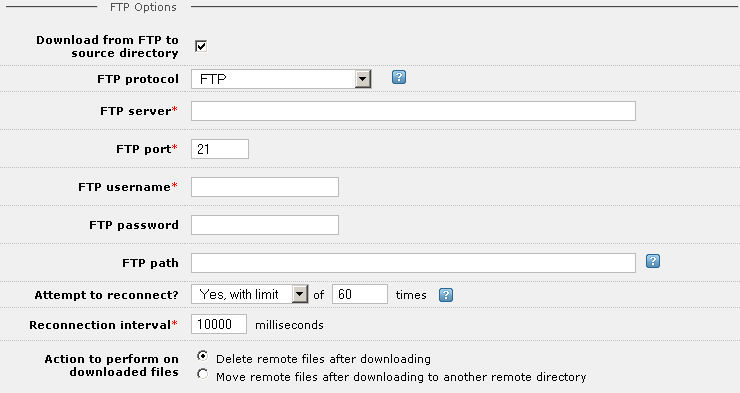
- From the FTP protocol list box, select the FTP protocol that you want to use. You can select FTP (standard FTP), FTPS (FTP over SSL) or SFTP (Secure Shell FTP).
- In the FTP server field, type the name of the FTP server from which you will be obtaining the files.
- In the FTP port field, type the port that the FTP server is using. If you are using the FTP protocol, this is usually port 21. If you are using FTPS, this is usually port 990. If you are using SFTP, this is usually port 22.
- In the FTP username field, type the username that you use to access the FTP server.
- If your FTP server requires a password for access, type the password in the FTP password field.
- In the FTP path field, type the location of the directory on the FTP server from which the obtained files are to be retrieved. How this field is interpreted depends on the protocol that you are using:
- If you are using the FTP or FTPS protocol, the directory specified in the FTP path field is relative to the home directory for the FTP user. For example, if the FTP user is iguanauser and the user’s home directory is C:\iguanauser\FTP, specifying iguanadir in the FTP path field indicates that files should be read from C:\iguanauser\FTP\iguanadir.
- If you are using the SFTP protocol, the FTP path field must contain the full path of the directory from which files are to be read.
- If the FTP path field is empty, the files are obtained from the user’s home directory if you are using the FTP or FTPS protocol, and from the FTP server’s root directory if you are using the SFTP protocol.
FTPS Settings [top]
If you have selected FTPS from the FTP protocol list box, fields appear that enable you to specify encryption information:
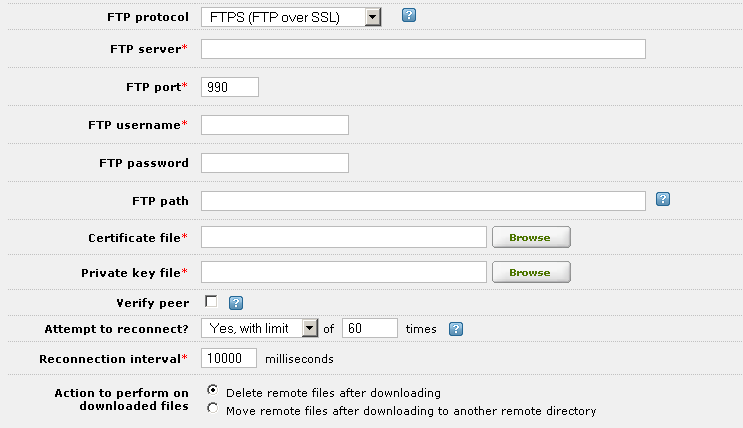
- In the Certificate file field, type or browse for the location of your certificate file.
- In the Private key file field, type or browse for the location of your private key file.
- If you want to verify the authenticity of the server that is sending you messages, select the Verify peer check box. In the Certificate authority file field that appears, type or browse for the location of the certificate authority file.
SFTP Settings [top]
If you have selected SFTP from the FTP protocol list box, fields appear that enable you to specify how to authenticate your connection:
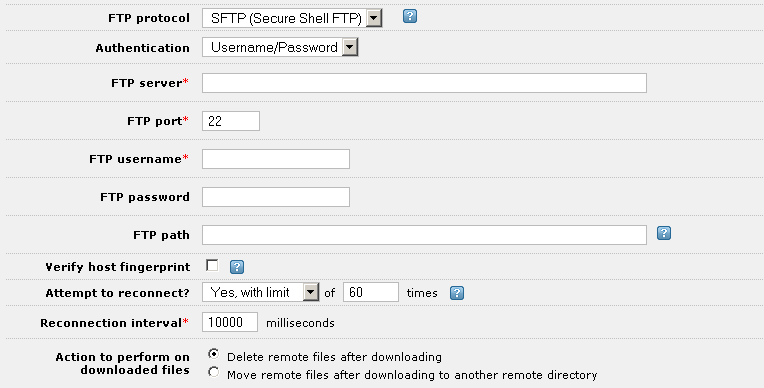
From the Authentication list box, select the type of SFTP authentication to use (either Username/Password or Private/Public Key).
If you have selected Username/Password from the Authentication list box, the FTP Options section of the Source screen will appear as shown above. Continue as follows:
- In the FTP password field, type the password that your FTP server is expecting.
- Select the Verify host fingerprint check box to verify the authenticity of the server that is receiving the messages. The Host fingerprint field appears:
 This field contains the host fingerprint, which is a 32-character string created using the MD5 cryptographic hash function.
 - If the field is empty, click the Get Fingerprint link to obtain the host fingerprint.
If you have selected Private/Public Key from the Authentication list box, the FTP Options section of the Source screen displays the fields shown below:
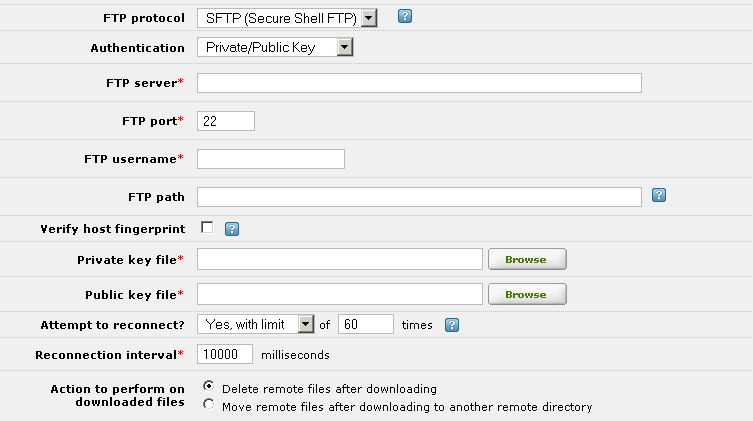
- Select the Verify host fingerprint check box to verify the authenticity of the server that is receiving the messages. The Host fingerprint field appears:
 This field contains the host fingerprint, which is a 32-character string created using the MD5 cryptographic hash function.
 - If the field is empty, click the Get Fingerprint link to obtain the host fingerprint.
- In the Private key file field, type or browse for the location of your private key file.
- In the Public key file field, type or browse for the location of your public key file.
Note: If you have selected Private/Public Key from the Authentication list box, you will need to configure your FTP server’s SSH daemon so that it will not prompt for a password when Iguana is downloading files.
Additional Options [top]
At the bottom of the FTP Options section, fields enable you to specify how reconnection should be handled and what to do with downloaded files:
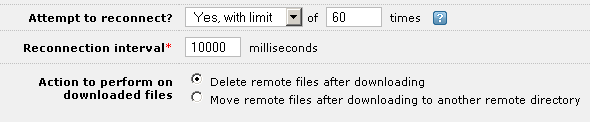
- From the Attempt to reconnect? list box, select whether you want Iguana to try and reconnect to the FTP server if an initial connection could not be made or if the connection is dropped. Select No if you do not want Iguana to reconnect, Yes (unlimited) if you want Iguana to keep trying to connect forever, or Yes, with limit if you want Iguana to make a limited number of reconnection attempts.
- If you select Yes, with limit, a text field appears that allows you to enter the amount of times that Iguana should try to connect before giving up.
- If you select Yes, with limit or Yes (unlimited), the Reconnection interval text field appears, allowing you to choose the number of milliseconds that Iguana should wait before trying to connect again.
- In the Action to perform on downloaded files section, specify what to do with the files on the FTP server after they have been obtained.
- If you select Move remote files after downloading to another remote directory, a field appears that allows you to specify the FTP path for downloaded files.
File Permission Problems in From File and To File Channel Components [top]
If a file permission error occurs when the From File source component of a channel attempts to read a file, or when the To File destination component of a channel attempts to write a file, check for the following:
- Does your computer grant the necessary permissions to allow the read or write operation to be performed?
- Does the file exist that you are trying to access?
- Is the file in use?