- Introduction
- Configuring Connection Information
- Configuring ACKnowledgment Settings
- Creating a Custom VMD File For ACK Verification
- Configuring Connection Settings
- Configuring SSL
- Iguana Performance and SSL Encryption
- Viewing the Certificate File
- Preventing Channels From Stopping Because of LLP Client Connection Errors
- Not Receiving the Same Number of ACKs that are Sent Out
Introduction
If you have specified LLP Client as the destination component for your channel, the Destination screen for this channel definition enables you to configure this destination component.

The LLP Client destination component is divided into four sections:
- The connection information section at the top of the screen.
- The ACKnowledgment Settings section.
- The Connection Settings section.
- The SSL Settings section.
Note: Iguana supports the use of IPv6 addresses with the LLP Client component.
Configuring Connection Information [top]
To configure the connection information:
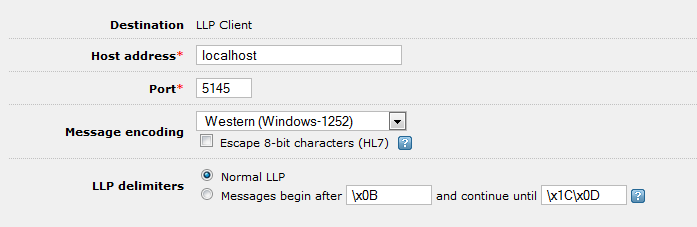
- In the Host address field, type the IP address or domain name of the target application’s machine. To include the value of an environment variable in the host address, use ${name}, where name is the name of an environment variable.
- In the Port field, type the port on which the target application is expecting to receive messages.
- From the Message encoding list box, select the encoding that will be used for messages sent through this channel.
- Select the Escape 8-bit characters (HL7) check box if you want escape characters to be provided for any 8-bit characters contained in the HL7 or ACK messages sent through this channel.
- In the LLP delimiters section you can choose a different message delimiter.
If you select the Escape 8-bit characters (HL7) check box, additional radio buttons appear that enable you to determine what escape character to use:
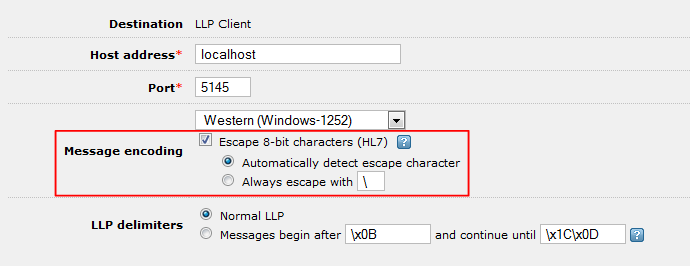
- Select the Automatically detect escape character radio button if you want Iguana to use the escape character specified in the MSH segment of the message. (By default, this escape character is \.)
- If you want to specify the escape character to use:
- Select the Always escape with radio button.
- Specify the character in the text field next to this radio button.
Note: You will need to specify the escape character yourself if the messages that the channel are processing do not contain MSH segments or contain non-standard MSH segments.
Configuring ACKnowledgment Settings [top]
After you have provided the LLP Client connection information, the next step is to configure the ACKnowledgment Settings section:
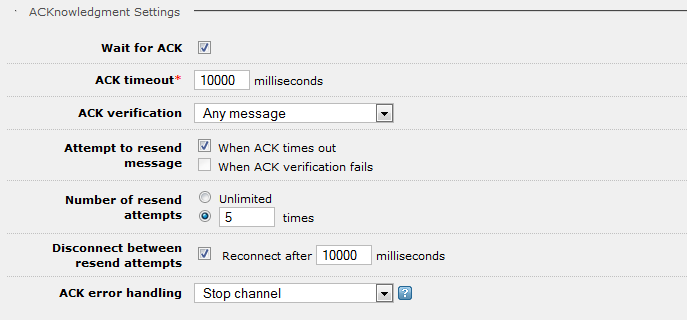
- Select the Wait for ACK check box if you want the Iguana channel to wait for an acknowledgment message to be returned before it sends the next message. If you unselect this check box, all of the other fields in this section will disappear, as none of them need to be selected.
Note: In the ACK timeout field, type the number of milliseconds to wait for the target application to send an acknowledgment message. If an acknowledgment is not received during this time, the message is resent if the When ACK times out check box (described below) is selected.
- From the ACK verification list box, select the type of validation acknowledgment variation you want. The table below shows the possible settings and their meanings:
| Acknowledgment verification | Meaning |
|---|---|
| Any Message | Treat any message sent back by the target machine as a valid acknowledgment. |
| Any ACK Message | Use the VMD file provided in the Iguana install directory (ack_verify.vmd) to parse the acknowledgment and ensure that it is an HL7 message of type ACK. Iguana uses the message identity to verify that the acknowledgment is valid. |
| Verified ACK Message | This option provides the strictest acknowledgment checking. The ack_verify.vmd file compares the MessageControlID field in the MSH segment of the original message with the corresponding field in the ACK message. The acknowledgment message must be of type ACK.You can add even more stringent acknowledgment verification by adding fields to the MSH table in the VMD file and mapping them to the fields that you want to compare in the messages. For example, you might want to compare the message type in the acknowledgment message to the message type in the original message.For more information on how to create a custom VMD file to perform ACK verification, see Creating a Custom VMD File For ACK Verification. |
If the ACK verification list box is set to Any ACK Message or Verified ACK Message, the ACK VMD path field appears:

In this field, you can type or browse for the location of the VMD file that parses the received ACK message to determine its validity. When you supply the file path, the absolute path is displayed. The default file, ack_verify.vmd, is typically fine to use.
| Tip: If the ACK verification list box is set to Verified ACK Message, the VMD file that handles the ACK verification will process both the ACK message and the original message. The ACK message is processed first. |
To include the value of an environment variable in the file path, use ${name}, where name is the name of the environment variable that you have defined. For example, the file path ${MYDIR}\myfile.vmd includes the value of the MYDIR environment variable.
The iguana_dir environment variable, which is defined by Iguana, is set to be the location of the Iguana configuration directory. To include this directory in your file path, specify ${iguana_dir} as part of the path.
- In the Attempt to resend message section, select the When ACK times out check box if you want the channel to resend the message if an acknowledgment has not been received in the time specified by the ACK timeout field.
- Select the When ACK verification fails check box if you want the channel to resend the message if acknowledgment verification fails. (Acknowledgment verification is performed if the ACK verification list box is set to Verified ACK Message.)
Note: The When ACK verification fails check box is disabled if the ACK verification list box is set to Any Message, as no acknowledgment verification is performed.
- From the ACK error handling list box, select what you want the channel to do when acknowledgment validation fails or when the channel times out while waiting for an acknowledgment message, and any and all attempts to resend the message have failed. Select Stop channel if you want the channel to stop, or select Skip message if you want the channel to skip the message.

- If either of the check boxes in the Attempt to resend message section is selected, the Number of resend attempts and Disconnect between resend attempts fields appear:
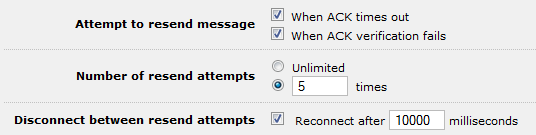
- In the Number of resend attempts section, select the Unlimited radio button if you want the channel to keep trying to send the message forever. If you select the other radio button, the number of attempts is limited; in the text box provided, type the maximum number of times to resend the message.
Note: If Iguana is unable to send a message, the channel will be stopped.
- Select the Disconnect between resend attempts check box if you want the channel to be disconnected between attempts to resend the message. If this check box is selected, in the Reconnect after text field, type the number of milliseconds to wait before reconnecting and resending the message.
Creating a Custom VMD File For ACK Verification [top]
If you are creating a channel whose destination component is LLP Client, and you have selected Verified ACK Message from the ACK verification list box to indicate that you want to verify the acknowledgment message, you can create a custom VMD file that specifies how acknowledgment verification is to be performed.
The easiest way to do this is to make a copy of the ack_verify.vmd file that is included with Iguana and then change it to perform the acknowledgment verification that you want. To do this:
- Copy the ack_verify.vmd file from the directory in which Iguana is installed to another location on your system. Or, alternatively, leave the copy of ack_verify.vmd in the directory in which Iguana is installed and rename it.
- Using Chameleon, open the VMD file copy that you have just created.
- In the Workspace, double-click the MSH table. This table contains a list of the fields to be matched during the verification process:
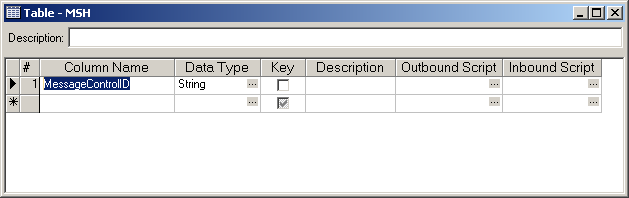
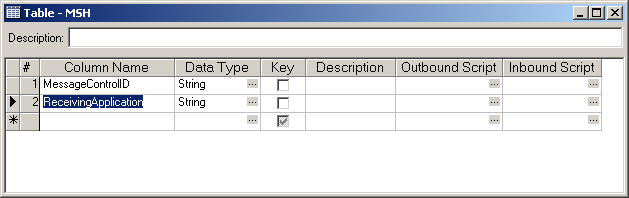
In this table, add the fields that you want to use to perform additional verification. For example, if you want to ensure that the Receiving Application field (the fifth field of the MSH segment, also referred to as MSH.5) of the original message matches the Sending Application field (MSH.3) of the acknowledgment message, you can add a ReceivingApplication field to the MSH table in the VMD file:
- In the Workspace, locate the ACK (Acknowledgment) message definition, and double-click Message Grammar.
- In the Table Grammar panel, double-click MSH. The Table Mapping window appears.
- In the Table Mapping window, click the … (ellipsis) button at the bottom right (next to the Grammar Root list box). The Grammar Root Selection window appears.
- In the Grammar Root Selection window, select Message. Click OK to close this window.
Note: By default, the grammar root for the ACK message definition’s table grammar is the MSA segment. If the additional fields that you are using for ACK verification are contained in the MSA segment, you do not need to change the grammar root for the ACK message definition.
The example outlined in this section uses the Receiving Application and Sending Application fields for additional verification. Since these fields are in the MSH segment, the grammar root must be changed to allow mapping from fields other than the MSA segment.
- In the Table Mapping window, locate the segment containing the field that you want to use for verification and expand it. Drag the field from the right panel to the Mapping column of the table. Repeat if necessary.

- In the Workspace, locate the Default message definition, which matches the original message that was sent. In this message definition, double-click Message Grammar. The Message Grammar window appears.
- In the Message Grammar window, in the Table Grammar panel, double-click MSH. The Table Mapping window appears.
- In the Table Mapping window, from the right panel, which lists all of the fields in the MSH segment, expand the segment and locate the field that you want to use for verification. Drag the field from the right panel to the Mapping column of the table. Repeat if necessary.

Note: In the Default message definition, the grammar root is the MSH segment. Since, in most cases, the fields that you will want to use for ACK verification can be found in this segment, you normally do not need to change the grammar root. However, if you want to use a field from another segment as part of your ACK verification, you can set the grammar root for this table grammar to be the entire message by following the procedure described above for the ACK message definition.
- In the main Chameleon window, from the File menu, select Save to save your file.
- In Iguana, edit your channel. In the Destination tab of the channel, update the ACK VMD path field to specify the location and file name of the VMD file that you have just created.
Your channel will now perform the ACK verification that you have specified in this file. ACK verification consists of the following steps:
- The acknowledgment message is processed by the ACK message definition, and the values of the fields specified in the ACK message definition’s Table Mapping window are retrieved.
- The original message is processed by the default message definition, and the values of the fields specified in the default message definition’s Table Mapping window are also retrieved.
- Each retrieved value from the original message is compared to its corresponding value in the acknowledgment message. If all corresponding values match, the acknowledgment message is considered successfully verified.
Configuring Connection Settings [top]
The next step when creating the LLP Client destination component is to specify the connection settings:
- From the Persistent connection? list box, select whether you want to be persistently connected to the remote host.
- Yes to establish a persistent connnection.
- No, disconnect after every message.
- No, disconnect after a timeout.
- If you select No, disconnect after a timeout a text field appears:

In this text field, specify the number of milliseconds to wait before timing out and disconnecting.
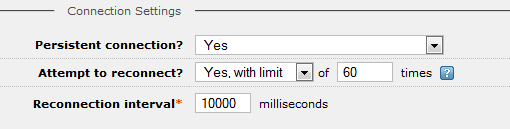
- From the Attempt to reconnect? list box, select whether you want Iguana to try and reconnect to the remote host during channel startup if an initial connection could not be made or if the connection is dropped while the channel is running.
- No if you do not want Iguana to reconnect.
- Yes (unlimited) if you want Iguana to keep trying to connect forever.
- Yes, with limit if you want Iguana to make a limited number of reconnection attempts.
- If you select Yes, with limit a text field appears:
In this text field, type the amount of times that Iguana should try to connect before giving up.
- If you select Yes, with limit or Yes (unlimited) from the Attempt to reconnect? list box, the Reconnection interval text field is displayed.

In this field, type the number of milliseconds that Iguana should wait before trying to connect again.
Configuring SSL [top]
If you want to use the SSL (Secure Socket Layer) transport mechanism to send messages securely, select the Use SSL check box. Additional fields appear that enable you to specify the details of the SSL connection:
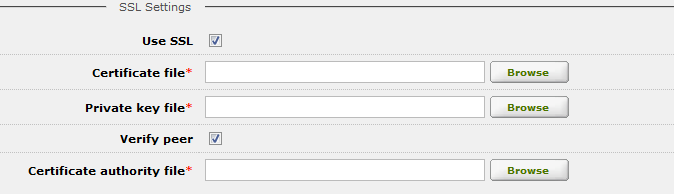
- In the Certificate file text field, type or browse for the location of your certificate file.
- In the Private key file text field, type or browse for the location of your private key file.
- If you want to verify the authenticity of the server to which you are sending messages, select the Verify peer check box. If the Verify peer check box is selected, the Certificate authority file text field is displayed.
- In the Certificate authority file text field, type or browse for the location of the certificate authority file.
Tip: To create certificate files and private key files for testing see, see the FAQ: How to create self-certified SSL certificate and public/private key files.
Using SSL may adversely affect performance if the connection is repeatedly dropped and re-established. For details, see Iguana Performance and SSL Encryption.
Iguana Performance and SSL Encryption [top]
If you are using the SSL protocol with any channel source or destination component that supports it, the SSL connections may consume a significant amount of processing time if the channels are repeatedly connecting to and disconnecting from the systems that are communicating with them.
This is because the SSL protocol creates a shared secret key (also known as a session key) whenever a connection between two systems is established. This session key is encrypted/decrypted using asymmetric encryption, which is computationally expensive. The size of the private and public keys directly affects how expensive this operation is.
After the session key has been successfully shared between the two systems using asymmetric encryption, the two systems subsequently use symmetric encryption with the session key to secure communications, which is much less computationally expensive.
When a connection is dropped, the process of establishing the session key is initiated again. If SSL channels are repeatedly connecting to and disconnecting from outside systems, system performance may be noticeably affected.
SSL channels that are configured to use a persistent connection should not cause a sustained drain on system resources, as symmetric encryption remains in use after the initial connection is established. If you notice that your Iguana server is consuming significant processor time and you are using SSL with a channel component, consider configuring the channel to use a persistent connection.
Since the size of the public and private keys can have an effect on processor time use, an alternative to using a persistent connection is to use smaller private keys. However, this is not recommended, as smaller keys are less secure than those that are longer (2048 bits or more).
Viewing the Certificate File [top]
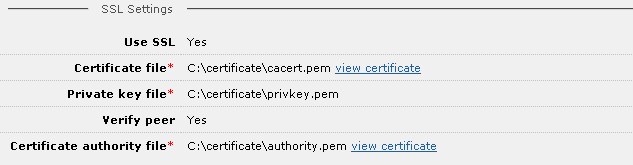
If you have specified that the LLP Client destination component is to use the SSL (Secure Socket Layer) transport mechanism to send messages, you can view the certificate files that you have set up for this component. You can view either the certificate file that the channel is using or the certificate authority file that verifies the authenticity of the server that will be receiving messages from the channel.
To view a certificate file, after you have created the channel, click the view certificate link in the Destination tab of your channel definition:
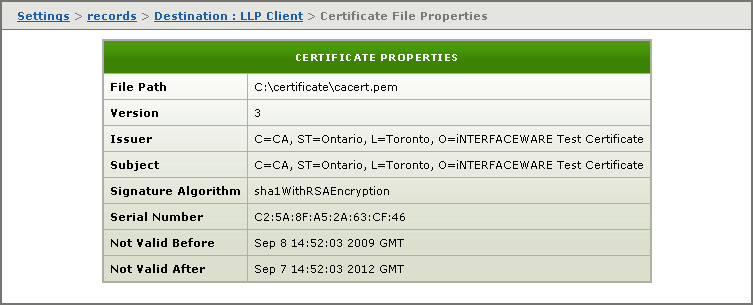
The Certificate File Properties page appears, enabling you to view the certificate information:
Preventing Channels From Stopping Because of LLP Client Connection Errors [top]
If your LLP client receives a connection error, Iguana will typically stop the channel. This error occurs whenever the receiving end does not properly close the connection. However, this can be prevented by increasing the number of automatic reconnection attempts.
To keep your channel from stopping because of LLP client connection errors in Iguana 4.0 or any later version:
- Open the Iguana dashboard, and stop the channel you want to modify.
- Click the channel name. The Channel Configuration settings appear.
- Click the Destination tab to display the LLP Client configuration settings.
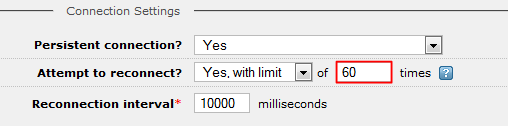
- Change the value of the Attempt to reconnect? list box to Yes, with limit, and change the value in the text field to a number greater than 0. In the example below, the value was changed to 1000. This specifies the maximum number of times the channel will attempt to connect to the remote host when the connection is lost.
- Adjust the Reconnection interval value accordingly. This specifies the number of milliseconds to wait between connection attempts.

Note: Setting Attempt to reconnect? to Yes (unlimited) means there is no limit to the number of reconnection attempts.
Not Receiving the Same Number of ACKs that are Sent Out [top]
If your channel is sending more messages than the number of ACKs it is receiving, this may be because ACK messages are taking a long time to be received, and your channel’s ACK timeout is being triggered before they arrive. This problem can be prevented by changing the value in the ACK timeout field:

You may need to repeatedly adjust this value until the channel starts receiving ACK messages consistently.