- Settings
- File Options
- FTP Options
- Using Format Specifiers in File Names
- Improving Iguana Performance When Using the ‘To File’ Destination Component
- Uploading Files to an FTP Server
- FTPS Settings
- SFTP Settings
- Additional Options
Settings
If you have specified To File as the destination component for your channel, the Destination screen displays two sections:
- The File Options section specifies information about the output files and the directory in which they are stored
- The FTP Options section enables you to upload files from your output directory to an FTP server
File Options: [top]
When the Destination screen first appears, the File Options section looks like this:
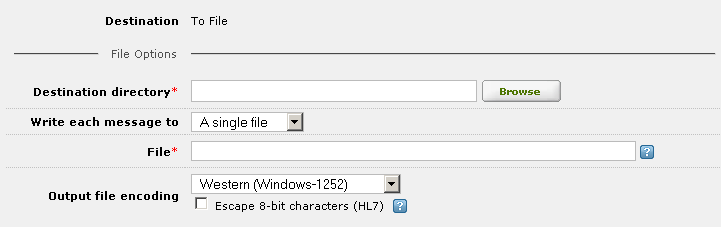
- In the Destination directory list box, type or browse for the path of the directory to which Iguana will write the message files. This directory must exist.
- From the Write each message to list box, select A single file if all output messages are to be written to a single file. Select Separate files if each message is to be written to its own file.
If you specify A single file for all output messages:
- In the File field, type the name of the file to which the output messages are to be written.
- Periodic file rollover is supported, use one or more format specifiers to indicate the rollover interval. For example, if you specify the file specifier %d, a new file is created every day. See Using Format Specifiers in File Names for more information.
- If you specify a rollover period the channel GUID is appended to the first file in the series, so that the channel for that series can be identified.
For example “%y%m%d.txt” will become “%y%m%d.txtGUID”, i.e., 20140721.txt4F73E56355887BAA0517E42B858AA594 (the 2nd file would be 20140722.txt)
- If you specify a rollover period the channel GUID is appended to the first file in the series, so that the channel for that series can be identified.
- If a file of the same name already exists, a new version of the file is created. An index, enclosed in parentheses, distinguishes the old file from the new one. For example, if a file named 2009July17.txt already exists, a new file named 2009July17(1).txt will be used instead.
Note: The index number used is always the first one that is available. For example, if files named 2009July17.txt, 2009July17(1).txt and 2009July17(4).txt exist, and a new copy of 2009July17.txt is created, the new copy is named 2009July17(2).txt.
If you specify Separate files for each output message, fields appear that enable you to specify the names of these separate files:
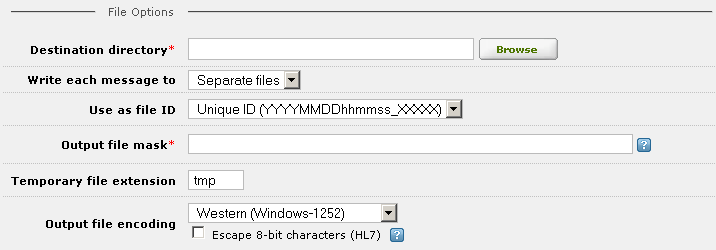
- In the Use as file ID list box, select one of the options shown in the table below:
Option Description Unique ID Create an identifier consisting of the current date and time and a five-digit index.The index is used to uniquely identify the message if more than one message is generated in the same second. The first message is given an index of 00000, the second is given 00001, and so on.For example, the second message generated on September 24, 2008 at 3:43:04 pm would have the identifier 20080924154304_00001. Timestamp Use a timestamp as the identifier. This timestamp is accurate to the current millisecond. Custom Timestamp Create a custom timestamp. This timestamp must contain the following format specifiers: - %Y (year)
- %m (month)
- %d (day)
- %H (hour)
- %M (minute)
- %S (second)
- %f (millisecond)
For more information on format specifiers that can be used in custom timestamps, see Using Format Specifiers in File Names.
Integer index Use an integer index as the unique identifier. This index is increased by one whenever a new file is created. Padded integer index Use an integer index as the unique identifier, and pad the index until it is a specified number of digits. This index is increased by one whenever a new file is created. Hint: If you specify separate files for each output message, it is best to have a purge script available to keep the number of files in the destination directory from becoming too large. See Improving Iguana Performance When Using the ‘To File’ Destination Component for more details.
- If you have specified Custom Timestamp, a sample custom timestamp is provided in the Output file mask field to make it easier for you to supply the required format specifiers.
- If you have selected Integer index or Padded integer index, the Next file index field appears allowing you to select the next integer value to use as an index. Iguana will stop the channel and display an error if an index is already in use.
- If you have selected Padded integer index, the Number of padded digits list box appears, allowing you to select the number of padded digits to use. For example, if you select 5 and the current index is 2, the padded integer index is 00002.
- In the Output file mask field, type a file mask that will be used to create the file names for the output messages. This mask must contain %i, which represents the file identifier specified by the Use as file id list box. For example, if the file id for a message is the index number 28, and the output file mask is output_%i.hl7, the output file name for this message is output_28.hl7.
Note: When you type a file mask in the output file mask field, a preview of what the file name would look like is displayed.
- In the Temporary file extension field, you can specify the file name suffix of a temporary working file that Iguana is to use while it is generating the output message. For example, if the output file for a message is named output_28.hl7 and the temporary file extension is tmp, the temporary working file would be output_28.hl7.tmp. When the output message is completely generated, output_28.hl7.tmp is renamed, becoming output_28.hl7.
Note: If the Temporary file extension field is left blank, Iguana writes its output message directly to the specified output file.
- From the Output file encoding list box, select the encoding that is used in the output file. On Windows, the default encoding is Western (Windows-1252). On Unix, Linux or Mac OS X, the default encoding is Western (ISO-8859-1). These two encodings are not significantly different.
- Select the Escape 8-bit characters (HL7) check box if you want escape characters to be provided for any 8-bit characters contained in the HL7 or ACK messages sent through this channel. Additional radio buttons appear that enable you to determine what escape character to use:
- Select the Automatically detect escape character radio button if you want Iguana to use the escape character specified in the MSH segment of the message. (By default, this escape character is \.)
- If you want to specify the escape character to use, select the Always escape with radio button, then specify the character in the text field next to this radio button. You will need to specify the escape character yourself if the messages that the channel are processing do not contain MSH segments or contain non-standard MSH segments.
FTP Options: [top]
Select the Upload to FTP check box if you want to upload the generated file or files to an FTP server at the destination site. See Uploading Files to an FTP Server for more information.
Tip: For greater control over ftp we recommend using a From Translator component and the net file transfer functions for ftp, ftps and sftp.
Note: If a file permission error occurs when the To File destination component of a channel attempts to write a file, see File Permission Problems in From File and To File Channel Components for tips on how to solve this problem.
Using Format Specifiers in File Names [top]
When you create a To File destination component for a channel and you indicate that all output messages are to be written to a single file, you can use one or more format specifiers to indicate to Iguana that a new file is to be created after a specified time period has elapsed. For example, if you specify the file specifier %d, a new file is created every day.
Note: These format specifiers are also used to create a unique output file name if your channel is writing each message to a separate output file and is using a custom timestamp to generate the file name.
The following format specifiers create a new file every hour:
| Format Specifier | Description | Example |
|---|---|---|
| %H | Hour in 24-hour format (00-23) | 15 |
| %I | Hour in 12-hour format (01-12) | 04 |
The following format specifiers create a new file every day:
| Format Specifier | Description | Example |
|---|---|---|
| %a | Weekday name, short version | Thu |
| %A | Weekday name, full version | Thursday |
| %d | Day of the month (01-31) | 19 |
| %j | Day of the year (001-366) | 143 |
The following format specifiers create a new file every week:
| Format Specifier | Description | Example |
|---|---|---|
| %U | Week number, with the first Sunday as the first day of week 1 (00-53) | 28 |
| %w | Weekday as a decimal number with Sunday as 0 (0-6) | 4 |
| %W | Week number, with the first Monday as the first day of week 1 (00-53) | 29 |
The following format specifiers create a new file every month:
| Format Specifier | Description | Example |
|---|---|---|
| %b | Month name, short version | Aug |
| %B | Month name, full version | August |
| %m | Month as a decimal number (01-12) | 06 |
The following format specifiers create a new file every year:
| Format Specifier | Description | Example |
|---|---|---|
| %y | Year, last two digits (00-99) | 09 |
| %Y | Year, all four digits | 2009 |
The following format specifiers are primarily for use in custom IDs that can be defined when writing each message to a separate file:
| Format Specifier | Description | Example |
|---|---|---|
| %f | Milliseconds (000-999) | 225 |
| %M | Minute (00-59) | 26 |
| %p | AM or PM | AM |
| %S | Second (00-61) | 38 |
| %% | The % character | % |
If two or more format specifiers are supplied, a new file is created for whichever time period is more frequent. For example, if you type %Y%B%d.txt in the File field, file names such as 2009July17.txt are generated, and a new file is created every day.
Note: If a file already exists, a new version of the file is created. An index, enclosed in parentheses, distinguishes the old file from the new one. For example, if a file named 2009July17.txt already exists, a new file named 2009July17(1).txt is created.
Tip: Providing multiple format specifiers is recommended, as this makes it easier to keep track of when message files were generated.
If you are using format specifiers to create a custom timestamp, the following format specifiers are required:
- %Y (year)
- %m (month)
- %d (day)
- %H (hour)
- %M (minute)
- %S (second)
- %f (millisecond)
See To File for more information on creating a custom timestamp for your channel’s To File destination component.
Improving Iguana Performance When Using the ‘To File’ Destination Component [top]
If you have created a channel whose destination component is To File and you are writing individual messages to separate files, it is best to have a purge script available to delete or move files from the directory into which they are written by the channel.
If the destination directory for the To File channel contains a very large number of messages, adding new files to this directory will take progressively larger amounts of time. This is because your computer’s operating system (such as, for example, Windows) needs to maintain an internal data structure to keep track of all of the files in a directory.
Moving or deleting files from the destination directory on a regular basis will ensure that the performance of this channel is not adversely affected.
Uploading Files to an FTP Server [top]
Tip: For greater control over ftp we recommend using a From Translator component and the net file transfer functions for ftp, ftps and sftp.
When you have specified To File as the destination component for a channel, you can indicate that the files that are created by this channel are to be sent to an FTP server at the destination site. To do this, select the Upload to FTP check box.
When this check box is selected, additional fields appear that enable you to provide information about the FTP server to which the files are to be sent:
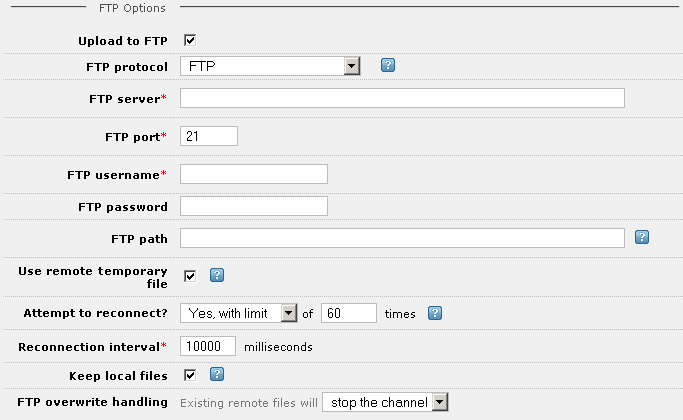
- From the FTP protocol list box, select the FTP protocol that you want to use. You can select FTP (standard FTP), FTPS (FTP over SSL) or SFTP (Secure Shell FTP).
- In the FTP server field, type the name of the FTP server to which you want to send the files.
- In the FTP port field, type the port that the FTP server is using. If you are using the FTP protocol, this is usually port 21. If you are using FTPS, this is usually port 990. If you are using SFTP, this is usually port 22.
- In the FTP username field, type the username that you use to access the FTP server.
- If your FTP server requires a password for access, type the password in the FTP password field.
- In the FTP path field, type the location of the directory on the FTP server into which the generated files are to be written. How this field is interpreted depends on the protocol that you are using:
- If you are using the FTP or FTPS protocol, the directory specified in the FTP path field is relative to the home directory for the FTP user. For example, if the FTP user is iguanauser and the user’s home directory is C:\iguanauser\FTP, specifying iguanadir in the FTP path field indicates that files should be written to C:\iguanauser\FTP\iguanadir.
- If you are using the SFTP protocol, the FTP path field must contain the full path of the directory into which files are to be written.
- If the FTP path field is empty, the files are stored in the user’s home directory if you are using the FTP or FTPS protocol, and in the FTP server’s root directory if you are using the SFTP protocol.
- Select the Use remote temporary file check box if Iguana is to use a temporary file when uploading. When the upload is complete, this temporary file is renamed to the final file name. This is useful for ensuring that remote systems do not read a partially uploaded file. (Disable this option if the remote server reports a “rename failed” error and leaves a temporary file with the extension -upload, and the channel stops. This typically means that the server is employing its own temporary file mechanism that is incompatible with Iguana.)
FTPS Settings: [top]
If you have selected FTPS from the FTP protocol list box, fields appear that enable you to specify encryption information:
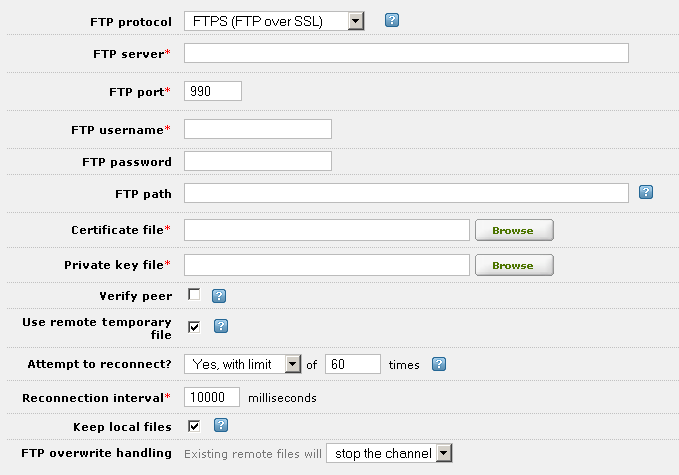
- In the Certificate file field, type or browse for the location of your certificate file.
- In the Private key file field, type or browse for the location of your private key file.
- If you want to verify the authenticity of the server that is sending you messages, select the Verify peer check box. In the Certificate authority file field that appears, type or browse for the location of the certificate authority file.
SFTP Settings: [top]
If you have selected SFTP from the FTP protocol list box, fields appear that enable you to specify how to authenticate your connection:
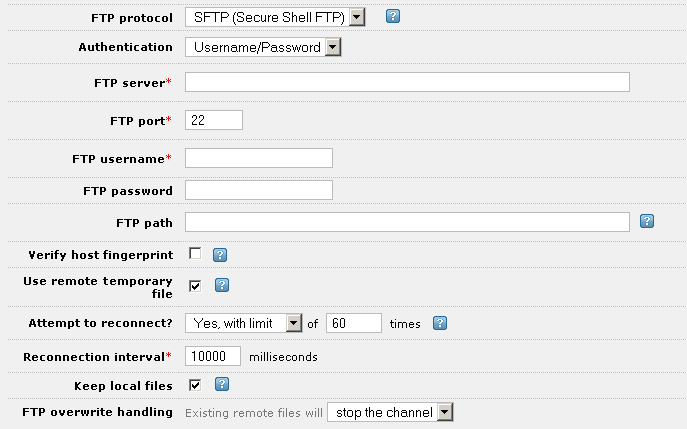
From the Authentication list box, select the type of SFTP authentication to use (either Username/Password or Private/Public Key).
If you have selected Username/Password, the FTP Options section will appear as shown above. Continue as follows:
- In the FTP password field, type the password that your FTP server is expecting.
- Select the Verify host fingerprint check box to verify the authenticity of the server that is receiving the messages. The Host fingerprint field appears:
 This field contains the host fingerprint, which is a 32-character string created using the MD5 cryptographic hash function.
 - If the field is empty, click the Get Fingerprint link to obtain the host fingerprint.
If you have selected Private/Public Key from the Authentication list box, the FTP Options section displays the fields shown below:
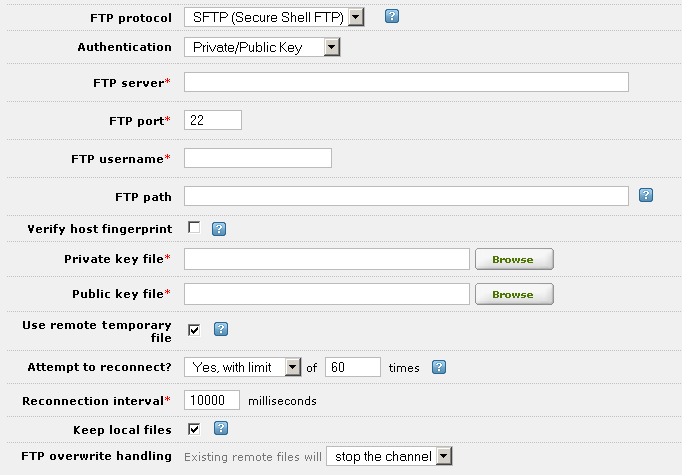
- Select the Verify host fingerprint check box to verify the authenticity of the server that is receiving the messages. The Host fingerprint field appears:
 This field contains the host fingerprint, which is a 32-character string created using the MD5 cryptographic hash function.
 - If the field is empty, click the Get Fingerprint link to obtain the host fingerprint.
- In the Private key file field, type or browse for the location of your private key file.
- In the Public key file field, type or browse for the location of your public key file.
Note: If you have selected Private/Public Key from the Authentication list box, you will need to configure your FTP server’s SSH daemon so that it will not prompt for a password when Iguana is uploading files.
Additional Options: [top]
At the bottom of the FTP Options section, fields enable you to specify how reconnection should be handled, whether to keep local files, and what to do if the FTP file transfer is about to overwrite an existing file:
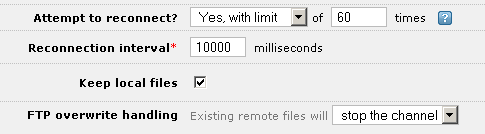
- From the Attempt to reconnect? list box, select whether you want Iguana to try and reconnect to the FTP server if an initial connection could not be made or if the connection is dropped. Select No if you do not want Iguana to reconnect, Yes (unlimited) if you want Iguana to keep trying to connect forever, or Yes, with limit if you want Iguana to make a limited number of reconnection attempts.
- If you select Yes, with limit, a text field appears that allows you to enter the amount of times that Iguana should try to connect before giving up.
- If you select Yes, with limit or Yes (unlimited), the Reconnection interval text field appears, allowing you to choose the number of milliseconds that Iguana should wait before trying to connect again.
- Select the Keep local files check box if a copy of the generated files is to be kept on the Iguana server.
- From the FTP overwrite handling list box, select what you want the channel to do when a remote file that you are attempting to write already exists. Select be overwritten if you want to overwrite the existing remote file, be skipped if you want to skip writing the remote file if it already exists, or stop the channel if you want the channel to stop if a remote file already exists.