For Parsed Data
Contents
One of the original applications of Iguana’s auto-completion feature still stands strong today: auto-completing parsed message data. Whenever you write script that manipulates specific elements of a message, auto-completion will step in and provide you with powerful shortcuts that save time and help you avoid errors. For example, imagine that you wanted to create a script that extracts the name of patient from an incoming message. Auto-completion will help you drill down to that specific information by walking you step-by-step through the hierarchy of a message’s segments and fields until you locate the correct information. Say goodbye to painstakingly counting through each pipe and carat! Say goodbye to the frustration of miscounts! Now you can navigate to the data that you seek quickly and accurately, without having to know its exact location in advance.
How It Works
- Start typing the variable that represents parsed message data. Make the appropriate selection from the auto-completion list offered .In our previous example, we created a variable (Orig) that called the hl7.parse function to read and parse incoming message data (Data) into segments. Let’s see if it worked! A simple method is to return specific patient information that is now (hopefully) mapped to the Orig variable. This will also provide us with an excellent opportunity to demonstrate how auto-completion works with parsed message data.Auto-completion immediately responds to our typing and correctly guesses that we might trying to use our own variable, Orig:

Note: Notice that the notation for the Orig option is the current incoming sample message. That’s a good indication that we’ve correctly mapped incoming message data to our variable!
- Once you choose the desired variable, auto-completion instantly recognizes that it contains parsed message data. Auto-completion proceeds by providing you with the first level of data to drill through: the message’s segments. Make the appropriate selection based on the kind of information you are seeking.In this example, we want to test out our code by returning the patient’s first name stored in our parsed message (Orig). Auto-completion has provided us with a list of applicable segments to choose from:
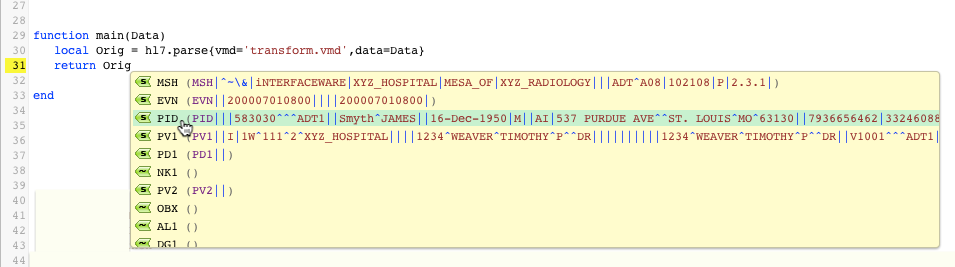 We’ve selected the PID option because we know that the PID segment includes basic patient information (such as a patient’s first and last name).
 - Auto-completion instantly drills down to the next level of data: the fields available within your chosen segment. Make the appropriate selection.Because we want to return the first name of our patient, the choice is fairly obvious:
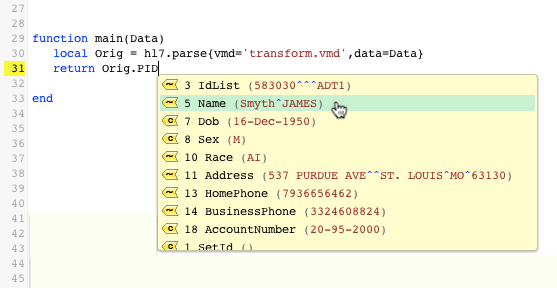
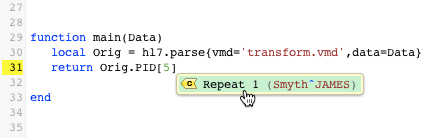
Notice that auto-completion adds numbers to our script rather than the proper “name” of each choice. This is linked to the table-like nature of how Lua handles data mapping. All you need to understand for now is that each number represents the location of your selections. In this case, Orig.PID[5] simply means that we have selected the 5th field in the PID segment of our message (otherwise known as the Name field).Note: If you are unsure of which option to pick, notice that each list item includes corresponding example data loaded directly from the current sample message. If you still can’t figure out what an auto-completion list item represents, simply cycle through sample messages to change the example data provided. In our example, we can deduce from the example “Smyth^JAMES” that the Name field must contain patient name information.
Auto-completion continues to drill down through the message, providing you with options for each level of data. Continue making selections until you have reached the desired data value.
- In HL7 format, some fields include “repeats”. Have no fear, auto-completion takes these into account as well! In this example, we’ve chosen to return the first repeat (Repeat 1) of the Name field:
… and now we’ve finally found the location of our patient’s first name, the Given Name subfield: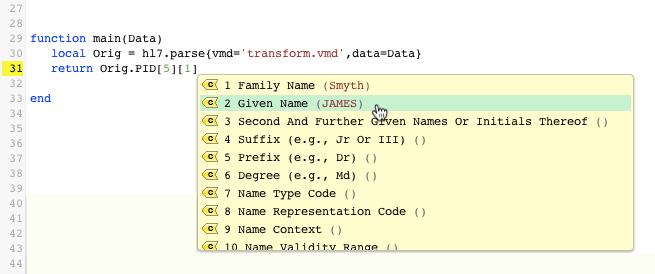 Success! Thanks to auto-completion, we were able to return a very specific piece of data from our parsed message without a) wasting time counting pipes and carats, and b) risking miscounts and errors.
What is Deep Auto-Completion?
“Deep” auto-completion is Iguana’s ability to search for matches throughout the entire parsed tree, not just the current level of data. In our example, we could have started out the procedure by simply typing “Orig.James” or “Orig.PID.Given” instead of walking through each level of data in the parsed message. Auto-completion would have skipped the interim levels and drilled straight to the match we were looking for.
Note: This only really works if you already know the correct search criteria. In our example, we didn’t know that the incoming sample’s first name is “James” or that the correct label for the desired PID subfield is “Given Name”. To ensure best results and improve your chances, deep auto-completion is NOT case-sensitive.