- Introduction
- Create or Modify a Channel Group
- Limit user access to one or more Channel Groups
- Create roles and choose permissions
- Assign Users to Roles
- Channel Group Permissions summary
Introduction
Permissions and notification rules can be managed more effectively using groups of channels.
Use Channel Groups to organize your channels, very useful when you have a large number of channels.
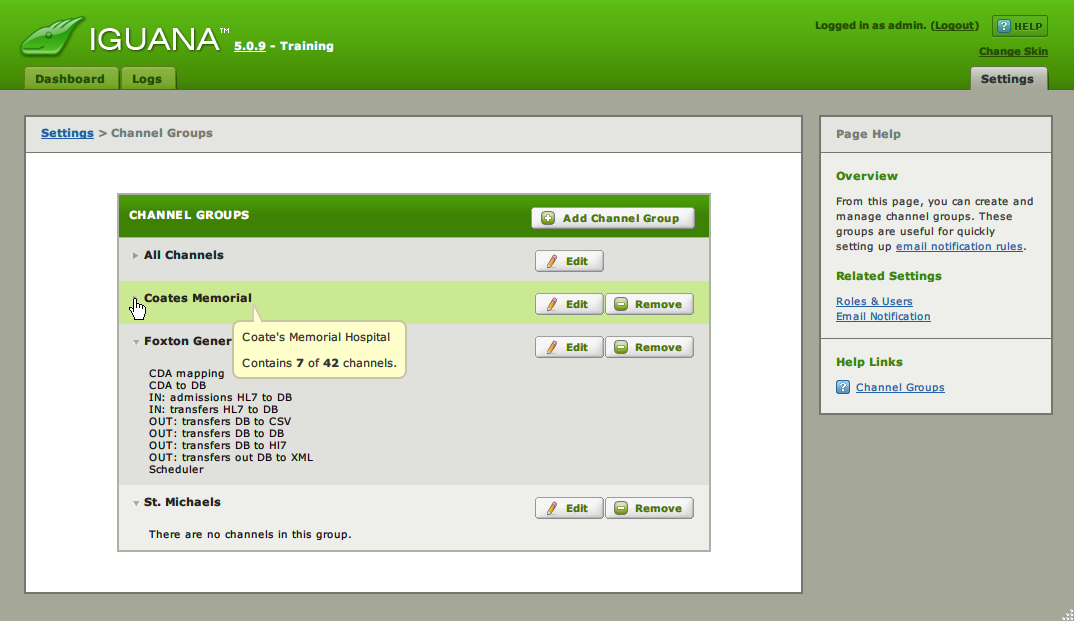
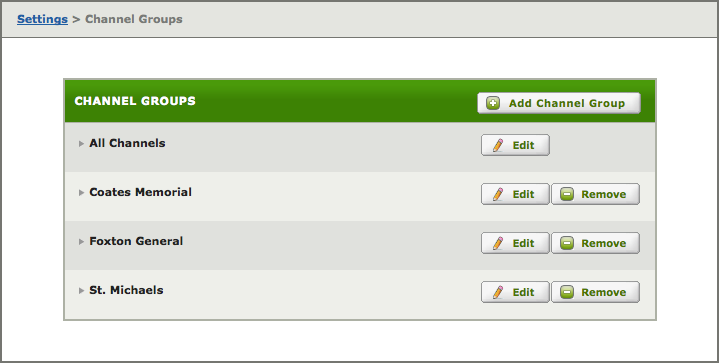
- Click Add Channel Group to create a new group
- Click Edit to modify a group, add/remove channels or rename
- Click Remove to delete a group
- Click the drop-down arrow to show the channels in a group
So how exactly can I organize things with Channel Groups?
- Limit user access to one or more Channel Groups, using Roles
- Define email rules for a Channel Group, using Email Notification
- Check the Channel Group Permissions summary
A useful trick – use dashboard tooltips to see the groups for a channel:
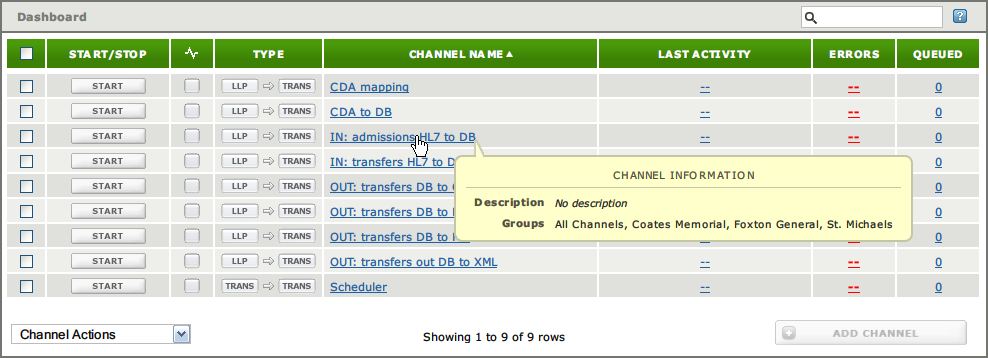
As you can see IN: admissions HL7 to DB is included in all three groups.
Create or Modify a Channel Group [top]
Manage channel groups using this screen.

To Create a new Channel Group:
- Enter the Name and Description.
- Select the Channels to include in the group.
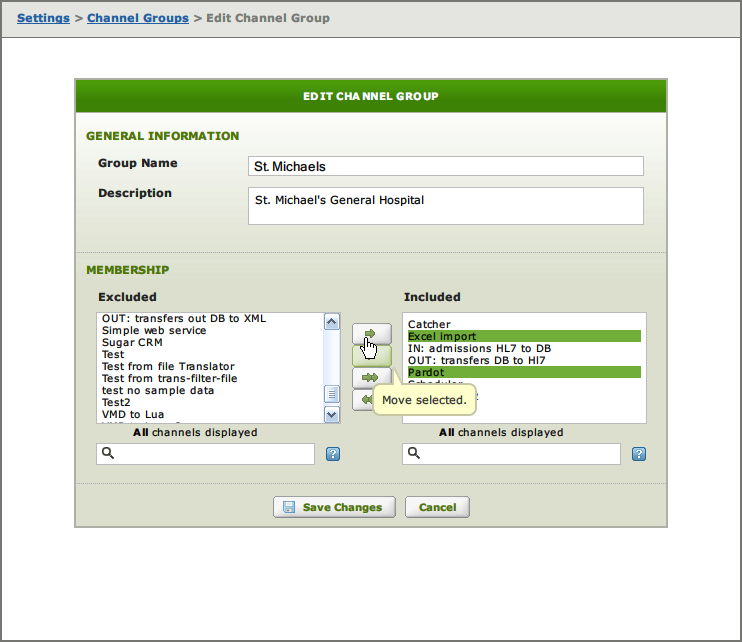
- The single arrow moves one or more selected channels.
- The double arrow moves all channels.
- Press the Add Group button.
To Modify an existing Channel Group:
- Modify Name, Description or Included Channels.
- Press the Save Changes Button.
A useful trick – use the search box to filter the channel list:
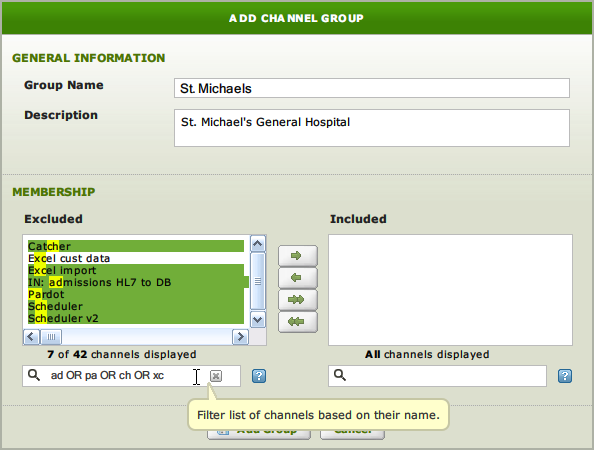
You can also use regular expressions – exactly the same as filtering channels in the Dashboard (point 7).
Limit user access to one or more Channel Groups [top]
Channel groups are useful for controlling which users have permissions to stop and start and edit channels.
We want to give users the following access:
| Role | Channel Groups | View Channels(default) | Edit Settings | Start/Stop Channels | View Logs | Export Logs | Use Translator IDE |
|---|---|---|---|---|---|---|---|
| System Administrators | All Channels | X | X | X | X | X | X |
| Helpdesk | All Channels | X | X | X | X | X | |
| Foxton Administrators | Foxton General | X | X | X | X | X | |
| Foxton Users | Foxton General | X |
| User Name | Role | Description |
|---|---|---|
| sysadmin | System Administrators | Administrator for all hospitals |
| help desk | Helpdesk | Generic helpdesk user |
| dgrady | Helpdesk | Help desk operator |
| foxadmin | Foxton Administrator | Generic Administrator for Foxton General Hospital |
| wmarcus | Foxton Administrator | Administrator for Foxton General Hospital – Chief of Staff |
| foxuser | Foxton Users | Generic Foxton user |
| smeredith | Foxton Users | Nurse |
This is a two step process:
The Roles should look now like this:

Create roles and choose permissions [top]
Now we will create the Roles and assign the permissions listed in the table.
| Role | Channel Groups | ViewChannels(default) | Edit Settings | Start/Stop Channels | View Logs | Export Logs | Use Translator IDE |
|---|---|---|---|---|---|---|---|
| System Administrators | All Channels | X | X | X | X | X | X |
| Helpdesk | All Channels | X | X | X | X | X | |
| Foxton Administrators | Foxton General | X | X | X | X | X | |
| Foxton Users | Foxton General | X |
Note: Some access requires combined permissions.
“Extra” access granted by combined permissions:
| Permissions | Mark/Unmark errors in the logs | Export log messages to the Iguana Editor |
|---|---|---|
| Edit + View Logs | X | |
| Edit + View Logs + Export Logs | X | X |

Tip: The Users group is created by default and can be removed if desired. By default the User group is only allowed to read the logs, for more strict control you could remove this permission. As each Iguana User needs to be a member of at least one group, using Users as the default group for everyone can be a useful technique. In our example we are going to create the Foxton Users group so we will not add our Foxton Users to the Users group.
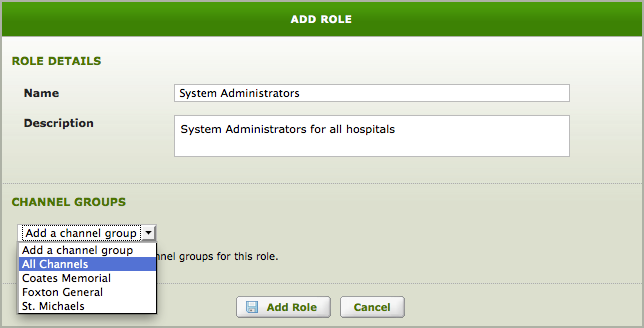
Click Add Role.
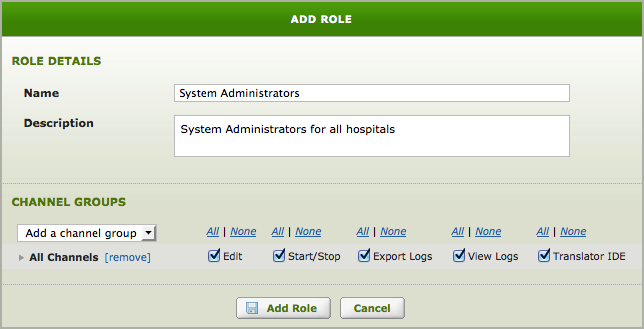
Enter Name and Description and select the All Channels group.
Grant full access and click Add Role.
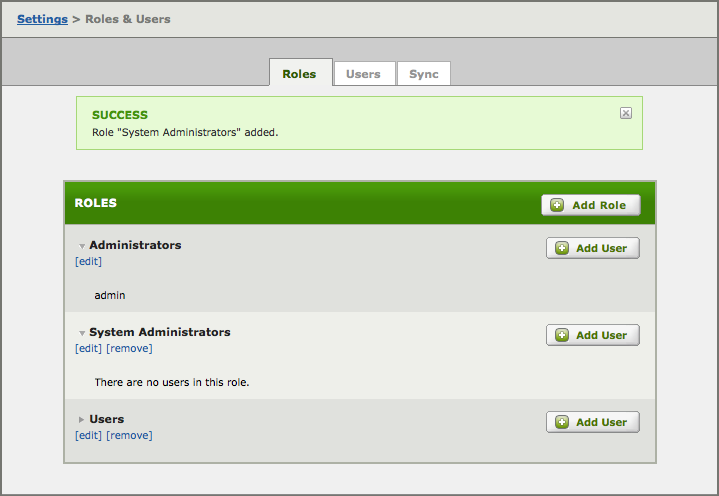
You should see this screen with the confirmation message.
| Role | Channel Groups | View Channels(default) | Edit Settings | Start/Stop Channels | View Logs | Export Logs | Use Translator IDE |
|---|---|---|---|---|---|---|---|
| System Administrators | All Channels | X | X | X | X | X | X |
| Helpdesk | All Channels | X | X | X | X | X | |
| Foxton Administrators | Foxton General | X | X | X | X | X | |
| Foxton Users | Foxton General | X |
Use the same process to create the other Roles.
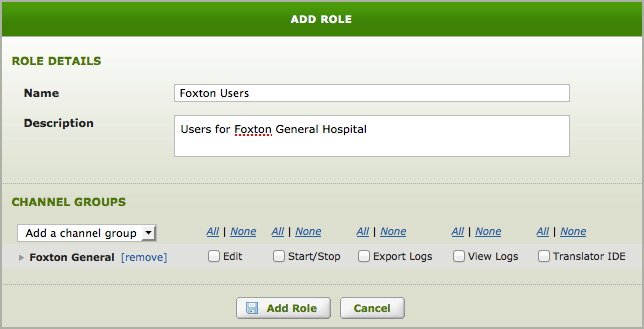
The Foxton Users group is a little different.
No permissions are selected, this means that users are only allowed to View channels.
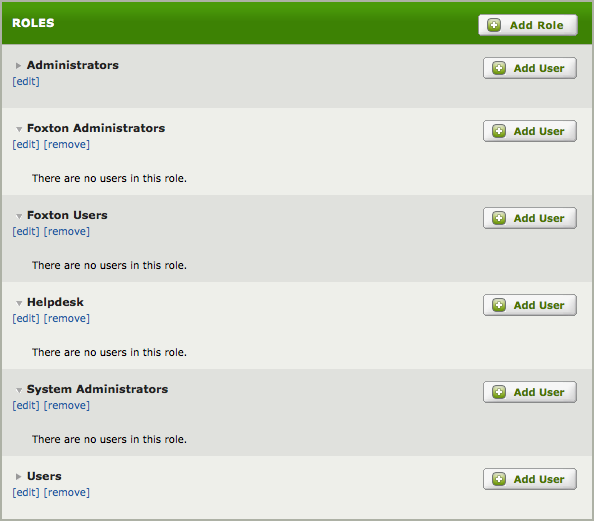
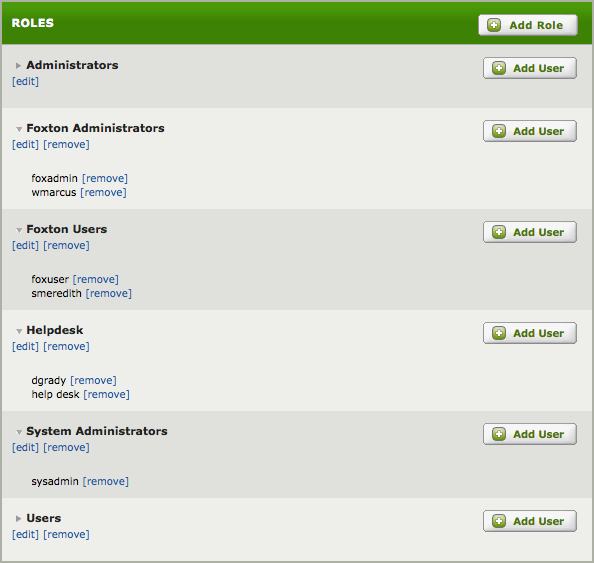
The Roles should now look like this:
Assign Users to Roles [top]
We need to create these Users and assign them to Roles we created previously.
| User Name | Role | Description |
|---|---|---|
| sysadmin | System Administrators | Administrator for all hospitals |
| help desk | Helpdesk | Generic helpdesk user |
| dgrady | Helpdesk | Help desk operator |
| foxadmin | Foxton Administrator | Generic Administrator for Foxton General Hospital |
| wmarcus | Foxton Administrator | Administrator for Foxton General Hospital – Chief of Staff |
| foxuser | Foxton Users | Generic Foxton user |
| smeredith | Foxton Users | Nurse |
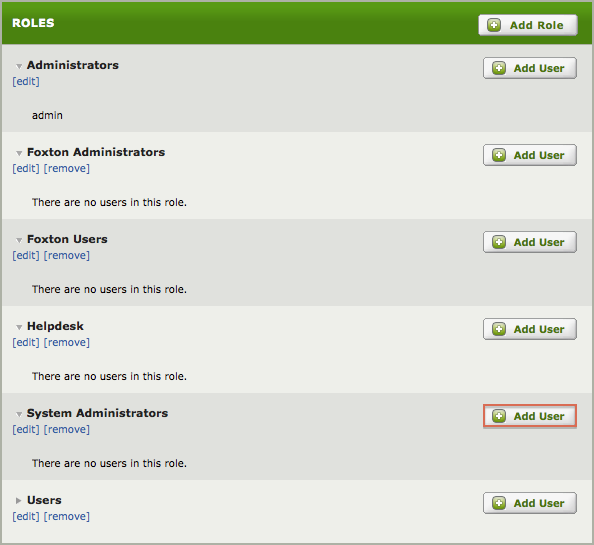
Click Add User for System Administrators.
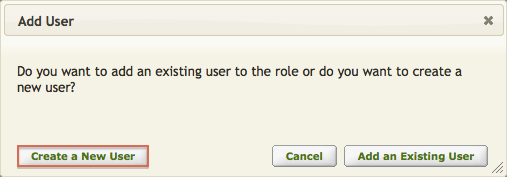
Select Create a New User.
Enter the User Name, Password , and add the System Administrators role, then Click Add User.
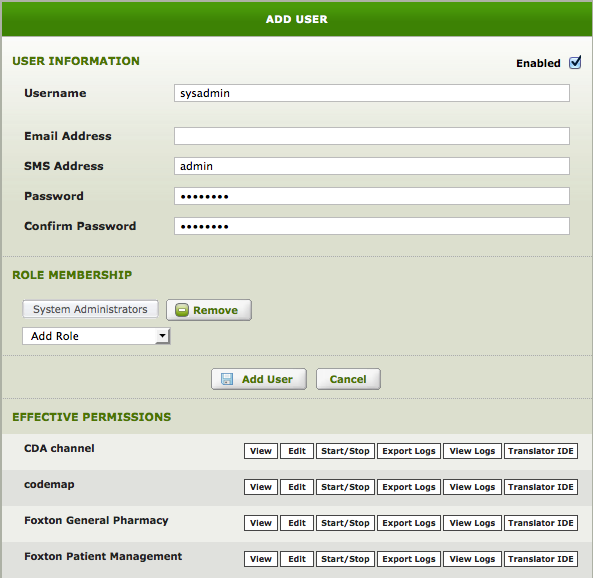
Create the remaining Users and add them to their Roles in the same way.
| User Name | Role | Description |
|---|---|---|
| sysadmin | System Administrators | Administrator for all hospitals |
| help desk | Helpdesk | Generic helpdesk user |
| dgrady | Helpdesk | Help desk operator |
| foxadmin | Foxton Administrator | Generic Administrator for Foxton General Hospital |
| wmarcus | Foxton Administrator | Administrator for Foxton General Hospital – Chief of Staff |
| foxuser | Foxton Users | Generic Foxton user |
| smeredith | Foxton Users | Nurse |
The Roles should look like this:
Channel Group Permissions summary [top]
This page shows use the Channel Group Permissions to apply commonly required levels of access. The rights granted only apply to channels that the user can see from their assigned Channel Groups.
Access granted by single permissions:
| Permission | Basic Tasks | Edit Settings | Start/Stop Channels | View Logs | Export Logs | Use Translator IDE |
|---|---|---|---|---|---|---|
| None | X | |||||
| View Logs | X | X | ||||
| Export Logs | X | X | X | |||
| Edit | X | |||||
| Translator IDE | X | X | ||||
| Start/Stop | X | X |
Note: “Basic Tasks” allows you to:
- View Channels
- View error and information messages in the log, and export them to a file
- Change dashboard column settings
“Extra” access granted by combined permissions:
| Permissions | Mark/Unmark errors in the logs | Export log messages to the Iguana Editor |
|---|---|---|
| Edit + View Logs | X | |
| Edit + View Logs + Export Logs | X | X |