- Introduction
- Building a GUI for a Translator Component in Lua
- Create a From HTTP component
- Hello world script
- Invoking the application
- Import an HTTP request from the logs
- Parse the request
- High level overview
- How the GUI looks
- Method Table Handler System
- Templating System
- Google Closure
- Parsing the IguanaConfiguration.xml file
- Define a configuration file in XML
- JSON calls between Iguana and the GUI in Javascript
- Creating a link from the custom GUI into the channel being configured
Introduction
This article was originally written for Iguana 5 so it uses version 5 screenshots, and may contain some out of date references. In particular you will need to update the section that parses the lIguanaConfiguration.xml fileIguanaConfiguration.xml file, because it is based on the Fossil repository structure (Iguana 6 uses Git for source control). If you have any questions please contact us at support@interfaceware.com.
Good companies are always looking for new ways to try and streamline their internal operations and make things more efficient.
It’s possible that your organization may have reached the kind of scale where distinct regular patterns are emerging in the flavours of the different types of interfaces that you have to deal with.
For organizations like this there may be some attractiveness in building out a sophisticated back end template which is actually driven off a configuration file which is edited in a GUI. This has the potential to streamline an implementation process so that much of the work could be performed by less technical staff while leaving the final tweaks to a more technical 1 or 2 people who act as expert resources to the larger team.
Personally I haven’t come across such as scenario but I am big believer that the people closest to the problem are the best people to judge the nature of the problem and whether it can be solved in this manner. Our job as an integration engine vendor is to enable our customers to leverage their own creativity to solve problems as they best see fit.
So this section of the standard template section addresses how one could leverage the Translator to achieve this goal. It makes a lot of sense to use the Translator itself to implement such a GUI for several reasons:
- Firstly it’s very easy to implement web applications using the Translator which makes it convenient to get access to this GUI across a team.
- The Translator is an exceptionally efficient environment to develop in compared to anything, internally we’ve started developing many web applications using it for our own needs and it really is a productive environment to work in.
- The GUI has easy access to the same underlying common Lua modules used in the template.
- It can be easily integrated into Iguana allowing a ‘one click’ to get under the hood and see how the data is being processed.
All in all, if you are going to build a custom GUI of this sort anyway this is the way to do it since it really will be possible to build an incredibly slick work flow. It’s also in harmony with the direction of Iguana as we move to a model of allowing custom components to be programmed using Lua.
Interested? Then read the next section to see how you would go about implementing this.
Building a GUI for a Translator Component in Lua [top]
This describes how best to get started writing a custom GUI for your own Translator components using Iguana. I provide an example which you can download from here and run. The documentation below talks about different parts of the code and explains how it works.
Hello World Web Application
This part describes the basics in getting a simple web application written using the Translator in terms of mechanics of creating a From HTTP(S) channel, taking HTTP calls from and serving up data to a browser.
- Create a From HTTP component, this will receive the web calls that we use to implement the GUI.
- Hello world script, the shell of simple web app.
- Invoking the application
- Import an HTTP request from the logs
Fully Worked Example
Then import this fully worked example zip Configure_Web_Example.zip Translator instance. This leverages a variety of concepts which as described below:
- High level overview
- How the GUI looks
- The method table handler system for dispatching calls from the browser
- The templating system and using Google closure to compress the Javascript in production
- It uses HTTP basic authentication to put a username and password on the script, in this case “admin” and “password”
- It parses the IguanaConfiguration.xml file to get a list of channels with To Translator components and the associated unique GUID for each one
- Define a configuration file in XML which the GUI can load and save to
- JSON calls between Iguana and the GUI in Javascript
- Creating a link from the custom GUI into the channel being configured, this gives your users an easy way to visually see how the configuration is working
The potential really does exist to make for a very convenient high level work flow, but with a simplicity of being able to quickly ‘get under the hood’ to see what is happening when things go wrong.
Create a From HTTP component [top]
This component is what will actually receive the web calls that we will use to implement our GUI. Before you start you might want to configure whether to use a dedicated HTTP(S) port to serve web services off, or the same port as Iguana’s own GUI.
Start by clicking Add Channel on the dashboard and fill out this screen like so:

You can set the channel name to something like “Configure” or something then move to the Source tab and set it up like this:

Click on the Add Channel button so that the screen becomes like this:
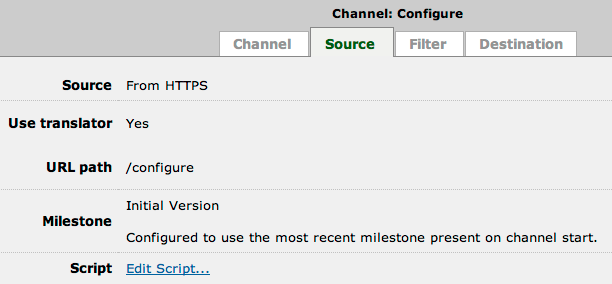
Then click on Edit Script. We’ll set up the hello world script for the first cut of the GUI shortly.
Hello world script [top]
The first cut of our web app script will:
- Log each incoming HTTP request, very important for development.
- Output a simple hello world message.
When we click on the Edit Script… link we expect to see a dialog like this:
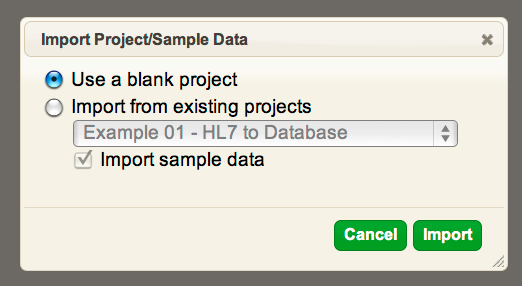
Leave it as “Use a blank project” and click on the Import button. Close the dialog that warns about no sample data and copy paste in the following Lua code to replace what is currently there with:
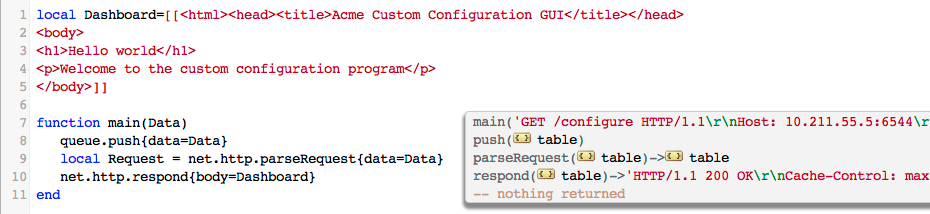
local Dashboard=[[<html><head><title>Acme Custom Configuration GUI</title></head>
<body>
<h1>Hello world</h1>
<p>Welcome to the custom configuration program</p>
</body>]]

function main(Data)
   queue.push{data=Data}
   net.http.respond{body=Dashboard}
end
Now click on the left icon of the milestone group to save the milestone:

The one that looks like a floppy disk with an arrow on it. That should bring up the “Save Milestone” dialog, replace the milestone name with something meaningful like “Hello world beginning” and like so:
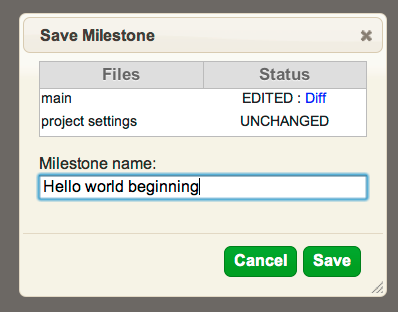
Then click the Save button. This is very common operation when working with the Translator, you don’t need to worry about saving your work, but every time you want to run the code within a channel the milestone must be saved.
Invoking the application [top]
- Run the channel.
- Then type into your browser a URL like this:
http://<IP address of your Iguana server>:<port number of web service>/configure
i.e., if you are running the server on your local machine and the web server ports are configured to use port 6544 then it would be:
http://localhost:6544/configure
If you are not sure what port Iguana is configured to serve web services off see configuring the web service port.
When you succeed you should see something like this in your browser:

The next step will be to make a simple drop down box that will list all of the channels we can configure and have a link to the dashboard.
Import an HTTP request from the logs [top]
Go back into the editor environment.
Our first step is a very important one for doing web development with the Translator. This is to pull in an HTTP request from the logs of Iguana which we will treat as “Sample Data”. This is a very common thing to do in the work flow since we use these requests to test out different branches of the code.
You should see the sample data control like this:

Clicking on the “None” button will display a drop down that allows us to import data from the logs, the flow should begin like this:
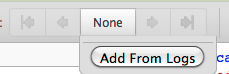
Clicking on the Add From Logs button will yield something like this:

By clicking on that request, the data is imported from the logs and becomes ‘sample data’. The Translator GUI will end up looking something like this now:

This is where things start to get fun. Click on the argument to ‘main’ and you’ll get the HTTP request in it’s raw ‘flatwire’ format:
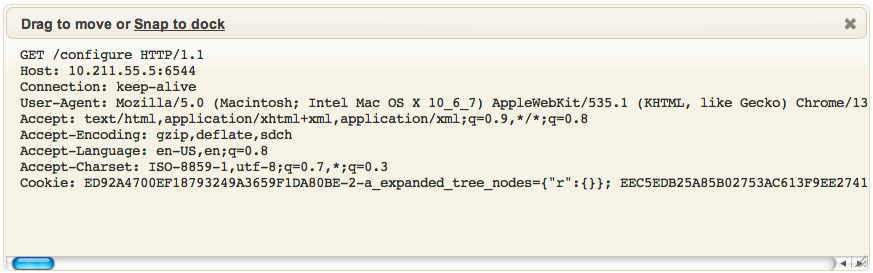
You’ll start to love the transparency that the Translator gives for web development. Unlike traditional web development environments like PHP which require the programmer to go to special effort to get to see this information, it’s easy to see under the hood what data is being received. It makes the environment an absolute pleasure for debugging.
Parse the request [top]
Parsing the request is easy. We can do it with one line of Lua:
local Request = net.http.parseRequest{data=Data}
This shows what you would expect to see in the editor:
By double clicking on the {} table that is returned from parseRequest we can see the Lua table containing the parsed data from the HTTP request:
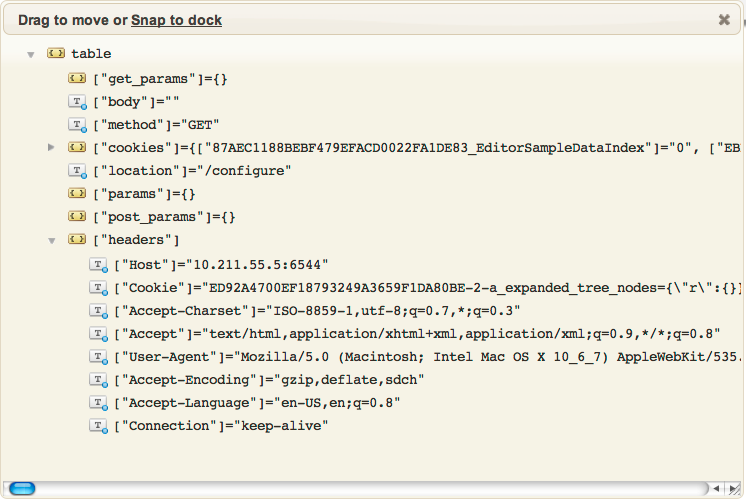
It’s beautiful how easy having the inbound HTTP request in an easy discoverable data-structure like this makes it to write the code to process it. There is no guessing what the the names of form variables are, they are right there in front of you. That gives you the basics of how web development works with the Translator. How to get data in and out via web calls.
High level overview [top]
The science of web application development has changed a lot from the pre-AJAX days.
Web development used to heavy on the idea of HTML templates that you would flesh out with template centric programming languages like PHP to put your data in. Most of the work was in the back end on the server.
Now a good web application is more like a client server program where:
- Most of work is on the client which is written in Javascript and uses the browser as a rendering engine. You never should need to do full page refreshes.
- The server is a source of data typically delivered via light weight efficient web service calls serving up JSON.
- The application code is delivered to the browser from the server as a set of static files, CSS (Cascading Style Sheet files) and Javascript.
I usually go for a structure of only serving up a single HTML page which then loads a single Javascript file and CSS file. This is how the Translator itself is built.
Modern web applications don’t need to have complete page refreshes, it gives a better user experience if you can avoid these and instead update your application dynamically using Javascript. It’s quite easy with modern browsers to alter the ‘anchor’ stuff on the location so AJAX applications can maintain expected behaviour with the back button. This approach makes for fast responsive web applications which are efficient on their use of network bandwidth.
From a development standpoint you might break up your Javascript and CSS into multiple files but for the final production version it more efficient to ‘compile’ them into a single compressed Javascript and CSS file. Google’s closure tool is very good for Javascript compression.
Why use the Translator for a Web Backend?
In my experience with modern web development is that currently about 15-20% of the effort is on the server side. The majority of the effort comes from working with the browser APIs in Javascript to make the GUI do what you need it to. For this reason it does make sense often to consider using the Translator for doing the back end if the application is strongly coupled to Iguana anyway. The Translator is perfect for the backend of a modern web application since it handles taking data in and out via HTTP very easy. If you compare say the effort of doing the same functionality in C# then the advantages the Translator has is:
- Data driven test development with a much more comprehensive data driven auto-completion and code navigation than what a traditional IDE like Visual Studio can offer.
- No slow compile, link, execute and debug cycles like you face with C#. Lua is a dynamic language that has an ultra fast Just In Time compiler that has no noticeable delays giving an extremely fast turnaround cycle for iterative development.
- All of your milestones and source control and IDE are perfectly integrated to work together out of the box. You effectively have a versioning and deployment system out of the box which replaces tedious home grown control systems required to control what goes into production.
- Lua is a really simple safe language, you can learn it in a few days and then much more of your mental efforts can go on the application.
- The Translator comes with infra-structure you would otherwise have to build yourself like a logging and error notification system when the application has issues. For a one off application no developer could justify the effort required to make the logging system that comes with Iguana. It makes supporting the application written with the Translator in production very easy, it’s simple to see when exceptions occurred and reproduce them in the Translator environment.
- A dynamic language in the auto-completion data aware environment of the Translator is just so much more convenient for dealing with JSON and XML data than a static language like C#, C++ or Java.
It’s something we recognize internally, we’ve started to write all our internal applications using Iguana and the Translator, it’s so much faster and more convenient for these applications than the way we used to do things. Try it, you’ll enjoy it.
How the GUI looks [top]
This the GUI looks that someone using it would see:
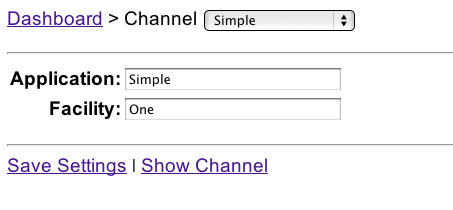
When it loads it populates a list of channels into the combo box that have To Translator components. The Application and Facility fields are populated with the values in the configuration file for the given channel. If you alter these values, it’s necessary to click on Save Settings to save the changes to the configuration file.
The Show Channel link will open the To Translator component in the Translator editor of the current Channel. It’s a very basic simple GUI intended to be an easy conceptual starting point for building a more elaborate GUI.
Method Table Handler System [top]
I find this a very convenient way to organize a web application. One defines a hash table of string keys that an application supports to the functions that handle each call.
This is how Iguana itself is organized, just a hash table of strings assigned function pointers implemented in C++.
It’s much easier to implement this structure in Lua than in C++ since Lua supports functions as first class values. This how this example does it. A global Lua table is defined called MethodTable:
MethodTable={
   file=ServeFile,
   channel_list=ChannelList,
   save_settings=SaveSettings,
   load_settings=LoadSettings,
}
This just has string keys mapped to Lua functions. When we get a request we can look for a POST or GET variable called ‘method’. If we have a handler function registered for that method, then we call it with the Request object.
local Request = net.http.parseRequest{data=Data}
local MethodName = Request.params.method

if MethodTable[MethodName] then
   MethodTable[MethodName](Request)
else
   local Body = template.Recall('main.html')
   net.http.respond{body=Body}
end
If no method exists we return the default main.html template.
This makes for a straightforward work flow to add new calls.
Templating System [top]
As I mentioned in my outline of a modern web application the server just has to serve up a source to the browser and respond to JSON web service calls.
To get a convenient work flow for the Translator I use a ‘template’ module. The main advantage of this module is that it uses some techniques to allow the Javascript, CSS and HTML template files it serves up to be edited on the fly in the Translator without requiring a milestone to be saved and the channel restarted.
How it works is that the template module effectively operates in three modes:
- Development mode.
- When iguana.isTest() == true i.e., running in test mode
- and when iguana.isTest() == false, i.e., running in the channel
- Production mode.
In development mode in the editor, when ever one changes a template, the change is immediately written as a file to disc. If the channel itself is running then when it serves up a request for each file it pulls the file off disc. In this manner the templates can be changed on the fly without requiring saving the milestone or restarting the channel. This is very convenient for tweaking Javascript and CSS code.
In production mode the templates are all stored in memory and served up quickly when required with no reference made to disc. As an experiment I also got the Translator to compile Javascript using Google’s Closure javascript compiler using it’s RESTful API.
This is how the interface works to the template module. Firstly each template must be registered in the main function:
-- For convenient put the code for each template into it's own self contained module:
template.Register('main.html', config_html.html())
template.Register('script.js', config_javascript.script())
template.Register('configure.css', config_css.css())
template.Register('hello.html', '<html><body><p>Hello world!</p></body></html>')
Then I wrote a single handler function for serving up these templates:
function ServeFile(Request)
   local MimeType = mime.Type(Request.params.file)
   local Body = template.Recall(Request.params.file)
   net.http.respond{entity_type=MimeType, body=Body}
end
The MIME type is deduced off the file extension, i.e., js results in text/javascript etc.
The source code for the template module itself is:
require('closure')
--[[
This template module is intended to simplify the web development within the Translator by allowing on the fly
editing of Javascript, HTML and CSS templates within the editor without saving a milestone.

The technique is to write files into the file system which the channel can server up when running in non production
mode. The editor is writing these files as they are changed and the running channel is serving them up. This means
one can develop much more iteratively.

In production mode the templates are served up out of memory only which is faster plus there is an experimental feature

]]

template={}

local TemplateTable={}

function template.Serve(Name, Content, ContentType)
   local FileName = "web_docs/"..Name
   if iguana.isTest() then
      local F = io.open(FileName, "w")
      F:write(Content)
      F:close()
   end
   local F = io.open(FileName, "r")
   local Body = F:read('*a')
   F:close()
   net.http.respond{entity_type=ContentType, body=Body}
end

local function RegisterProd(Name, Content)
   if not TemplateTable[Name] then
      if Name:sub(#Name-2, #Name) == '.js' then
         TemplateTable[Name] = closure.compile(Content)
      else
         TemplateTable[Name] = Content
      end
   end
end

local function RecallProd(Name)
   return TemplateTable[Name]
end

function template.Register(Name, Content)
   TemplateTable[Name] = true
   local FileName = "web_docs/"..Name
   if iguana.isTest() then
      local F = io.open(FileName, "w")
      F:write(Content)
      F:close()
   end
end

function template.Recall(Name)
   if not TemplateTable[Name] then
      return "Resource does not exist."
   end
   local FileName = "web_docs/"..Name
   local F = io.open(FileName, "r")
   if not F then
      return nil
   end
   local Body = F:read('*a')
   F:close()
   return Body
end

function template.SwitchProductionOn()
   template.Register = RegisterProd
   template.Recall = RecallProd
end
Google Closure [top]
Google have made a very convenient Javascript compiler called Closure. Javascript compilers can reduce the size of Javascript to make it faster to send across the web and for browsers to load and parse the code. They are helpful for making web applications faster.
What’s kind of cool is that Google provide a RESTful API to Closure so it’s possible to actually invoke it right from within the Translator. This is the source to a simple module I wrote to invoke it:
closure ={}

local Url = 'http://closure-compiler.appspot.com/compile'

function closure.compile(Code)
   local P={
      js_code=Code,
      compilation_level='SIMPLE_OPTIMIZATIONS',
      output_format='text',
      output_info='compiled_code'
   }
   local Out = net.http.post{url=Url,
         parameters=P, live=true}
   if Out:sub(1,5) == 'Error' then
      iguana.logWarning('Unable to compress Javacript code:\n'..Out)
      return Code
   end
   return Out
end
Generally you don’t want to invoke the compiler in this manner too often online since Google will shut you out. So I set up the template module to only do the compilation if and when there is the production flag set and if the compilation fails then the code gracefully degrades to using the uncompressed javascript code. Still very neat that one can do this so easily using RESTful APIs.
Parsing the IguanaConfiguration.xml file [top]
Warning: This section is not compatible with Iguana 6, as we are now using Git source control instead of Fossil.
If you need help updating this code for Iguana 6 please contact us at support@interfaceware.com.
The channel_info module has some simple code to load and parse the IguanaConfiguration.xml file. It is quite easy to iterate through the channels and find those which have To Translator components and list them together with the GUIDs of these Translator components. See the fossil repository layout (Iguana 5 documentation) for a reference of how this file is structured and how to get these GUIDs:
require('node')

local function trace(a,b,c,d) return end

channel_info={}

local function ReadFile(FileName)
   local F = io.open(FileName)
   local X = F:read("*all")
   F:close()
   return X
end

local function IguanaConfig()
   local X = ReadFile('IguanaConfiguration.xml')
   X = xml.parse{data=X}
   return X
end

function channel_info.ChannelList()
   local List = {}
   local X = IguanaConfig()
   for i =1, X.iguana_config.channel_config:childCount('channel') do
      local Channel = X.iguana_config.channel_config:child('channel',i)
      if Channel.to_mapper then
         -- We have a Channel with a To Translator component
         trace(Channel)
         List[#List+1] = {name=Channel.name:nodeValue(), guid=Channel.to_mapper.guid:nodeValue()}
      end
   end
   return List
end
Define a configuration file in XML [top]
This example uses a XML configuration file that has the name <GUID>.xml where the GUID is that of the To Translator instance associated with the channel.
This is by no means the only possible choice. The configuration could be stored in a remote database for instance if you are dealing with a farm of Iguana servers.
The myconfig module provides a convenient interface to initialize and save to to this file. It’s layered over the more generic config module. This is the source to myconfig:
require('config')

myconfig = {}

-- The Default configuration
local Config=[[
<config
   sending_app='My Application'
   sending_facility='Acme'
/>
]]

function myconfig.Get(ChannelGuid)
   if ChannelGuid then
      return config.Load(ChannelGuid, Config)
   end
   return config.File(config.TO, Config)
end
You can see the module gives the default version of the configuration file.
For the web application to use this module it passes in the GUID of the Translator instance. For the channel itself the interface to obtain the configuration file is simpler. This screen shot shows it nicely:

In this context we can omit passing the GUID of the Translator instance since it picks it up automatically. By initializing the Config object outside of the main function it means we only read the configuration file once when the channel is started. This is more efficient.
JSON calls between Iguana and the GUI in Javascript [top]
The GUI is all implemented using Javascript using AJAX calls with JSON. It makes use of the powerful jQuery library.
For convenience and speed the jQuery library is loaded from the Google content delivery network as you can see in the HTML template:
<html>
<head>
<title>Custom Configuration GUI</title>
<script type="text/javascript" src="http://ajax.googleapis.com/ajax/libs/jquery/1.6.2/jquery.min.js"></script>
<script type="text/javascript" src="?method=file&file=script.js"></script>
<link rel="stylesheet" type="text/css" href="?method=file&file=configure.css">
</head>
<body>
</body>
As you can see the HTML code here is trivial. All the real work is done with Javascript leveraging the jQuery library. The setup of the screen is done using the jQuery onReady event:
$(document).ready(function() {
// One could get more elaborate with reading the 6543 HTTP port from the Iguana configuration file here.
$('body').html ( '<p><a href="http://' + location.hostname + ':6543/">Dashboard</a> > Channel <span id="channel_select"></span></p><hr> <table>
<tr><th>Application:</th><td><input type="text" id="sending_app"></td></tr>
<tr><th>Facility:</th><td><input type="text" id="sending_facility"></td></tr></table><p>
<hr><a href="#" id="save_settings">Save Settings</a> | <a id="show_channel" href="#">Show Channel</a>');
$.getJSON('/configure?method=channel_list', function(Data) { PopulateChannelSelect(Data); });
$('#show_channel').click(ShowChannel);
$('#save_settings').click(SaveSettings);
});
The AJAX call to /configure?method=channel_list retrieves a JSON list of channels with their associated GUIDs. This is implemented in the back end using the method table handler:
function ChannelList(Request)
   local List = channel_info.ChannelList()
   local OptionList = {}
   for i = 1, #List do
      OptionList[i] = List[i]
   end
   net.http.respond{body=json.serialize{data=OptionList}, entity_type='text/json'}
end
The JSON that is returned is like this:
[
   {
      "name": "ADT",
      "guid": "26C4F66CE4317E00967271F0259224DB"
   },
   {
      "name": "Simple",
      "guid": "0B619A807569589759ADBF27CE771CC6"
   },
   {
      "name": "Query",
      "guid": "E1B526517C7940A9C1F2AED85069B0A7"
   },
   {
      "name": "Demo Query",
      "guid": "D8C451BC92301318AB97B98BD0ED7B2A"
   },
   {
      "name": "ADT In",
      "guid": "D209ACF5E8AE2B44EC8743B39FC3C646"
   }
]
There are similar calls to load and save the contents of the form are all implemented in a similar manner using AJAX calls with JSON. It’s quite straightforward.
Creating a link from the custom GUI into the channel being configured [top]
It makes for a very convenient work flow to be able to have a link from the GUI that takes the user directly to the To Translator editor for that channel. The beauty of this is that the user can tweak the settings to the configuration file in one window and see the result of those changes in the Translator in another window. The implementation of the link is done with jQuery, pulling the appropriate information about the current channel in the SELECT control:
function ShowChannel(){
   // Could get more elaborate with determining the port to map to.
   var Url = 'http://' + location.hostname + ':6543/mapper/#Page=OpenEditor&ChannelName=' + $('#chan_select :selected').text()
       + '&ChannelGuid=' + $('#chan_select').val() + '&ComponentType=Destination&ComponentName=To+Translator'
   window.open(Url);
}