- Introduction
- Creating a Centralized Directory Structure
- Relative Paths for VMD Files
- Creating an Iguana Test Server
- Strategies for Disaster Recovery and High Availability
- Separating system files from the Application
- Defining Multiple Servers to use a Single Configuration File
Introduction
This post was originally written for Iguana 5 so it contains version 5 screenshots, and may contain out of date references.
Iguana makes it easy for you to centralize all of your configuration files and data in one directory hierarchy. This makes it possible for you to manage your files and data with version control software such as GIT, Mercurial, Subversion, Visual Source safe etc.
The advantages of recent versions of Iguana for configuration management are:
- It offers the ability to create a centralized directory structure, provided that you use relative file paths to specify the locations of your VMD files;
- You can easily use your configuration management or version control software to create a test version of any Iguana production server;
- Disaster recovery is much easier;
- If you are operating in a high availability environment, configurations can be easily reproduced on secondary backup machines;
- You can separate the application data from the application itself;
- You can also separate the configuration files from the logs.
- You can use environment variables to specify values for an Iguana server, thus enabling you to use the same configuration file for servers on multiple machines.
Creating a Centralized Directory Structure [top]
Iguana allows you to specify the directory in which an Iguana configuration file is stored. This means that you can use a single directory to store your configuration file, your log files, and any VMD files that you create for your server. If you store the VMD files in XML format, all of these files are text, so they can be easily saved using version control or change management software.
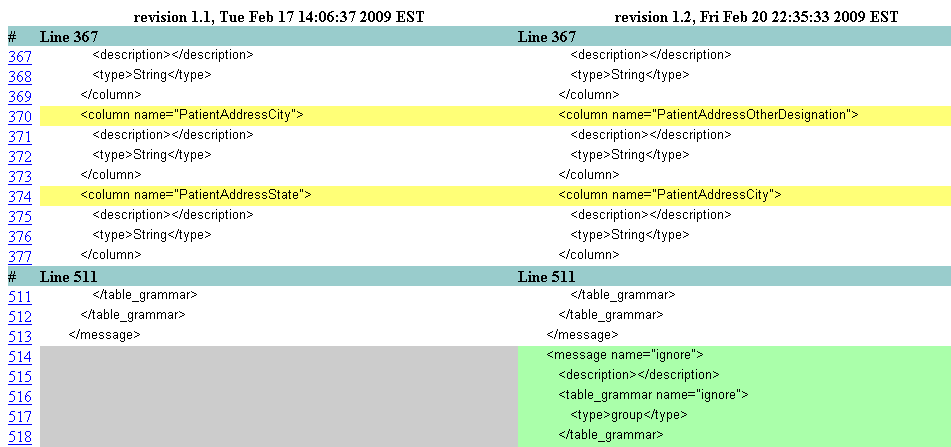
For example, here is the display output from a CVS client called ViewCVS that shows the changes in a VMD file in XML.
If you are running more than one Iguana server, you can create a master directory for all of your servers, and then create one subdirectory for each server that you use. This enables you to store all of your Iguana data in one directory hierarchy.
Relative Paths for VMD Files [top]
If you want to ensure that all VMD files that your Iguana server uses are contained in the same directory as the configuration file and the data, you must use a relative path to specify the location of any VMD file used in a channel definition.
There are two similar (but different) types of relative paths used in Iguana:
- Relative paths used by various HL7 and X12 built-in library functions.
- Relative paths used in the LLP Listener source component.
Relative paths for HL7 and X12 library functions
Iguana stores all of it VMD (and other) project files in the other directory. Iguana uses the other directory as a starting point, and then determines the location of VMD files relative to the other directory.
Note: These “other project files” can be shared between projects, so when multiple projects use the same file there is only a single copy stored within the other directory.
The other directory is located within the working directory, and defined as <working directory>\edit\<iguana user>\other\, for example: C:\IguanaConfig\edit\admin\other or C:\Program Files\iNTERFACEWARE\Iguana\edit\admin\other. If you have not explicitly defined a working directory, Iguana uses its installation directory as the working directory (such as C:\Program Files\iNTERFACEWARE\Iguana)
Iguana finds the file by appending the file path + name to the other directory, for example:
- “demo.vmd” becomes “<working directory>\edit\<iguana user>\other\demo.vmd” (i.e., C:\IguanaConfig\edit\admin\other\demo.vmd or C:\Program Files\iNTERFACEWARE\Iguana\edit\admin\other\demo.vmd)
- “example\demo.vmd” becomes “<working directory>\edit\<iguana user>\other\example\demo.vmd” (i.e., C:\IguanaConfig\edit\admin\other\example\demo.vmd or C:\Program Files\iNTERFACEWARE\Iguana\edit\admin\other\example\demo.vmd).
These are the built-in functions that use VMD project files with relative paths:
- hl7.parse{} and hl7.message{}
- chm.parse{}, chm.toXml{} and chm.transform{}
- x12.parse{} and x12.message{}
Consider the following code snippet:
In this example we assume a custom windows install, with a working directory of C:\IguanaConfig\, and that we are logged on as the admin user.

Relative paths for the LLP Listener
The LLP Listener stores VMD files relative to the Iguana working directory (unlike library functions that use the other directory). If you have not explicitly defined a working directory, Iguana uses its installation directory as the working directory (such as C:\Program Files\iNTERFACEWARE\Iguana).
Note: These files can be shared between channels, so when multiple channels use the same file there is only a single copy stored within the workiing directory.
Iguana finds the file by appending the file path + name to the working directory, for example:
- “autoack.vmd” becomes “<working directory>\autoack.vmd” (i.e., C:\IguanaConfig\autoack.vmd or C:\Program Files\iNTERFACEWARE\Iguana\autoack.vmd)
- “vmdfiles\autoack.vmd” becomes “<working directory>\vmdfiles\autoack.vmd” (i.e., C:\IguanaConfig\vmdfiles\autoack.vmd or C:\Program Files\iNTERFACEWARE\Iguana\vmdfiles\autoack.vmd).
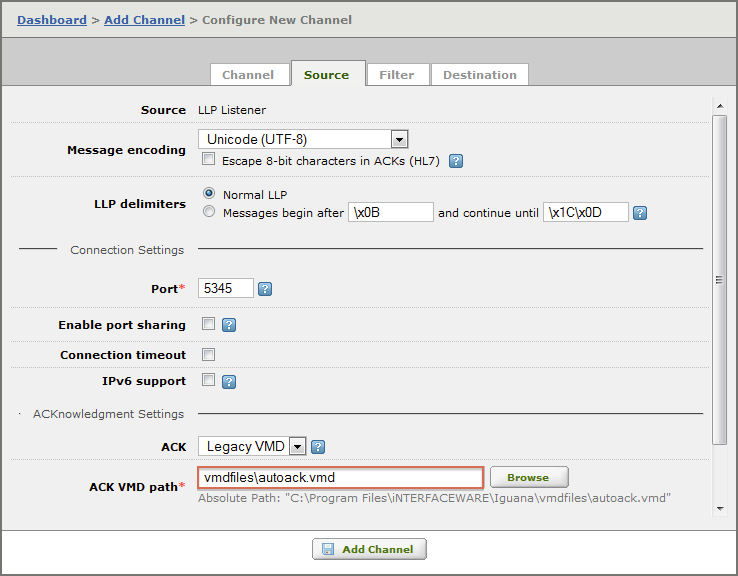
Consider the following LLP Listener component definition:
In this example, the location of the VMD file in the ACK VMD path field is specified by the relative path vmdfiles\autoack.vmd. If the Iguana working directory is D:\build\v3, the server will look for the VMD file in D:\build\v3\vmdfiles\autoack.vmd.
If you specify relative paths for all of your VMD files, you can ensure that any version of Iguana that is contained in a directory only uses VMD files that are stored in that directory. This makes it much easier when you want to transfer projects from one server to another (e.g., from development to test, or test to production).
Tip: The simplest solution is to locate all VMD files in the same directory as the IguanaConfiguration.xml configuration file. This means that all path names specified in channel definitions simply have to include the name of the VMD file.
In an LLP Listener channel source component, the default is to assume that the VMD file is in the same directory as the configuration file.

Another solution is to use an environment variable to specify the directory in which the VMD files are stored.
This example uses iguana_dir, an environment variable defined by Iguana, whose value is the location of the directory in which Iguana is installed.

Please contact support at support@interfaceware.com if you need more help.
Creating an Iguana Test Server [top]
If you want to create a test version of an Iguana server that is in production, you must:
- Ensure that your channel definitions use a relative path to define the location of each VMD file used by the production server (see Using Relative Paths for VMD File Definitions for more details);
- Use your version control or change management software to check out a working copy of all configuration files, log files and VMD files used by the production server;
- Install another copy of Iguana in your test environment, to use as a test server;
- Set your test server’s working directory to the location of the working copy. (See Specifying the Configuration File Directory for details on how to do this.)
This method enables you to safely experiment with new channels, configurations and components without risking any harm to your production environment:

Emergency changes to the production server can also be saved in the source code repository.
Note: Setting up a test environment for Iguana makes it easier to limit the number of people that work with channels that process live patient data. This ensures easier compliance with regulations such as the HIPAA Privacy Act, and limits the risk of accidentally sending confidential patient data to the wrong channel (and, hence, to the wrong health-care facility).
Strategies for Disaster Recovery and High Availability [top]
Disaster Recovery
Because you can configure your Iguana server to store of all its configuration information and data in any location you specify, disaster recovery becomes much easier.
All you need to do is ensure that your centralized Iguana directory is checked in or backed up at regular intervals. Then, if something goes wrong with your server and your configuration becomes corrupted, you can restore the configuration information and log data from the last time you backed it up.
High Availability
Iguana can be configured to fit into any kind of “high availability” (HA) approach. Iguana plays nicely in all clustered configurations, failover, active/active etc. We have customers that have configured Iguana across thousands of HA production sites using many different platforms. Please contact us at support@interfaceware.com for more information on HA and Failover.
Separating system files from the Application [top]
Data files
Iguana enables you to keep your application data separate from your application. For example, you can store the Iguana server on one hard drive and put your configuration files and log data on a second hard drive. This separation ensures that your data will not be affected if something goes wrong with the hard drive on which your applications are running.
Separating Configuration and Log files
Iguana 4.0 and later versions also allow you to specify a separate directory for your log files. This means that you can store your application, your configuration files and your log files on separate hard drives or partitions. Separating your configuration files and log data makes it easier to test upgraded versions of Iguana.
See Changing the Log Directory for more information on how to specify the location of the log directory for your Iguana server. Please contact us at support@interfaceware.com for more information on HA and Failover.
Defining Multiple Servers to use a Single Configuration File [top]
Within Iguana, you can view, define and edit the environment variables that have been specified for your system:
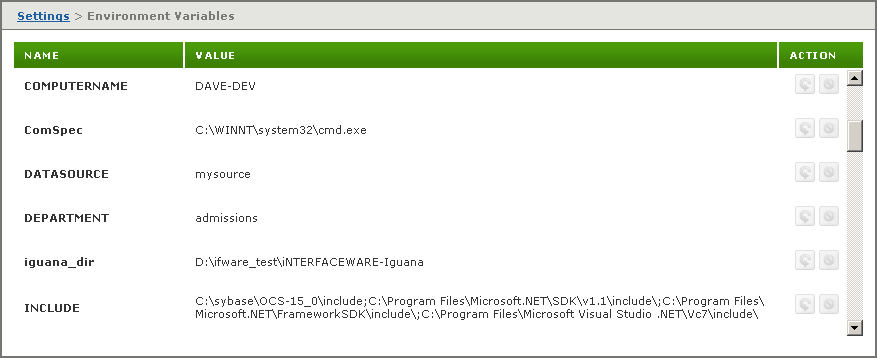
You can use environment variables to define multiple servers that use the same configuration file. For example, you can create a production Iguana server and a test Iguana server that are effectively identical. To ensure that your test server does not affect your production server, you can use environment variables to reference either the production environment or the test environment.
To use the same configuration file in multiple environments:
- Move your configuration file to a physical storage location that can be accessed by all of the machines on which an Iguana server will be located.
- Install Iguana on each machine.
- Edit each Iguana server’s iguana_service.hdf file to specify where the configuration file is located. See Set the Configuration File Directory for details on how to do this.
- For each Iguana server, define environment variables that specify the environment on which the server will be running.
For example, if you are using one database for your production environment and another for your test environment, you can use an environment variable named DATASOURCE to specify the data source in a From Database or To Database channel component:
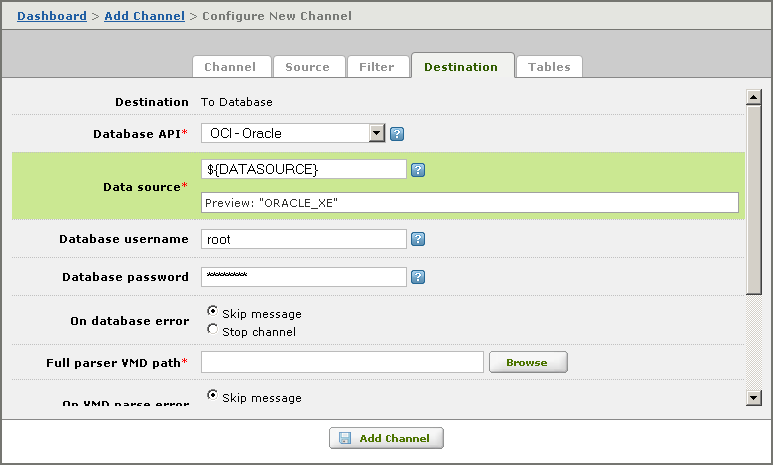
This enables you to use the same channel definition in both your production environment and your test environment. To change from one environment to another, all you need to do is change the value of DATASOURCE.
To show another example, if you have defined a channel with a To File channel component, you can use an environment variable to specify the directory into which files are to be written:
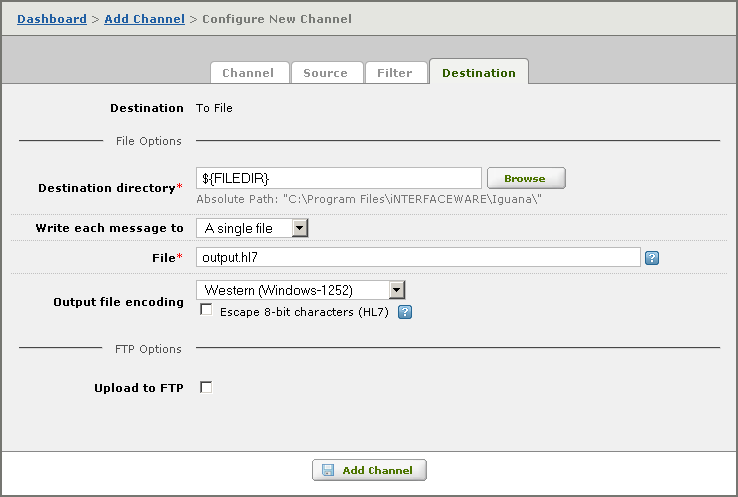
To use a different directory in your test environment, all you need to do is change the value of the FILEDIR environment variable.