- Setting up an Oracle Database Instant Client
- Setting up an ODBC Data Source for Oracle
- Using an ODBC Oracle Data Source
- Using an OCI Oracle Data Source
- The OCI Shared Object
- OCI TNS Names
- Using the 32-bit or 64-bit Oracle Client Library
This article contains useful information for connecting to Oracle databases.
If you are using a 64 bit operating system it usually best to use the 64 bit version of Oracle. Also you need to ensure that you use 64 bit ODBC/OCI drivers on a 64 bit operating system.
Setting up an Oracle Database Instant Client [top]
If you plan to use Iguana to obtain data from or store data into an Oracle database, and you do not have an existing Oracle client, the easiest way to interact with the Oracle database is with an Oracle Database Instant Client. This Instant Client enables you to establish an ODBC connection to your Oracle database.
Warning! Be sure to use version 11.1 or later of the Oracle Database Instant Client. Version 10.2 of the Oracle Database Instant Client does not include all of the required DLL files.
To set up the Oracle Database Instant Client, you must:
- Install the Oracle Database Instant Client and its ODBC driver on your system;
- Set the TNS_ADMIN environment variable;
- Configure a tnsnames.ora configuration file for your client.
To install the Oracle Database Instant Client:
- Download the Oracle Database Instant Client from the Oracle web site. You will need the Basic and ODBC Supplement packages. Place these packages in a folder or directory on your computer (such as C:\Oracle).
- Unzip the packages that you have downloaded. The unzipped files will be copied into a subdirectory named instantclient_X_Y, where X and Y represent the version number of the Oracle Database Instant Client (for example, C:\Oracle\instantclient_11_1).
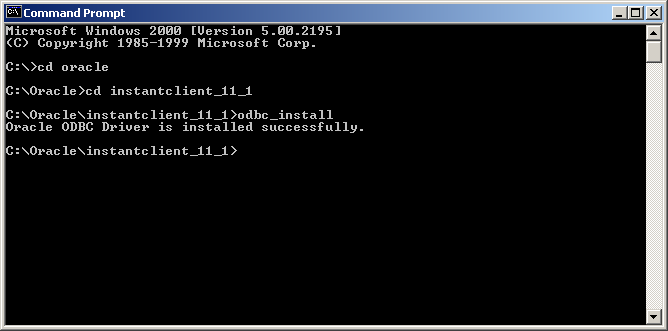
- Open a Command Prompt window, and set your current directory to be the instantclient_X_Y directory into which the unzipped files have been copied.
- Type odbc_install. This will install the ODBC driver on your system:
The next steps are to ensure that the necessary Windows environment variables are defined. You will need to:
- Create an environment variable named TNS_ADMIN, and set its value to be the directory that contains the Oracle Database Instant Client (for example, C:\Oracle);
- Ensure that the directory that contains the Oracle Database Instant Client is included in the PATH environment variable.
To define the necessary environment variables:
- From Windows, open the Control Panel and click System.
- Click the Advanced tab.
- Click Environment Variables.
- In the System variables panel, click New.
- In the Variable Name field, type TNS_ADMIN.
- In the Variable Value field, type the name of the directory that contains your Oracle Database Instant Client (for example, C:\Oracle).
- Click OK to create the environment variable. The Environment Variables window is now displayed again.
- In the System variables panel, locate the variable named Path or PATH. (If it does not exist, create it using the steps that you used above to create TNS_ADMIN.)
- Select the PATH environment variable, and click Edit.
- In the Edit System Variable window, in the Variable Value field, position your cursor at the end of the current list. Append a semi-colon ; to the list, then type the directory that contains your Oracle Database Instant Client.
- Click OK to close the Edit System Variable window.
- Click OK again to close the Environment Variables window.
- Click OK to close the System Properties window.
Next, you must create a tnsnames.ora configuration file for your Oracle Database Instant Client. This file should be located in the directory in which your Oracle Database Instant Client is installed (for example, C:\Oracle). The tnsnames.ora file should look like this:
MY_ORACLE_SOURCE =
    (DESCRIPTION =
        (ADDRESS_LIST =
            (ADDRESS = (PROTOCOL = TCP)(HOST = hostname)(PORT = portnum))
        ) (CONNECT_DATA =
            (SID = XE) (SERVER = DEDICATED)
        )
    )
In the definition shown above, replace MY_ORACLE_SOURCE with the name of your Oracle data source, replace hostname with the host name for your Oracle server, and replace portnum with the port on which your Oracle server is running.
The final step is to create a file named sqlnet.ora, located in the same directory as tnsnames.ora. In this file, add the following line:
TCP.CONNECT_TIMEOUT=5
This tells the Oracle client to time out if a connection to the Oracle server cannot be obtained within 5 seconds. (The default is to never time out, which can cause problems if the server is down or cannot be reached.)
Your Oracle client is now ready for use as an ODBC data source. See Setting up an ODBC Data Source for Oracle for information on how to set up an ODBC data source for Oracle.
Setting up an ODBC Data Source for Oracle [top]
To set up an ODBC data source for your Oracle client, perform the following steps:
- From Windows, click Start, then select Settings, Control Panel, Administrative Tools and Data Sources (ODBC). The ODBC Data Source Administrator window appears.
- Click the System DSN tab, and click Add to create a new data source. The Create New Data Source window appears. Your Oracle client driver should appear on this list:
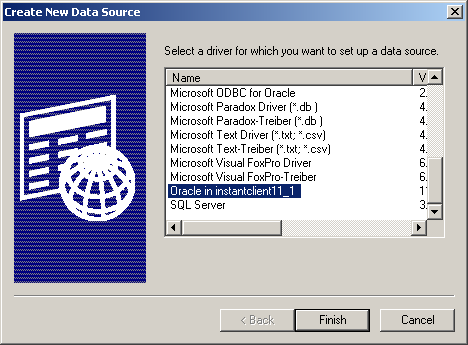
- Select your Oracle client driver from the list, and click Finish. The ODBC Oracle Driver Configuration window appears.
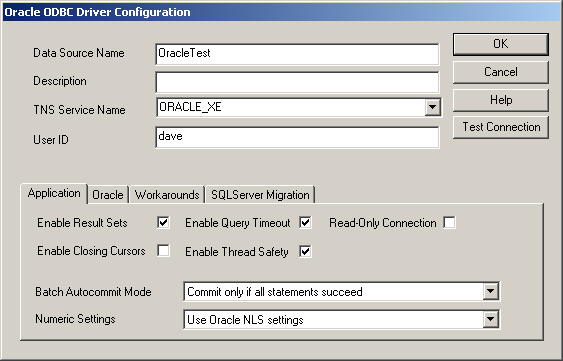
- In the Data Source Name field, type the name that you want to use for this ODBC data source.
- In the TNS Service Name field, type the name of your Oracle service. This is the name that is specified in the tnsnames.ora file that is defined for your Oracle client.
- In the User ID field, type the username that you use to log into the Oracle database. The Oracle ODBC Driver Configuration window should now look something like this:
- Click OK to create the ODBC data source for your Oracle client. The new data source now appears in the ODBC Data Source Administrator window:
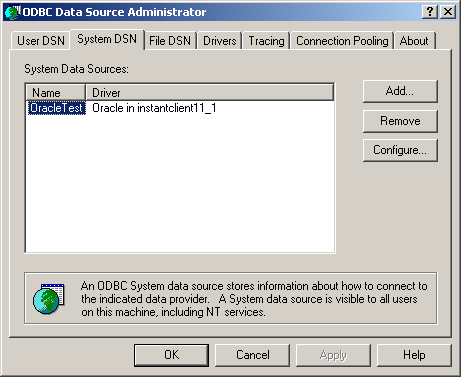
The data source is now ready for use.
Using an ODBC Oracle Data Source [top]
If you use an ODBC data source to interact with your Oracle database, and you want to use Iguana with this database, you need to supply the following when specifying a database in an Iguana channel:
- The name of the ODBC data source;
- The username that you use when accessing the database;
- The password for that username.
How you will interact with your Oracle database depends on what version of Iguana you are using:
- If you are using Iguana 4.0 or later, you can use a From Database component to read information from a database to generate an HL7 message, and you can use a To Database channel component to populate your database tables with information from an HL7 message.
- If you are using a version of Iguana that is older than version 4.0, you can use your Oracle database to store your channel logging information. This database will also be used by any From Database or To Database channel components that you create.
In all versions of Iguana, set the following fields to ensure that your channel can access your Oracle database through an ODBC data source:
- From the Database API list box, select ODBC – Oracle.
- In the Data source field, type the name of the ODBC data source.
Note: To locate the name of the ODBC data source:
- Open the Control Panel.
- Select Administrative Tools and Data Sources (ODBC).
- Click the System DSN tab.
The name of the ODBC data source for your Oracle client should be listed there.
- In the Database username field, type the username that you use to access the Oracle database.
- In the Database password field, type the password for your username.
The following is an example of an Iguana channel that uses an ODBC Oracle database as its destination component:

For more details on using a database in a channel:
- See From Database for information on using a database as a source component when creating a channel.
- See To Database for information on using a database as a destination component when creating a channel.
Note: For information on how to create an ODBC data source for an Oracle client, see Setting Up an ODBC Data Source for Oracle. If you do not have an Oracle client and need to access an Oracle database from Iguana, the Oracle Database Instant Client is recommended. See Setting Up an Oracle Database Instant Client for more details.
Tip: If Iguana is writing to or reading from a database, and your database is using an ODBC driver to interact with Iguana, the trace log from your ODBC driver (sql.log) could use up all available disk space on your hard drive.
For more information, see Microsoft’s article on potential disk space issues related to sql.log and ODBC tracing: http://support.microsoft.com/kb/268591.
Using an OCI Oracle Data Source [top]
If you plan to use OCI Oracle in an Iguana channel, you must ensure that Iguana has access to the correct database API for your Oracle database.
Note: In Iguana 4.0 or later, the path to the OCI Oracle shared library that Iguana is using is displayed on the Database Settings screen in the Iguana web interface. See Database Settings for more details.
How you will interact with your Oracle database depends on what version of Iguana you are using:
- If you are using Iguana 4.0 or later, you can use a From Database component to read information from a database to generate an HL7 message, and you can use a To Database channel component to populate your database tables with information from an HL7 message.
- If you are using a version of Iguana that is older than version 4.0, you can use your Oracle database to store your channel logging information. This database will also be used by any From Database or To Database channel components that you create.
In all versions of Iguana, set the following fields to ensure that your channel can access your Oracle database:
- From the Database API list box, select OCI – Oracle.
- In the Data source field, type the Oracle service name. This is the name that is specified in the tnsnames.ora file that is defined for your Oracle client.
- In the Database username field, type the username that you use to access the Oracle database.
- In the Database password field, type the password for your username.
The following is an example of a channel that uses an OCI Oracle database as its destination component:

For more details on using a database in a channel:
- See From Database for information on using a database as a source component when creating a channel in Iguana version 4.0 or later.
- See To Database for information on using a database as a destination component when creating a channel in Iguana version 4.0 or later.
Note: In the tnsnames.ora file defined for your Oracle client, a database configuration entry looks like this:Replace MY_ORACLE_SOURCE with the name of your Oracle data source. This is the name that you specify in the Data source field in an Iguana channel. Replace hostname with the host name for your Oracle server, and replace portnum with the port on which your Oracle server is running.
MY_ORACLE_SOURCE =
    (DESCRIPTION =
        (ADDRESS_LIST =
            (ADDRESS = (PROTOCOL = TCP)(HOST = hostname)(PORT = portnum))
        ) (CONNECT_DATA =
            (SID = XE) (SERVER = DEDICATED)
        )
    )
The sqlnet.ora file defined for your Oracle client should contain the following:
TCP.CONNECT_TIMEOUT=5
This tells the Oracle client to time out if a connection to the Oracle server cannot be obtained within 5 seconds. (The default is to never time out, which can cause problems if the server is down or cannot be reached.) If this file does not exist, it should be created in the same directory that contains tnsnames.ora.
The OCI Shared Object [top]
Iguana relies on the detection of the Oracle Instance Client shared object. The shared object name is platform dependent and is listed below:
| Platform | Shared Object File Name |
|---|---|
| HPUX | libclntsh.sl |
| Other Unix platforms | libclntsh.so |
| Mac OS X | libclntsh.dylib |
| Windows | oci.dll |
Once the shared object is found, the absolute directory path it is located in must be placed into the LD_LIBRARY_PATH (or the equivalent dynamic linker variable for your platform) before starting Iguana.
The Instance Client distribution may append a version number to the shared object file name. In that case, simply create a symbolic link with the appropriate name to the versioned name, so Iguana can find the file.
See also Using Iguana With OCI Oracle Using Oracle Instant Client on Unix, Linux and Mac OS X
OCI TNS Names [top]
A common issue that arises with OCI under Unix, Linux or Mac OS X is providing access to the TNS Names when configuring a channel.
A file named tnsnames.ora must exist in the path listing pointed to by the TNS_ADMIN environment variable.
Please see the Oracle documentation about creating/editing the tnsnames.ora file, and setting the TNS_ADMIN environment variable.
Using the 32-bit or 64-bit Oracle Client Library [top]
When using the Oracle client library, you must use the version of the library that corresponds to the version of Iguana that you are using.
- If you are using the 32-bit version of Iguana, you must use the 32-bit version of the Oracle client library.
- If you are using the 64-bit version of Iguana, you must use the 64-bit version of the Oracle client library.