Setup: 01 - File to Socket
Contents
The following instructions will help you set up the first Iguana demo channel (01 – File to Socket) correctly.
Step One: Set up the files
Before you create the channel, you need to make sure that you have all the files and folders needed:
- Locate your Iguana install directory.
- Within the iNTERFACEWARE/Iguana folder, create a new folder and name it ‘Demo‘.
- Within the Demo folder, create a new folder and call it ‘Messages‘.
- Save this sample data file to the iNTERFACEWARE/Iguana/Demo/Messages folder: sample_data.txt
- Download this project zip file: 01_File_to_Socket_Filter.zip
Step Two: Create the channel
Now you are ready to create the channel itself:
- From the Iguana Dashboard, click the Add Channel button. The Add Channel dialog appears.
- Make the following component selections:
- Source = From File
- Destination = LLP Client
- Click the Configure Channel button. The Channel Configuration screen appears, providing you access to the new channel’s settings.
- In the Channel tab, enter the following information:
- Channel name = 01-File to Socket
- Description = Grab messages from a file and send out to LLP
- In the Source tab, enter the following information:
- Source Directory = /Demo/Messages/
- Extension of files to read = txt
- In the Filter tab, enable the User Filter checkbox.
- In the Destination tab, keep the default settings:
- Host address = localhost
- Port = 5145
- Click the Add Channel button.
Warning! Upon creating the channel, you will receive an automatic ‘error’ because you have not yet saved a milestone. Don’t worry, we will fix this when we add the code (see below).
Step Three: Import the code
With the channel set up, now you can import the code:
- If you are not already in the Channel Configuration screen, click the channel’s name in the Dashboard to open it.
- In the Filter tab, click the Edit Script hyperlink. Iguana launches the Translator and the following dialog appears:
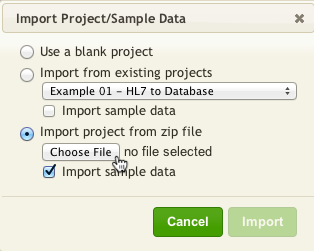
- Enable both Import project from zip file and its accompanying Import sample data option.
- Click the Choose File button.
- In the dialog that appears, browse and select the project zip file that you downloaded earlier (01_File_to_Socket_Filter.zip)
- Click the Import button. Iguana loads the project into the Translator (including the code, module library and sample data).
- Save your first milestone.
Continue: Setup: 02 - Socket to Database