- Introduction
- View Pending & Processed Messages
- Resubmit a Single Message
- Resubmit Multiple Messages
- Skip Processing Messages
- Resubmit Messages Using the HL7 Simulator
- How the Preview Panel works
- Reposition the Queue in Pictures
- More Information
Introduction
You can Resubmit single log messages, or multiple log messages. Messages can be re-sent to the same channel or forwarded to a different channel.
To resubmit multiple messages you Reposition the queue for a channel to re-start processing from a specified message. You can also reposition the queue to omit processing a group of messages.
You can also use the HL7 Simulator to resubmit batches of messages to any channel that uses an LLP Listener as the source component. This method has one major advantage, you can use any log query (i.e., a time range) to select the messages to resubmit.
You must be a member of the Administrators Role to Resubmit messages and Reposition the logs, see Roles for more information.
Note: When you are locating a message, the following shortcut keys may be useful:
- Ctrl+Home displays the most recent log message that matches the current search criterion.
- Ctrl+End displays the oldest log message that matches the current search criterion.
View Pending & Processed Messages [top]
You can view Pending and Processed messages in the Logs screen just like any other message. If a channel From Channel source component then you will need to select the source channel(s) to include messages from those channel(s).
There are two ways to view Pending and Processed messages in the Logs screen:
- Click the link in the Queued column in the Dashboard:
- Clicking the “1” (can be any number) link for LLP End Channel will show Pending, and Processed and other messages:

- Clicking a “0” link will show any Processed and other messages:

- Clicking the “1” (can be any number) link for LLP End Channel will show Pending, and Processed and other messages:
- View the channel messages in the Logs screen and select the desired channel:
- This channel does not have a From Channel source component so you can see the Pending and Processed messages:

- This channel has a From Channel source component so we had to select the source channel HL7 SIM to QUE to see the Pending and Processed messages:

- This channel does not have a From Channel source component so you can see the Pending and Processed messages:
Resubmit a Single Message [top]
If an HL7 message has been logged, you can re-send the message from the Iguana logs screen. This is useful if an unexpected problem occurs at the receiving end or if you want to forward the message to a different channel.
Warning! If you are using a To Translator component you need to ensure it does not update live data in test mode. This is because Preview Panel needs to run the To Translator script to generate the preview output (exactly the same way that annotations and auto-complete generate data).
The way to do this is to use isTest() to prevent live data from being updated in test mode.
To resubmit a message:
- Click the Logs tab.
- Scroll through the messages to find the one you want to resubmit, or use the search feature.
- Click the message to view it.
- Click
 to display the resubmit screen:

- Click to display the log message resubmit screen:

- From the Resubmit To Channel list box, select the channel to resubmit to:

- You can edit the message in the upper panel. As you edit the message changes are shown in the lower Preview panel.
- Click Resubmit to resubmit the message, or Cancel to return to log messages.
Resubmit Multiple Messages [top]
There are times when you need to resubmit messages through Iguana, for example:
- You are bringing a new system live which you need to ‘back populate’ with historical data.
- An application has failed to process messages due to database or other failure and requires reprocessing several days worth of data etc.
- There was an integration (mapping/logic) error in which requires reprocessing of affected messages.
These scenarios are very easy to deal with in Iguana since you can requeue messages in a few mouse clicks.
Note: You must select a specific channel to display the PROCESSED or PENDING button in the log messages of type Message. These buttons do not appear if log messages from all channels are being displayed.
You cannot reposition a channel whose destination component is To Channel.
To reposition a channel to resubmit multiple messages:
- Select the channel to reposition from the Channel list box in the Search Criteria panel:

- If the channel has a From Channel source component, select the source channel that you want to display and reposition. (See Selecting The Source Channels Of A ‘From Channel’ Source Component To Display for details on how to do this.)
- From the Type list box, select Messages:

- Locate the Processed message to restart from:
- Click the Last Processed Message link to view the last message processed by the channel:

- Scroll down to find the message to restart from.
Note: This method works well for resending a few messages. - If you need to resend a large number of messages, then you can use a Text Query to identify the message to restart from:

- Click the Last Processed Message link to view the last message processed by the channel:
- Click the PROCESSED button at the left side of the chosen message:

- Click Start Here to re-send messages (including the current message) :
Note: To resend messages excluding the current message click After This Message.

Tips for resending Messages
Scenario: You know the first bad message. For example you discover bad data in your database beginning with Gary Adams (see above). In this case you need to reprocess all the messages including Gary Adams.
- Follow the resubmit procedure above, and in select Start Here in step six to begin reprocessing including Gary Adams.
Scenario: You know the last good message. For example you discover missing data in your database and you identify that Gary Adams was the last record that was successfully processed. In this case you need to reprocess all the messages excluding Gary Adams.
- Follow the resubmit procedure above, and in select After This Message in step six to begin reprocessing excluding Gary Adams.
Shortcuts for listing the messages for a channel. Here are a couple of alternatives to selecting the channel in the logs window (as we did in the procedure above).
In the dashboard you can click the Queued link for a channel:

- A numbered link will include pending and processed messages
(In this case 01-File to Socket has 85 pending messages) - A link with zero will only include processed messages
You can also click the Queued link in the properties for a channel:

Skip Processing Messages [top]
There are times when you need to skip processing for one or more queued (pending) messages, for example:
- Messages were sent in error and you don’t want to process them
- Messages contain invalid data
- Messages contain errors and are stopping the channel
Skipping messages is almost identical to resubmitting messages, the only difference is that you select a Pending message to restart from instead of a Processed message. All Pending messages prior to the message you restart from will be marked as Processed.
To reposition a channel to skip processing for one or more messages:
- Select the channel to reposition from the Channel list box in the Search Criteria panel:
- If the channel has a From Channel source component, select the source channel that you want to display and reposition. (See Selecting The Source Channels Of A ‘From Channel’ Source Component To Display for details on how to do this.)
- From the Type list box, select Messages:
- Locate the Pending message to restart from:
Note: All Pending messages prior to the selected message will be marked as Processed.- Click the Last Processed Message link to view the last message processed by the channel:
- Scroll up to find the message to restart from.
Note: This method works well for skipping a few messages. - If you need to skip a large number of messages, then you can use a Text Query to identify the message to restart from:

- Click the Last Processed Message link to view the last message processed by the channel:
- Click the PENDING button at the left side of the chosen message:

- Click Start Here to skip messages prior to the current message:
Note: To skip messages including the current message click After This Message.
Resubmit Messages Using the HL7 Simulator [top]
You can use the HL7 Simulator makes it easy to resubmit batches of messages to any channel that uses an LLP Listener as the source component. The advantage the advantage of this method is that you can use any log query (i.e., a time range) to select the messages to resubmit.
This procedure is also useful when you want to send a batch of messages to a different channel. You could use another channel to test code changes, or you might wish to forward some messages to a different destination.
Note: Remember this method only works for channels that use an LLP Listener source component.
To resubmit a batch of messages using the HL7 Simulator:
- Export the log messages to be resubmitted to a text file.
Note: Use the (default) export option One entry per line which creates a file that the Simulator can use as input. - Verify that the messages are error-free before attempting to resubmit them.
- Stop the channel that has the LLP Listener source component.
- Temporarily change the port number that the channel uses
- Record the original port number for later reference
- Change the port number
- Click Save
Note: Your live HL7 feed will not be processed until the original port number is restored at the end of this procedure.
- Re-start the channel that has LLP Listener as the source component:

- Run the HL7 Simulator utility.
- In the Port field, specify the temporary port number of the channel.
- In the Message File field, specify the text file you exported containing the messages that you want to resubmit.
- In the Time delay (ms) field, change the default value from 1000 to 100. This will increase the speed in which the Simulator sends the messages to your target.
- Ensure that the Stop sending messages at the end of file option is checked.
- Click the Start button to begin sending messages to your target destination component.
- While the messages are being sent, check the logs and verify that the resubmitted messages are now being processed successfully. If you are still receiving errors, you may want to check that the structure of the messages is correct and/or check the status of your server.
- After all the messages have been successfully processed, stop the channel and change the port number back to its original value, then click Save Changes.
- Restart your channel, to resume processing of your live HL7 feed.
How the Preview Panel works [top]
What appears in the Preview panel depends on the destination component of the channel to which you are sending the message. If the channel has a destination component of To Database, the Preview panel displays the SQL command that will be sent to the database:

For channels with a destination component other than To Database, the message to be resent is displayed in Segment View format:

Warning! The preview pane does not execute the Filter script, only the Destination script. This means that if a Filter script exists then the preview pane can display invalid results. However when the message is resubmitted the Filter script will run as expected (if it exists).
For example: If the Filter reads IDs from the queue and SELECTS message data from the database (like the Database to HL7 Tutorial) then errors can occur. In this case the Filter script does not run and the message corresponding to the ID of “1” is not retrieved from the database. Therefore the unprocessed ID of 1 (instead of the retrieved message) is previewed, which causes this error:
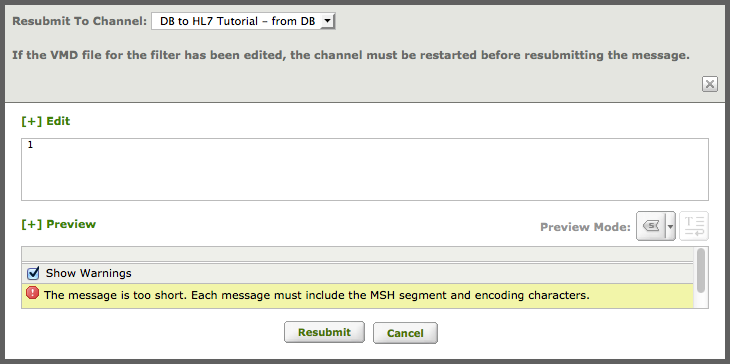
However when the message is resubmitted to the live channel the Filter script will run, and the message will be processed correctly.
Note: Before you resubmit a message, you must restart the channel to which you are resubmitting the message if either of the following is true:
- The channel has a destination component of To Database and you have edited the VMD file that this destination component uses to parse message data and map it into database tables.
- The channel uses a filter, the filter is applied after the original message is logged, and you have edited the VMD file that performs the filtering.
For example: If you have updated your VMD file to add a column to a table in your database, data will not be loaded into this column until the channel is stopped and restarted.
Tip: If your channel has a To Plugin destination component, you will not be able to preview the message that you want to resubmit unless the channel and the plugin are running.
You can control how the message is to be displayed in the Preview panel. The option buttons available depend on the destination component of the channel to which you are resubmitting the message.
These are the view options in the preview pane (not all options are available for every message):
| Button | View Mode | Description |
|---|---|---|
 |
Hex-dump | View the log message in hexadecimal format. |
 |
Plain-text | View the log message in text format. |
 |
Segment View | View the segments that are defined in this message. This is the default for all messages except those being sent to channels whose destination component is To Database. |
 |
Segment Grammar View | View the segments in the segment grammar of the message definition that processed this message. This view mode is available only if this is a message that is being resubmitted to a channel whose destination component is To Database. |
 |
Table View (Graphical) | Parse the message and view the generated tables in graphical format. This button only appears if this message is being resubmitted to a channel whose destination component is To Database. |
 |
Table View (Plain-text) | Parse the message and view the generated tables in text format. This button only appears if this message is being resubmitted to a channel whose destination component is To Database. |
 |
SQL View | Parse the message and view the SQL statements that add this message to the database. This button only appears if this message is being resubmitted to a channel whose destination component is To Database. In this case, this view is the default for the Preview panel. |
Reposition the Queue in Pictures [top]
There are four possible combinations when you reposition the queue, these are explained below.
Note: The source position for a channel is simply a pointer to the last message that was processed, for more information see Understanding the Message Queue.
- PROCESSED + Start here
If the message has previously been processed (the button you clicked was PROCESSED) and you have clicked Start here, the source position of the channel is moved back to just before this message, and this message is reprocessed by the channel. Any messages that arrived later than this message that have already been processed are also reprocessed:

- PROCESSED + After this message
If the message has previously been processed (the button you clicked was PROCESSED) and you have clicked After this message, the source position of the channel is set to be this message, and all messages after this one are processed by the channel. Any messages after this one that have already been processed are reprocessed:

- PENDING + Start here
If the message is waiting in the message queue (the button you clicked was PENDING) and you have clicked Start here, the source position of the channel is moved ahead to just before this message, and this message becomes the next message processed. If there are messages that arrived before this message that have not yet been processed, these messages are skipped:

- PENDING + After this message
If the message is waiting in the message queue (the button you clicked was PENDING) and you have clicked After this message, the source position of the channel is set to this message. This message is skipped, and any messages that arrived before this message are also skipped:

Note: If this message is the last message in the queue, clicking PENDING and After this message empties the message queue without processing any of the messages.
More information [top]
- Sending and receiving HL7 test messages
- Using the HL7 Simulator on Linux and Mac
- Send HL7 sample data using LLP Client