Configuring a Channel
Contents
When you first add a new channel, the Configure New Channel screen appears:
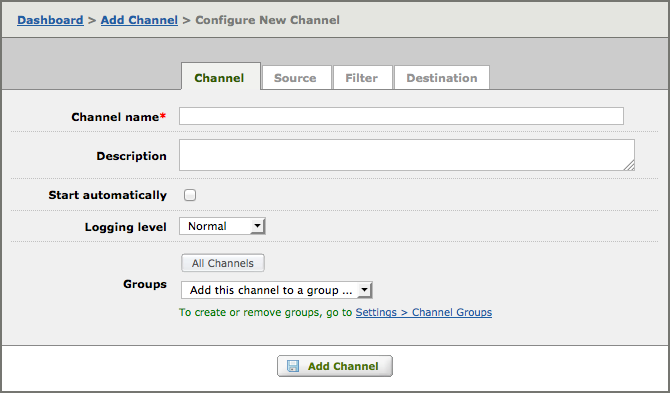
This screen includes the following tabs:
- The Channel tab, in which you supply the configuration details for the channel itself
- The Source tab, in which you configure the source component of the channel
- The Filter tab, in which you can specify a script or VMD file to filter incoming messages
- The Destination tab, in which you configure the destination component of the channel
- The Tables tab, in which you specify the database information. This section only appears if you’ve chosen From Database as the source component or To Database as the destination component
Note: The exact contents of the Configure Channel screen and each of its tabs depend on the source and destination components that you selected when you first created your channel.
To configure basic channel details:
- If it is not already displayed, click the Channel tab to access basic channel details.
- In the Channel name field, type the channel name. This is the name that will identify the channel on the dashboard and in the logs.
- In the Description field, you can type a brief description of this channel. This description can include information such as the client facility, purpose, organization name, site name or CRM number.
- Select the Start automatically check box if you want this channel to be started when the Iguana service is started. If you have previously created a channel, the Start automatically check box will be selected by default if it was selected in the previous channel definition. Start automatically will be unselected by default if it was unselected in the previous channel definition.
- From the Logging level list box, select the logging level for this channel:
Logging level Log Messages Displayed Normal Messages, acknowledgement messages, informational log messages and errors Errors only Errors only Debug Everything that the Normal logging level displays, and Debug log messages. Debug log messages can be used to debug a specific problem with a channel. - From the Groups list box, select one or more channel groups to which you want this channel to belong. As you select each channel group, it is displayed on the screen.
Note: If you want to remove the channel from a channel group, locate the channel group on the screen and click Remove.
Once you have finished setting up your channel’s basic details, you can proceed with completing the other Configure New Channel tabs. For more information on these settings, see our comprehensive Channel Settings section.
Continue: Editing/Removing a Channel