- Introduction
- Create the Channel
- Load the Mapping Script
- View the Sample Data
- Mapping: Script Overview
- Mapping: Script Modules
- Mapping: main()
- Mapping: MapData() parsing
- Mapping: MapData() filtering
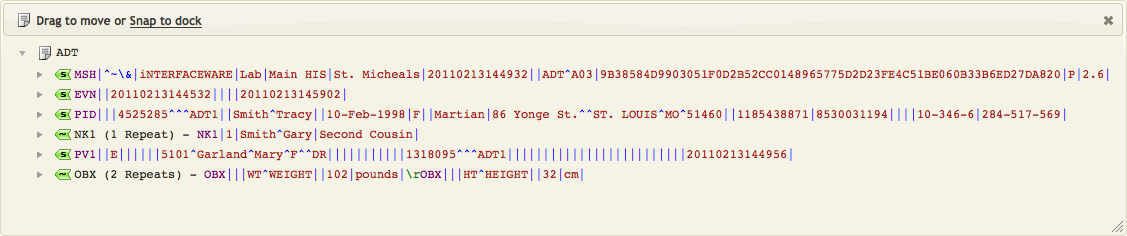
- Mapping: ADT Messages
- Mapping: PID Data
- Mapping: Next Of Kin
- Mapping: Weight
- Mapping: Lab Messages
- Populate the Database
- Merge the Database Tables
- Save a Channel Commit
- Test the Channel
Introduction
This article was originally written for Iguana 5 so it contains version 5 screenshots, and may contain out of date references. The principles used however remain valid.
If you have any questions please contact us at support@interfaceware.com.
This tutorial uses the Iguana Translator to map patient data from an incoming stream of HL7 ADT messages from an LLP connection into a database.
Create the Channel [top]
First, we need to create the channel through which the message data will be sent.
To create the channel:
- In the Dashboard, click Add Channel.
The Select Channel Components dialog appears:

- From the Source list box, select LLP Listener.
Note: For this tutorial the message source is a stream of HL7 ADT messages from an LLP connection. - From the Destination list box, select To Translator.
- Click the Configure Channel button. The Configure New Channel screen appears, offering us several tabs that we can use to configure channel settings:

- In the Channel Name field, type the name of the channel. In this tutorial, we will use llp_to_database (but you can enter any name).
- Click the Source tab to view the configuration settings for the source component (in this case, an LLP listener). The following screen appears:

- Ensure that “Unicode (UTF-8)” Message encoding is selected, do not change any of the other values.
- Click the Destination tab. The following screen appears:
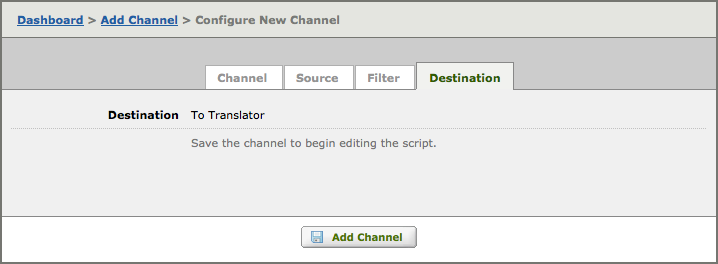
As you can see above, you cannot access To Translator destinations settings or view its mapping script until after you have created the channel. - Click Add Channel to finish adding the channel.
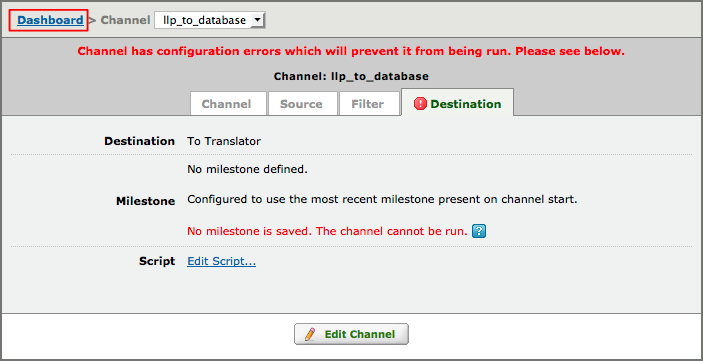
- You will be presented with this “commit error“, but don’t worry it is expected! It simply means you need to add code and save a commit before you can run the channel. We will import the code in the next step and then we will save a commit (that fixes the error) in the penultimate step of this Tutorial.

Note: The screenshot (above) was changed from Iguana V6 to show the “commit error” instead of the historical (V5) “milestone error”:
- Click the Dashboard link. As you can see Iguana has created the channel and automatically added it to the Dashboard.
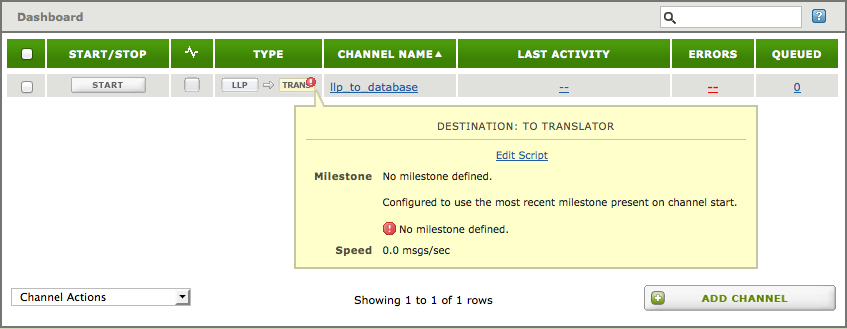
As you can see the same “milestone error” is also show on the Dashboard.
Next Step?
Now that we’ve created a channel, we can use its destination component to access the Translator and import the code we will use for this tutorial.
Load the Mapping Script [top]
Now that the channel has been created, the next steps is to import our mapping script.
To access this mapping script:
- Download the HL7_to_database_To_Translator.zip project file.
- From the Dashboard, click the name of the channel that you have just created.
- Click the Destination tab.
- Click the Edit Script link.
- Select Import project from zip file.
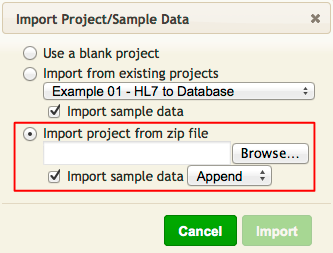
- Make sure that the Import sample data option is selected.
Tip: if you need to Import the project again, select the Replace option (to prevent duplicate copies of the same data in your project).
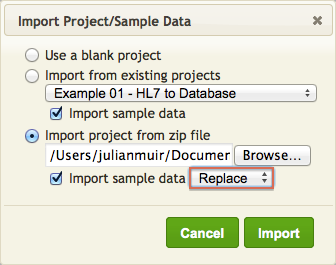
- Use Browse to select the project zip file you saved in step 1.
- Click Import. The Iguana Translator window appears, and the script that you have selected is displayed:
The script shown here is written in Lua, a popular open-source language that is simple and easy to use. For an introduction to the basic concepts of Lua, see Introduction to Lua.
Note: You do not need to know much of the Lua programming language to be able to create useful mapping scripts. The script code in this tutorial contains almost all of the Lua statements and concepts that you will need.
Next Step?
Now that we’ve opened the script, we will examine the sample messages that were imported with the project.
View the Sample Data [top]
One of the most useful features of the Iguana Translator is the ability to work with sample message data as you write and edit the mapping script. This helps you ensure that your script is doing what you want it to do, in real-time, without having to compile or test every change.
Use the navigation controls to move through the messages:

Click the Edit Message button to view the current sample message:

This will open the Edit Message screen:

To view all the sample data that was loaded with the project:
- Click the Sample Data link, located at the top left of the Script Editor screen.

- The sample data screen appears with a list of all the messages.

- Click on a message to view or edit it.

Next Step?
Now that you have viewed the sample data, you are ready to start examining the script. The following section will help you learn more about how the code works and what you can do to customize it.
Mapping: Script Overview [top]
At this point in the tutorial, you are all set up and ready to look under the hood! Now you are ready to learn more about the code itself. The mapping pages are designed to walk you through key concepts and get you comfortable with mapping scripts.
The mapping script provided with this channel performs the following tasks:
- Parses the incoming HL7 message into the script’s internal data format.
- Creates the database tables that will store data mapped from the incoming messages.
- Filters incoming messages to ensure that they belong to an expected message type.
- Performs the final mapping.
- Merge the database tables into an external database
1. Parsing the incoming HL7 message
Parsing the incoming HL7 message into the script’s internal data format is handled by the built-in function hl7.parse():

See Calling hl7.parse() and db.tables() for more details on how hl7.parse() works.
2. Creating the database tables
The task of creating the database tables that will store data mapped from the incoming messages is handled by the built-in function db.tables():

See Calling hl7.parse() and db.tables() for more details on how db.tables() works.
3. Filtering incoming messages
Filtering incoming messages to ensure that they belong to an expected message type is handled by the FilterMessage() function:

The FilterMessage() function is defined in the script. Calling hl7.parse() and db.tables() describes this function.
4. Performing the mapping
Performing the mapping is handled by the ProcessLab() and ProcessADT() functions:

Both of these functions are defined in the script. The sample message in this tutorial is handled by ProcessADT(), which is described in Processing ADT Messages.
5. Merging the database tables
The final step is to perform the task of merging its database tables (created by db.tables()) with the tables stored in an external database. The built-in function conn:merge() performs this task. See Merging the Database Tables for more details.
Next Step?
Now that you know the basic tasks that the script performs, let’s examine the code in more detail.
Mapping: Script Modules [top]
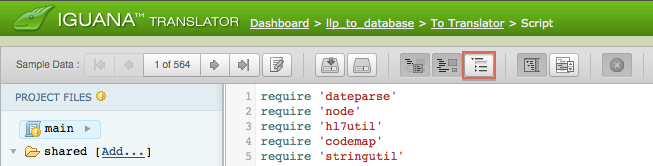
Let’s start examining the mapping script! Check out the first few lines of the script displayed in the Editor window:
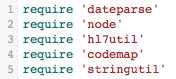
Translator scripts make extensive use of shared modules, these modules contain useful functions that your script can call to perform common tasks. Each module you are using needs a corresponding require statement to load it into your script.
The Project Manager panel, located at the left of the screen, also displays these modules in its shared folder:
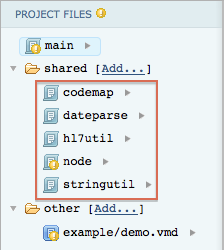
You can click any of these names to examine the code contained in these modules and determine what functions your script can call.
Next Step?
Now you know where functions come from and how we access them for our scripts. In the next step, you will learn about the main() function, the core script that we use to actually execute our code.
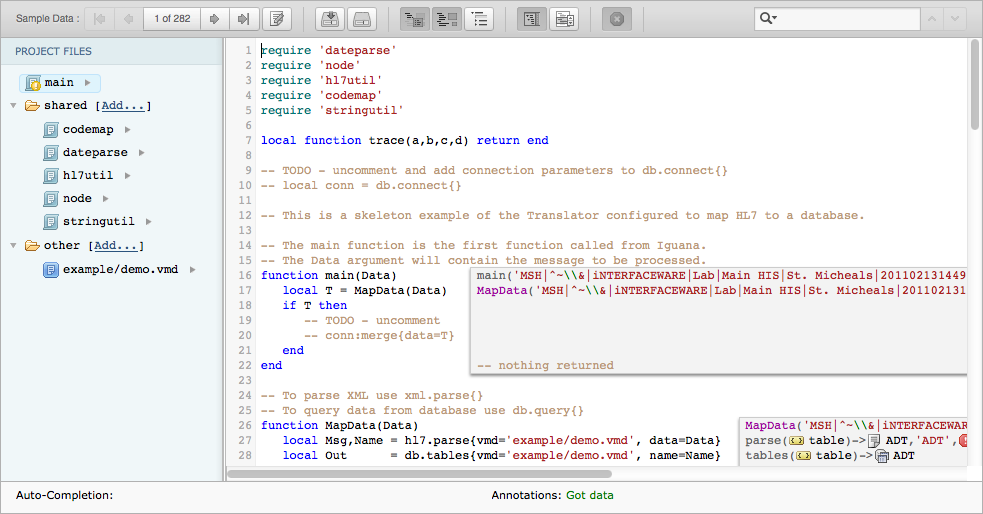
Mapping: main() [top]
The next step is to examine the main() function, which is the first function that the Iguana Translator calls when it starts to run your script. The main() function drives your program, everything starts from here. The rest of your scripts simply define the tasks that main() is in charge of executing.

In this example script, main() is passed the variable Data, which contains the message data that we want to process.
Notice that main() also calls another function, MapData(). This function performs the actual work of mapping the data, and is defined further down in our code.
The box that appears to the right of the main() function is an example of an annotation. Annotations indicate what information from the sample data is being accessed in the adjacent code. In other words, you can see how your code works with message data in real-time. For this particular main() function, the annotation displays what is stored in the Data variable (the entire sample message).
Tip: When writing script code, we suggest that you use short variable names (such as T, shown in the example above). This makes your code more compact, leaving more space to display annotations.
Next Step?
Now you understand the purpose of the main() function. Next we will examine MapData(), the first function that main() calls, and learn how it parses incoming HL7 messages using hl7.parse() and db.tables().
Mapping: MapData() parsing [top]
MapData() is a custom function that the main() function uses to execute a specific task. In this case the task is mapping the message data to a table node tree structure (that will later be merged into our database).
To do this it uses the built-in functions hl7.parse{} and db.tables{}, that are supplied with Iguana. It also uses three custom functions, FilterMessage(), ProcessLab() and ProcessADT(); in much the same way that main() calls MapData().
How It Works
The code calls hl7.parse{} to parse the incoming HL7 messages, and then db.tables{} to create a table node tree to map the data into.

Note: For simplicity this code uses a single VMD file for the message structure and the table mapping, we recommend using separate VMD files.
About hl7.parse():
MapData() calls the hl7.parse() function, which is built into the Iguana Translator:

hl7.parse() parses the message data and stores the results in the Msg and Name variables.
It requires two parameters:
- vmd, which specifies the VMD file to use when parsing (described below)
- data, which specifies the variable that contains the message to be parsed
To use hl7.parse(), you must supply a VMD template file that defines the structure of the incoming messages. VMD files can be edited or created using Chameleon.
Note: The parameter variable Data that contains the message provided to the mapping script is usually passed as the second (data) parameter.
It has three return values:
- The first return is the parsed message as a read-only HL7 node tree, which is loaded into the
Msgvariable - The second return is the name of the message type, which is loaded into the
Namevariable - The third return is a table of warnings, that we do not use in this example
Note: The second return is the name of the message definition in the VMD file that matches the current message.
Tip: The table of warnings from the third return can be useful to track problems with parsing messages. See Using the Warnings returned from hl7.parse{}.
In the annotation for the hl7.parse() function, you can display the structure of the parsed message. To do this, click the ADT link:

The segments of the parsed message appear in a popup window:
Each of these segments can be expanded to display its fields.
Note: For a detailed explanation of what annotations are and how they work, see Working With Annotations.
About db.tables():
MapData() also calls the db.tables() function, which is another built-in Iguana function:

db.tables() creates an empty record table node tree, which can be used as a parameter for conn:merge{}.- vmd, which is the VMD file containing the table definitions matching your database
- name, which is the name of the message type that was returned by
hl7.parse()
It has one return value:
- This return is an empty record table node tree (derived from the supplied VMD), which is loaded into the
Outvariable
Once the HL7 message has been mapped, we will use Out and conn:merge{} to merge the data into our database.
Next Step?
Now you understand the purpose of the MapData() function. Next we will examine how to filter out unknown messages using the FilterMessage() function.
Mapping: MapData() filtering [top]
MapData() uses FilterMessage() to filter our unknown messages. The call to FilterMessage() detects when unknown messages are sent through the Iguana channel.
Note: You can also filter on other criteria in the HL7 header (MSH segment), i.e., you could filter out messages from certain hospitals.
Before You Start
The demo.vmd file contains a default message definition, Catchall, which matches all messages that are not Lab or ADT messages.
This is a screenshot of the Catchall message in Chameleon. See understanding VMD files for more information.

Note: If we want to process another type of message (ORM for example), then we can add a new message definition to the VMD.
How It Works
We don’t want to process unknown (“Catchall”) messages. When MapData() finds a Catchall message it filters it out and returns nil to main() which prevents the message from being processed.
- Call
FilterMessage()to check for Catchall (unknown) messages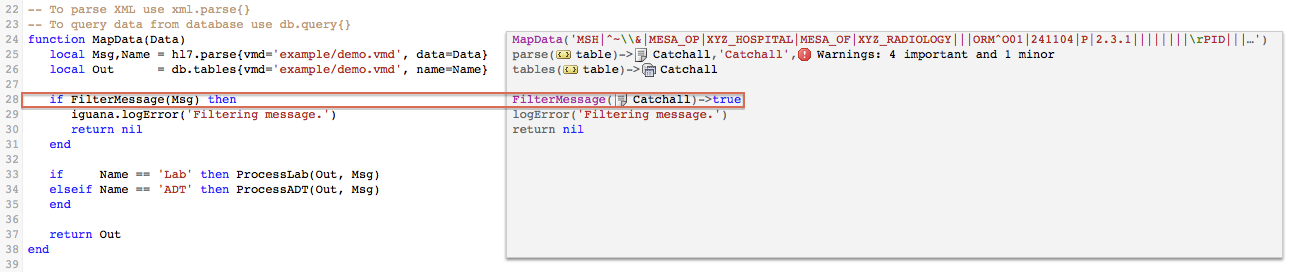
- When
FilterMessage()finds a Catchall message- It calls
ReportFilter()to log an error message “Unexpected message type.”Note: Two messages are logged for Each Catchall message as
MapData()also logs an error. FilterMessage()then returns true toMapData()

Tip: You might wonder why we don’t simply filter on the
Namereturned fromhl7.parse{}, given that that this would make the code simpler (and we are always espousing minimalism and simpler code)UsingNamelike this instead ofMsgwould look like this:

The reason is simple but subtle: Using theMsgis more versatile, we can filter on any information in the MSH segment, i.e., you could filter out test messages from “iNTERFACEWARE”.

- It calls
- When
MapData()identifies a Catchall message (true returned fromFilterMessage())- It logs an error “Filtering message.”
Note: Two messages are logged for Each Catchall message as
ReportFilter()also logs an error. - Then it returns nil to
main()to indicate there is no valid message to process
- It logs an error “Filtering message.”
- The
main()function only processes valid messages, so when it receives a nil return fromMapData()it does nothing.
- Finally if a valid message is found then
MapData()calls a function to map the data- For Lab message the
ProcessLab()function is called - For ADT messages the
ProcessADT()function is called

- For Lab message the
Next Step?
Now you understand how the MapData() filters unknown messages. Since the sample data for this tutorial is matched by ADT, the script next calls ProcessADT(), therefore the the next thing we look at will be the ProcessADT() function.
Mapping: ADT Messages [top]
In this script, ProcessADT() is the function that handles the processing of incoming ADT messages.
It looks like this:

ProcessADT() is passed two variables:
Out, which is an empty record table node tree that will be used to store the message dataMsg, which contains the message data to be mapped into theOutvariable
ProcessADT() calls three functions, each of which handles a specific mapping task:
MapPatient(), which maps patient data from the incoming message’s PID segmentMapWeight(), which maps the patient’s weight from the incoming message’s OBX segmentMapNextOfKin(), which maps the patient’s next of kin information from the incoming message’s NK1 segments
The details of these functions are described in the next three pages.
Note: The for statement ensures that each of the next of kin is mapped:

Note: #Msg.NK1 is the number of NK1 segments defined in the incoming message.
For more information on how for statements work in Lua, see Conditional Statements and Loops.
Next Step?
Now you understand the structure of the ProcessADT() function. Next we will look at how MapPatient() is used to map the patient data.
Mapping: PID Data [top]
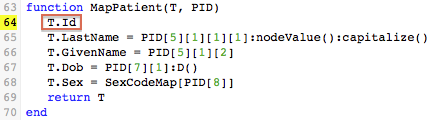
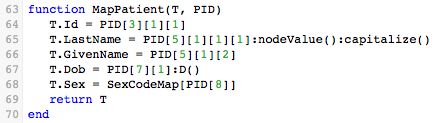
The MapPatient() function handles the mapping of data from the PID segment.
It looks like this:

This function maps data from the message’s PID segment to a database table row, represented by the table node tree variable T.
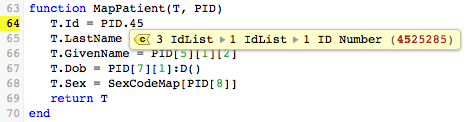
For example, this statement takes the third field of the PID segment, locates its first sub-field, locates that sub-field’s first sub-sub-field, and assigns that to the Id field of the database table T.

As you can see PID[3][1][1] is the Patient Id Number from the HL7 message:
One of the most useful features of the Iguana Translator is that it provides auto-completion capabilities that make it much easier to create statements such as the above. To show how auto-completion works, remove the above statement from the script, then start to type it in again.
When you type “T.“, the Iguana Translator displays a list of fields to choose from:
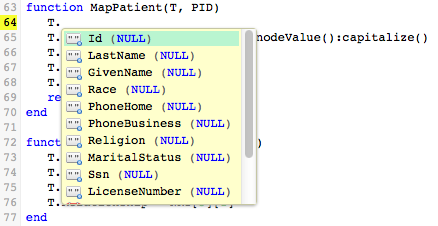
When you select Id, the code is automatically updated to include the T.Id field:
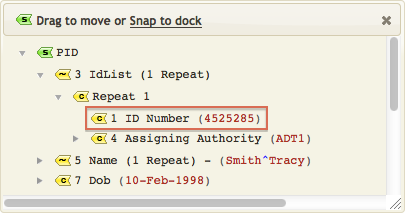
Now, if you continue typing “= PID[“, another list appears, for the fields that are defined in the PID segment. This list includes the values of the fields, as obtained from the sample data:
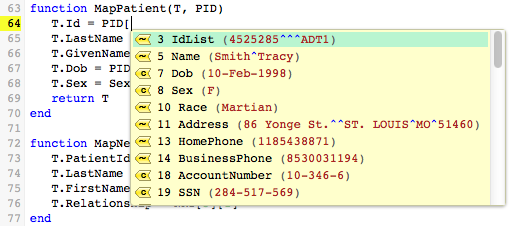
When you select field 3, Patient Identifier List, a list of the available sub-fields is displayed. In this case, there is only one sub-field. As before, the value of this sub-field is displayed:
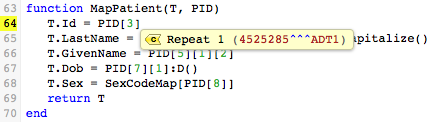
When you select Repeat 1, yet another list appears, this time of the sub-sub-fields defined for sub-field 1 of PID field 3:
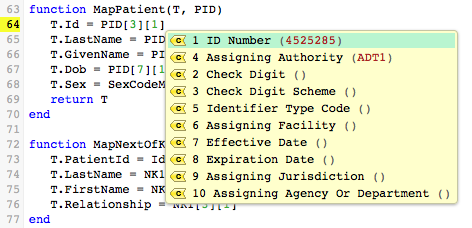
From this list, you can see that the sample data contains values for sub-sub-fields 1 and 4. When you select sub-sub-field 1, ID Number, the mapping statement is complete:
As you can see this is an exact reconstruction of the statement that you originally removed. The Iguana Translator allows you to recreate this statement without having to know how the PID segment is structured. And, if a field or sub-field of the PID segment has a value defined in the sample data, this value is displayed as part of the list from which you are choosing. This makes it easier to determine what fields need to be mapped.
Note: If you know the your sample data values you can use deep auto-completion (see bottom of page) by just typing in “.data“, and choosing the correct field in a single step (instead of the three steps needed above). This nifty technique can be a great time-saver.
In this case typing “45” (the first two digits of the ID Number) is enough to identify the desired field:
The rest of the mapping statements in MapPatient() perform similar mapping operations.
The statement that maps data to the LastName field uses two useful methods :nodeValue() and :capitalize():

To understand what this statement does, first note that the value contained in PID[5][1][1][1] is stored in the Iguana Translator’s internal storage format; this internal format is a node. The :nodeValue() function converts this node to a Lua string.
When the node is converted to a string, you can use functions from the stringutil module (included in this script) or the Lua string library to transform the value of a field. In this example, capitalize() is called (which is defined in the stringutil module). This converts the first character of the string to uppercase (capital) letters, and the rest of the string to lowercase (small) letters.
Note: In Lua, the statement T.LastName = PID[5][1][1][1]:S():capitalize() takes advantage of the Lua “OO style syntax”
This means that in Lua the following statements are equivalent:
List[i].functionName(List[i])
List[i]:functionName()
Which means that the following statements are equivalent:
-- easier way
T.LastName = PID[5][1][1][1]:S():capitalize()

-- more complicated way
local stringval = PID[5][1][1][1].S(PID[5][1][1][1])
T.LastName = stringval.capitalize(stringval)
As you can see, using Lua’s : syntax feature makes it easier to write statements that transform data.
The statement that maps date of birth uses a date formatting function :D():

This statement takes the value stored in PID[7][1], in the Iguana Translator’s internal node format, and uses the node.D() function (included in the dateparse module) to convert the date and time to the date-time format that the database is expecting.
Finally, this statement takes the value stored in PID[8] and uses the SexCodeMap table to convert it.

This map is defined in the script:
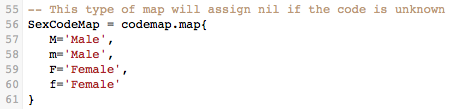
If PID[8] contains M or m, it is converted to Male. Similarly, F and f are converted to Female.
Next Step?
Now you understand how MapPatient() maps the PID segment data. Next we will look at how MapNextOfKin() is used to map the data for next of kin.
Mapping: Next Of Kin [top]
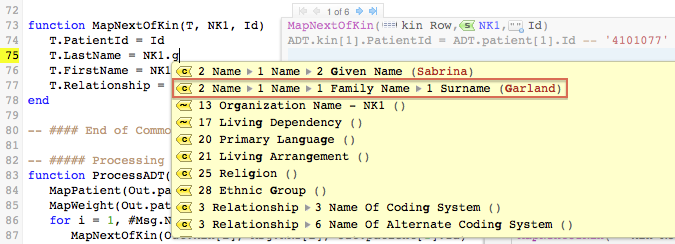
The MapNextOfKin() function uses the techniques that you have seen used in MapPatient() to map next of kin data from an NK1 segment to a next-of-kin row in the database table.
It looks like this:


And if you know your sample values, don’t forget to use the magically quick deep auto-completion (see bottom of page) feature.
Simply typing “.g” for Garland brings up a list where you can choose the correct field with one click.
Since MapNextOfKin() is called more than once in this script, the annotation to the right of the code for this function enables you to select which of the next of kin to display. To select a next of kin, position your cursor at the top left of the annotation, and use the arrow buttons to move through the list of next of kin.

Note: These arrow buttons are provided in an annotation whenever the adjacent script code is used to process repeating fields, groups of fields, database result rows, or any set of multiple items.
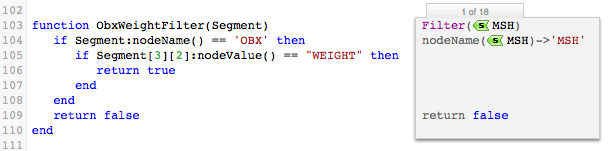
For example, the function ObxWeightFilter() is called once for each segment in the message. You can use the Arrow buttons to navigate through these calls.
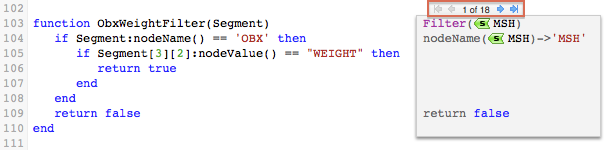
Note: The ObxWeightFilter() is covered on the next page.
Next Step?
Now you understand how MapNextOfKin() works its mapping magic. Next we will look at how MapWeight() is used to map weight information.
Mapping: Weight [top]
When processing HL7 (or other) messages, we often need to be retrieve data from several message segments. For example, to obtain patient information, you may need to access both the PID segment and one or more OBX segments.
This is the type of problem where the power of the Iguana Translator really comes into its own. The Translator allows you to search through all the segments and fields in a message. This makes it easy to obtain the data that you need.
MapWeight() is an example of a function that searches through the fields of an incoming message.
It looks like this:

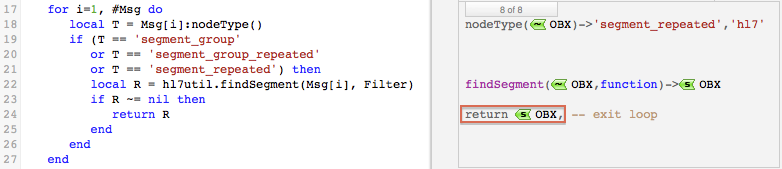
In this tutorial the incoming ADT messages may contain any number of OBX segments, any one of which could contain patient weight information. To determine if weight information is included in a segment, MapWeight calls the function hl7util.findSegment().

The second parameter passed to hl7util.findSegment(), ObxWeightFilter, is itself a function that checks whether a segment is an OBX segment that contains a WEIGHT field.
Note: In Lua, functions are values and they behave like any other value. Because of this they can be passed as parameters to other functions, or assigned to variables.
Using the search function as a parameter allowed us to write a flexible, generic search function. To implement a new search, all you need to do is create a new search function with the appropriate criteria and pass it to hl7util.findSegment().
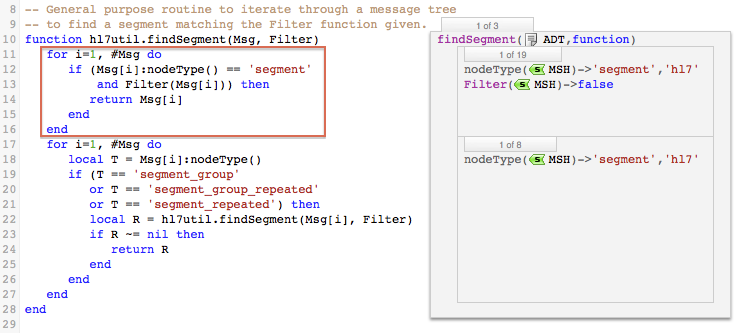
hl7util.findSegment() iterates through the Msg it receives and uses the ObxWeightFilter() function to check whether each segment matches the search criteria. The first segment that matches those criteria is returned; if no matching segment is found nothing is returned.
In this case a matching OBX segment is found:

As you can see, this segment contains the weight information that the script is looking for. The Iguana Translator was able to locate this information even though multiple OBX segments were defined in the incoming message.
The next section is optional reading. It explains how the hl7util.findSegment() function actually works, so feel free to skip to the end of the page, unless you are interested.
The first part of this function examines all the elements in the HL7 node tree (generated from the incoming message by hl7.parse()). If an element is a segment, the Filter function (ObxWeightFilter()) is called. If an OBX segment that contains weight information is found, then it is returned to MapWeight().
MapWeight() then maps the patient’s weight from the returned OBX segment into the T.Weight field.

The second part of hl7util.findSegment() handles incoming messages that contain segment groups or repeated segments. If either of these exist, hl7util.findSegment() is called once for each of the segments in the group.
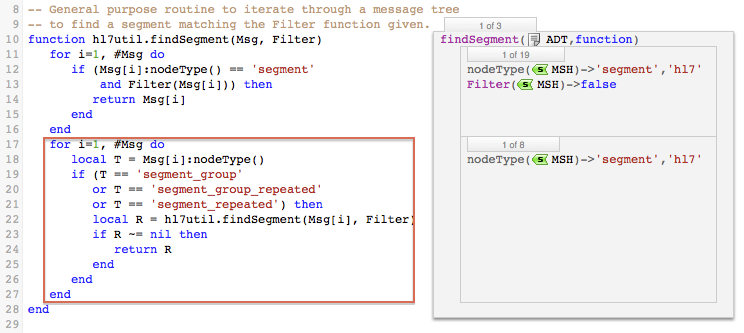
Note: The recursive calls to hl7util.findSegment() are used to iterate through the levels of the table node tree.
In this example, the OBX segments are repeated segments. Eventually, hl7util.findSegment() is called for the OBX segment that contains the weight information.
Next Step?
Now you understand how how MapWeight() is used to map the weight information. Next we will look at how ProcessLab() is used to process Lab messages.
Mapping: Lab Messages [top]
Processing a Lab message is very simple. In this example we are only going to process the Patient information, if it exists.
Note: In a real application we would probably want to process the Lab info as well, but we chose to keep it simple for the tutorial.
ProcessLab() looks like this:

If you have a Lab message without patient data then there is nothing to process:

Note: We should probably not have a Lab message without a patient, so we could add an else statement to handle it.
As a quick thought exercise, what would we need to do to process the Lab information?
Pretty simple really:
- Create a new mapping function
MapLab()for the Lab information, you will find that theOutvariable (Lab table node tree) does not include anywhere to map Lab data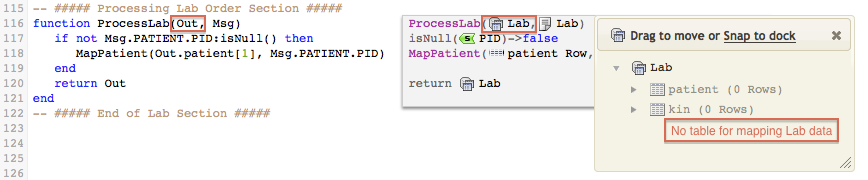
Assuming that our database has a table called Lab, we need to add this to the Lab structure - Update the VMD file to include a definition for the Lab table, when this is done you should see something like this:

Next Step?
Now you understand how ProcessLab() is used to process Lab messages. At this point all of the mapping operations have been performed, so we will move on to to inserting data into the database. The next step is to examine how we populate the table node tree that contains the data to be inserted into the database.
Populate the Database [top]
The previous section, Understanding the Mapping Script, showed how the mapping script extracted patient data from an ADT message and loaded it into the table node tree. This section also showed how annotations, located next to the code, enabled you to determine what values would be mapped from a sample message into the tables in the tree.
The annotations can also be used to display the contents of the table node tree that you are creating (to merge into the database).
To see how annotations work with node tree tables, take a look at the annotation located next to the call to db.tables(). An ADT link is included in this annotation:

When you click this ADT link, a popup window appears, displaying the table node tree that you are creating:

As you can see, these tables are empty, as no data has been mapped to them. To view the fields of these empty tables, click the Show Empty Nodes button at the top of the Iguana Translator screen:
The popup window is then updated to display the tables that have been created:
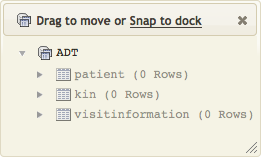
In this example, three tables have been created: a table for patient data, a table for next-of-kin data and a table for visit information.
Note: The tables to be created are specified by the VMD file that is passed to db.tables() when it is called. In this example, this VMD file is the demo.vmd (from the example directory under the Iguana install directory).
In the mapping script, the variable Out stores the table node tree. These table trees are passed to the ProcessLab() and ProcessADT() functions that parse the incoming messages. The rows of the tables are then passed to the functions that perform the actual mapping. For example, examine the ProcessADT() function that parses incoming ADT messages:

There is only one patient with one weight, so only a single row is passed to the MapPatient() and MapWeight() mapping functions. A patient can have many kin so a for loop is used to process them, and to pass multiple table rows to the MapNextOfKin() mapping function.
There is an ADT link in the annotation next to the return Out statement:

Click the ADT link to see the data that has been mapped:
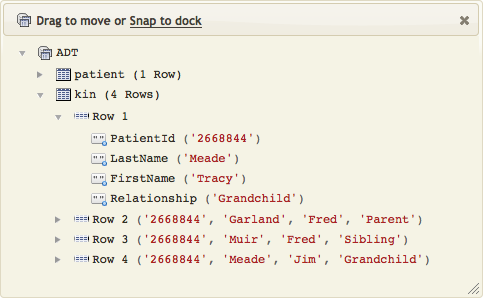
Note: Click the arrows next to each row to show or hide details.
This makes it very easy to confirm that you have loaded the correct data into the table node tree.
Next Step?
Once you have determined that your data is correct, then the next step is to merge the node tree tables into your existing database.
Merge the Database Tables [top]
To merge the data into our database we will use the conn:merge() function, which is provided with the Iguana Translator.
Before You Start
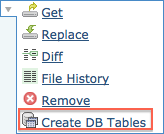
If your database does not contain the necessary tables, you can generate them from within the Iguana Translator. To do this:
- In the Project Files panel hover your cursor over the arrow next to the VMD file. A popup menu appears:

- Select Create DB Tables.
The Export Tables screen appears:
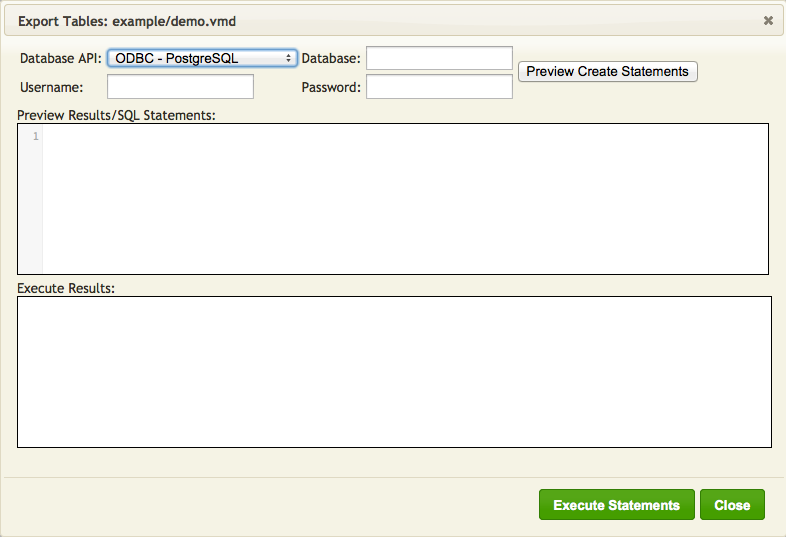
- Fill in the fields to match the picture below:
Note: If you want to use a different database, then these fields must match the parameters you provided in the call to
db.connect()- From the Database API list box, select the database to use
- In the Database field, type the name of the database
- In the Username field, type the username to use when accessing the database
- In the Password field, type the password to use when accessing the database
- Click Preview Create Statements. The SQL statements that will be executed are displayed in the Preview Results/SQL Statements panel:
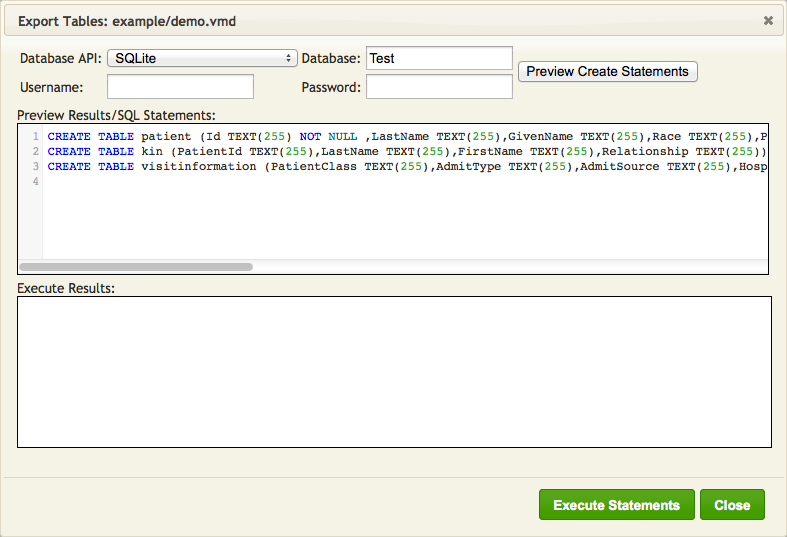
Note: Username and Password are not used by SQLite (you can supply them but they will just be ignored).
- Examine these statements. If they are correct, click Execute Statements. The results of the executed statements are displayed in the Execute Results panel:
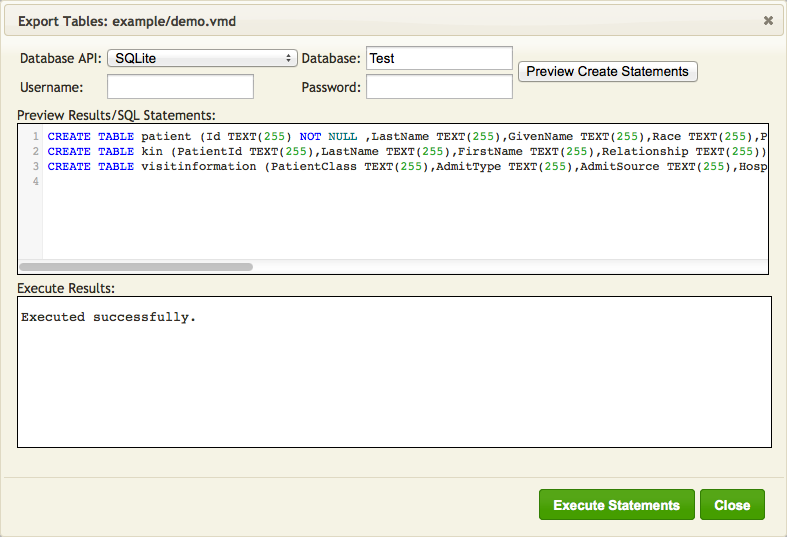
- Click Close to close this window.
How it Works
We use the conn:merge() function to merge the data T (in the table node tree) into our database.
Here is an example of a call to conn:merge():
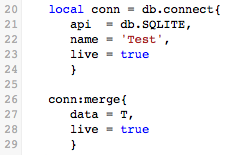
We are using SQLite because it is plug and play, so you can paste in the sample code and it will just work.
Note: You can also connect to a different database if you wish.
The merge process is composed of two parts:
- You create a database connection object using
db.connect(). - You merge the data using the
conn:merge()method of the connection object you created.
The following list show the parameters for db.connect():
| Key | Required | Description |
|---|---|---|
| api | Yes | The database type. Valid values are db.MY_SQL, db.ORACLE_OCI, db.ORACLE_ODBC, db.SQLITE, db.SQL_SERVER, db.POSTGRES, db.DB2, db.INFORMIX, db.INTERBASE, db.FILEMAKER, db.SYBASE_ASA and db.SYBASE_ASE, db.ACCESS. |
| name | Yes | The name or address of the database (for example, test@localhost). |
| user | Yes | The username to use when accessing the database (neither required or used for SQLite) |
| password | Yes | The password to use when accessing the database (neither required or used for SQLite) |
| live | No | if true, the connection is opened in the editor (defaults to true) |
| use_unicode | No | If true, Unicode will be used when communicating with the database |
| timeout | No | Maximum time in seconds allowed for the query (0 for infinite) Note: Timeout is supported only for ODBC based connections and defaults to 5 minutes |
The following list show the parameters for conn:merge():
| Key | Required | Description |
|---|---|---|
| data | Yes | et to a node table tree created using db.tables() |
| bulk_insert | No | set to true to use bulk insert logic |
| transaction | No | set to false to disable inserting/updating all rows as a transaction |
| live | No | if true, the connection is opened in the editor (defaults to true) |
In the script, you can add the call to conn:merge() anywhere after the Out table node tree have been populated.
For example, you can add it as the last statement in the main() function:
Note: we also added db.connect() above main().
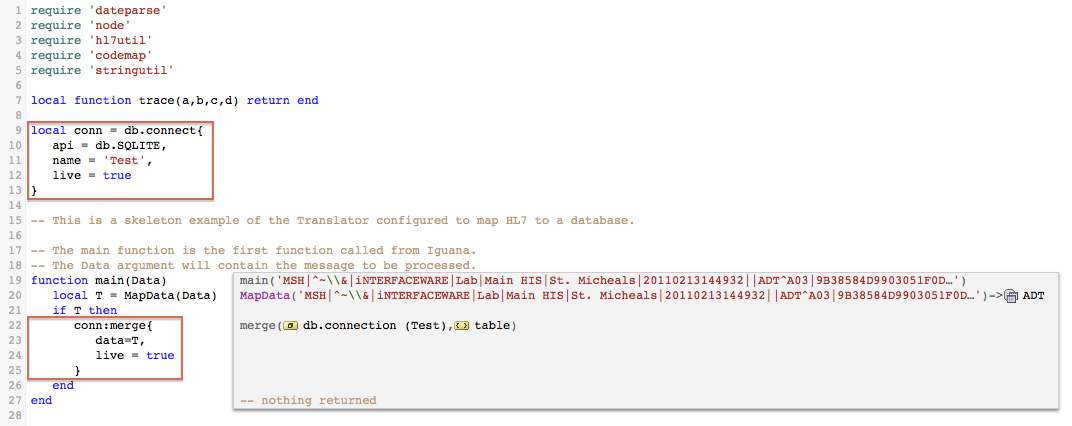
Sample Code
Simply replace the first 22 lines of code (up to and including the end of the main() function), with the code below.
require 'dateparse'
require 'node'
require 'hl7util'
require 'codemap'
require 'stringutil'

local function trace(a,b,c,d) return end

local conn = db.connect{
   api = db.SQLITE,
   name = 'Test',
   live = true
}

-- This is a skeleton example of the Translator configured to map HL7 to a database.

-- The main function is the first function called from Iguana.
-- The Data argument will contain the message to be processed.
function main(Data)
   local T = MapData(Data)
   if T then
      conn:merge{
         data=T,
         live = true
      }
   end
end
Next Step?
Once you have added the call to conn:merge to the script, and have created the tables in the database (if necessary), the next step is to save the script as a commit.
Save a Channel Commit [top]
The Iguana Translator enables you to save the current version of the script as a commit. Saved commits can then be restored or used at a later date. This enables you to make changes to your script safely, as you can always roll back to an earlier commit if needed.
Next Step?
Once you have saved a commit, the last step is to run the channel to ensure that the mapping script works as intended.
Test the Channel [top]
When you have completed the mapping script and have set up the database tables, the final step is to test the channel to ensure that data is being processed properly.
To test the channel:
- From the Dashboard click the Start button for your channel. The status indicator should turn green.
- Hover your cursor over the LLP icon in the Type column. This displays information about the source component, including the port that it is using:

Make a note of this port number. - Open the HL7 Simulator. On Windows, you can do this by clicking the Windows Start button, then selecting All Programs, iNTERFACEWARE, HL7 Analytical Tools, and HL7 Simulator.The HL7 Simulator window appears:

Note: If you are using a Mac then you can run the Simulator in Parallels (using a Windows VM) and replace “localhost” in the Host field with the IP Address of your Mac. Using a VM on a Linux box should work in much the same way.
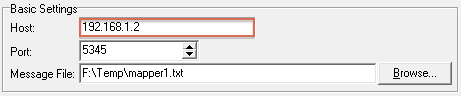
- In the Port field, specify the port through which to send the test message. This is the port number from step 2.
- In the Message File field, browse for or type the location of the test messages that you want to send. For this tutorial you can download mapper1.txt and use the single message it contains.
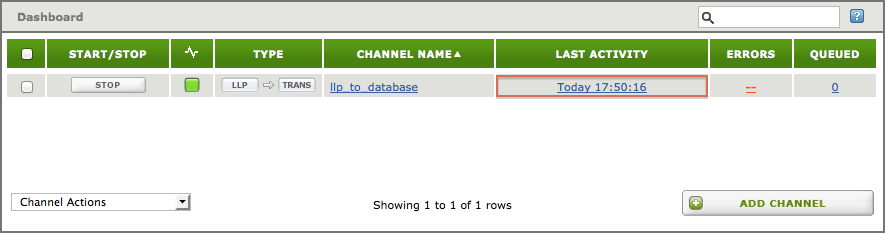
- Click Start. The Last Activity column in the Dashboard should indicate that the channel has been recently active:
- Check your database tables to see whether the data was successfully loaded.
- In the HL7 Simulator, click Stop to stop the simulation.
- In the Dashboard, click Stop to stop the channel.
Now you know how to use Iguana Translator to send data from an LLP connection to a database. You can also use the Iguana Translator to perform a variety of other mapping operations.
What’s Next?
- For more details on how to use the Iguana Translator, see the Translator section
- You may also want to look at the Database to HL7 Tutorial
- See our other interface tutorials (Iguana 5 documentation) in this section
- See our general tutorials (Iguana 5 documentation) section
- If you have specific questions try using the wiki search box, as we have many helpful examples and tips
If you need further help you can also contact support at support@interfaceware.com.