- Introduction
- Import the channel from the repository
- Customizing the comprehensive CDA document
- Create a minimal CDA document
- Review the minimal CDA document
- Create a blank CDA document
- Populate the CDA header
- Add an ‘author’ element
- Add a ‘patient’ element
- Add a ‘custodian’ element
- Add the CDA body
- Populate the CDA body
- Review the final document
- Customize the CDA header template
- Create a new “set” or “add” function
- Review what you’ve learned
- More Information
Introduction
Welcome! This article uses CDA API functions and a template to demonstrate our key techniques for creating a comprehensive CDA document. This channel creates a comprehensive CCD (continuity of care document) that contains all of the header and body elements that you are ever likely to need (you can add or remove elements if you need to).
The CCD (C32) is the most common CDA document, it is designed to provide a bird’s eye view of a patient’s most relevant healthcare data, covering one or more encounters.
First we will show you the complete CDA channel and explain briefly how to modify it to create your own customized CDA. If you feel comfortable with the approach you can safely ignore the rest of this article and set about modifying this channel to create your own CDA.
On the other hand if you find it too much to take in all at once (there is rather a lot of code), then we have you covered too! We will simplify the code to only create a “Minimal CDA”, i.e., the simplest possible CCD compliant document that only contains the minimum number of elements required to pass NIST validation. Then we briefly review the code and the minimal CDA document, and show you how to re-create it using our approach.
After working through this process you should be comfortable customizing the original channel to create your own CDA.
If you need more help feel free to contact us at support@interfaceware.com.
You may also wish to review the CDA Section for more information.
Note: This article assumes that you already have a working knowledge of CDA, XML, Lua, and the Iguana Translator.
NIST Validation
Throughout this tutorial, we will ask you to use an online compliance “checking” tool to test our evolving CDA document. This is a great habit to get into as you build your own CDA documents, to determine errors and identify any missing information.
Import the channel from the repository [top]
Step 1: Import the channel
- Import the CDA – Generate Document example from the builtin Iguana Protocols repository.
Step 1: Run the code
- Go to the Dashboard.
- Hover your mouse over the channel’s HTTPS source component and click on the URL Path hyperlink provided:

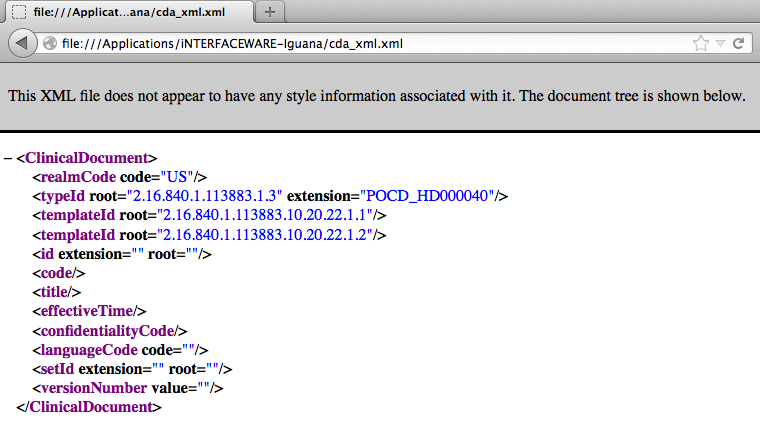
- This is the first few lines of the resulting CDA document is displayed in response to your web call:

- Save the WebViewLayout_CDA.xsl XSL stylesheet in the Iguana working directory
- Use a web browser to open the cda_web.xml document in the Iguana working directory, these are the first few lines of the same CDA document when formatted with the stylesheet:

Tip: There is no particular rule with regards to how you might use Iguana to trigger generating your finished CDA document. The example used in this article triggers it with a simple web service call.
You could just as easily save it to a file, or push it onto the Iguana queue, etc.
Customizing the comprehensive CDA document [top]
This channel creates a CDA document sample by hard-coding static values directly into the scripts. In a real-life scenario you will need to create most of this data dynamically, from incoming HL7 messages, from a database, or from a web service, etc. Though there will always be a certain amount of static data remaining.
You can easily automate this with a combination of common Iguana scripting techniques:
- Mapping incoming data: Add mapping functions to your scripts to pull and parse data from an external database, HL7 message etc
- Generating data: Add conditional and iterative statements to your functions to automatically generate incremental values, etc
- Manual entry: As with our tutorial, you might still have to manually add certain static data values directly into the code and/or template
How the code works:
- First we create an empty CDA using local
cda.new() - Then we fill out the CDA Header:
- We use the
FillHeader()function to fill the ClinicalDocument element - We use
addElement()to add the recordTarget element to the ClinicalDocument and and fill it using theFillPatient()function - Then we use
addElement()multiple times to add the remaining header elements to the ClinicalDocument, and matchingFill<element>()functions to fill them

- We use the
- Then we fill out the CDA body:
- We use
addElement()to add a component element to the ClinicalDocument - We use
addElement()to add a structuredBody element to that component - Then we use
addElement()multiple times to add component elements to the structuredBody, and matchingFill<element>()functions to fill them

- We use
- Notice that each of the
Fill<element>()functions is placed in its own local module, for example theFillHeader()function is in the fillheader.lua module:

This is how to customize the code:
- If you need to change the CDA header content then modify the
CdaSchemain the shared cda.lua module:- This template contains all the mandatory attributes for a CDA header
- You can change attribute values
- You can also add extra attributes if required

- Then we fill out the CDA Header:
- Modify the
FillHeader()function in the fillheader.lua module to fill the ClinicalDocument element using the information you require - Modify the
FillPatient()function to fill the recordTarget element using the information you require - Remove any elements you don’t need by removing the corresponding
addElement()andFill<element>()function calls - Add any new elements you need by creating the corresponding
addElement()andFill<element>()function calls
Note: You will also to create corresponding local module containing theFill<element>()function - Modify the remaining
addElement()and matchingFill<element>()functions to fill elements using the information you require
- Modify the
- Then we fill out the CDA body:
- Remove any components you don’t need by removing the corresponding
addElement()andFill<element>()function calls - Add any new components you need by creating the corresponding
addElement()andFill<element>()function calls
Note: You will also to create corresponding local module containing theFill<element>()function - Modify the remaining
addElement()and matchingFill<element>()functions to fill components using the information you require
- Remove any components you don’t need by removing the corresponding
Need help figuring this out? Feel free to contact us at support@interfaceware.com!
Note: Using local modules for the functions means the code runs much faster in the Editor than the CDA channel we created for Iguana 5, which used functions in the main module. The reason for the performance increase is that the overhead for annotations is greatly reduced.
Create a minimal CDA document [top]
First we then strip the code down to a CCD (C32) compliant document that includes only the minimum number of elements required to pass NIST validation. Then we will go through step and show you build the document from scratch.
Tip: After you finish working with the minimal CDA you will probably want to revert back to the initial commit for the original channel, or import the original channel again.
Simply replace the main() function with this code to create the minimal CDA:
function main(Data)
   local Doc = cda.new()
   local CD = Doc.ClinicalDocument

    -- CDA Header
   FillHeader(CD)
   local RT = CD:addElement('recordTarget')
   FillPatient(RT)
   local A = CD:addElement('author')
   FillAuthor(A)
   local C = CD:addElement('custodian')
   FillCustodian(C)

   -- CDA Body
   local Body = CD:addElement('component')
   local SB = Body:addElement('structuredBody')
   local COM = SB:addElement('component')
   FillEncounters(COM)
   COM = SB:addElement('component')
   FillProblemList(COM)

   trace(CD)
   net.http.respond{body=tostring(Doc)}

   -- TEST CODE: write CDA to file (in Iguana install dir)
   if iguana.isTest() then
      -- unformatted xml
      local f = io.open('cda_xml.xml','w+')
      f:write(tostring(Doc))
      f:close()
      -- formatted with xsl stylesheet
      f = io.open('cda_web.xml','w+')
      f:write('<?xml-stylesheet type="text/xsl" href="WebViewLayout_CDA.xsl"?>\n')
      f:write(tostring(Doc))
      f:close()
   end
end
Review the minimal CDA document [top]
At this point, we recommend that you return to the script and browse around. If it seems like a mountain of code, don’t panic! We are going to spend the rest of this tutorial re-creating this code so that you can get a much better idea of how our CDA process works. Soon you’ll be churning out CDA documents without a breaking a sweat!
Here are a few pointers:
- Take a look at the
main()function (in main module) - Notice how the
cda.new()is used to create the empty CDA document - Look at how we fill out the CDA Header and then the CDA Body
- The
net.http.respondcall sends the required HTTP response for the channel - Finally take a look at the test code at the end that writes out two report files to the Iguana working directory:
- cda_xml.xml – unformatted report file
- cda_web.xml – formatted report file
Note: To format the report you will also need the WebViewLayout_CDA.xsl XSL stylesheet in the Iguana working directory
- To view the formatted version, browse to the Iguana working directory and open the cda_web.xml file in your browser:

Tip: You can easily adapt the test code to write report files elsewhere and then run the report from a shortcut or a browser bookmark.
Create a blank CDA document [top]
Now that you’ve had a chance to examine the final product, it’s your turn to create it! Let’s start from scratch by deleting almost all the code from the main script, and the corresponding Fill<element>() functions in the local modules. Once we have a clean slate, we will add some code that will create a brand new, empty CDA document.
Step 1: Delete the sample code
Let’s get rid of the code so we can practice building the CDA sample ourselves:
- Delete all the main.lua code listed after local
addElement = node.addElementon line 33 of the script:

Do not worry about the error that appears, we will fix this in the next step. - Add the
main()function back in:


Another error? Don’t worry, we will fix this shortly. - Delete code from the following modules:
- fillheader.lua – delete the
FillHeader()function - fillstakeholders.lua – delete the
FillAuthor()function
- fillheader.lua – delete the
Step 2: Create a new document
Let’s build a brand new CDA!
- Add the following code to the empty
main()function:

The first line of code creates a new, “blank” CDA document header with some predefined header metadata. The local variableDocnow holds a parsed tree structure that represents the XML document.In the second line, thenet.http.respondcall sends the required HTTP response for our channel. This resolves that lingering error! - Save a commit to record your work.
Here are the resulting annotations:


Did you know? The header structure that we’ve just created is based on templates stored in the CDA API’s ‘cda’ module. Click on the cda.new() functions’ corresponding annotation to step into the module’s code and scroll to the top of the module to check out the template:


At the end of this tutorial, we’ll have a quick chat about how to tweak this template to suit your own CDA requirements.
Step 3: Review the results
Throughout this tutorial, we are going to regularly check the final results of our changes. To make this easy, we are going to add some code to the bottom of our main() function that will save our script’s resulting XML to two different external files: an unformatted file (“cda_xml.xml”), and one with an XSL stylesheet applied (“cda_web.xml”). This will allow you to use any browser to view the CDA document you are building (as either a nicely formatted CDA, or as raw XML).
- Save this XSL stylesheet to the Iguana working directory: WebViewLayout_CDA.xsl
- Copy and paste this code at the end of the
main()function:-- TEST CODE: write CDA to file (in Iguana install dir) if iguana.isTest() then -- unformatted xml local f = io.open('cda_xml.xml','w+') f:write(tostring(Doc)) f:close() -- formatted with xsl stylesheet f = io.open('cda_web.xml','w+') f:write('<?xml-stylesheet type="text/xsl" href="WebViewLayout_CDA.xsl"?>\n') f:write(tostring(Doc)) f:close() end - Save a commit to record your work.
- Want to see this in action? Browse to the Iguana working directory and open cda_web.xml. The following formatted version of the empty CDA should launch in your web browser:

- Using a web browser or a text editor, browse the Iguana working directory and open cda_xml.xml. The following unformatted XML appears:
Step 4: Test the results
Throughout this tutorial, we will ask you to verify our work using NIST’s online validation tool. We will walk you through the procedure here; however, in later steps, we will assume that you are comfortable with the process.
- Browse to the NIST website’s Validation Tool.
Tip: If the NIST site is unavailable you can also use the Lantana validation tool
- Following the instructions NIST provides, browse to the Iguana working directory and select the unformatted XML file that we produced in the previous step.
- Complete the form using the following selections (marked in red):
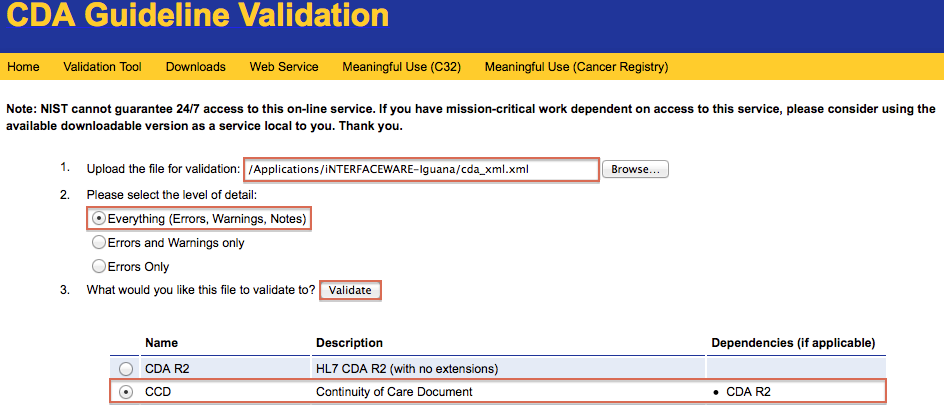
- Click the Validate button. The following results should appear:
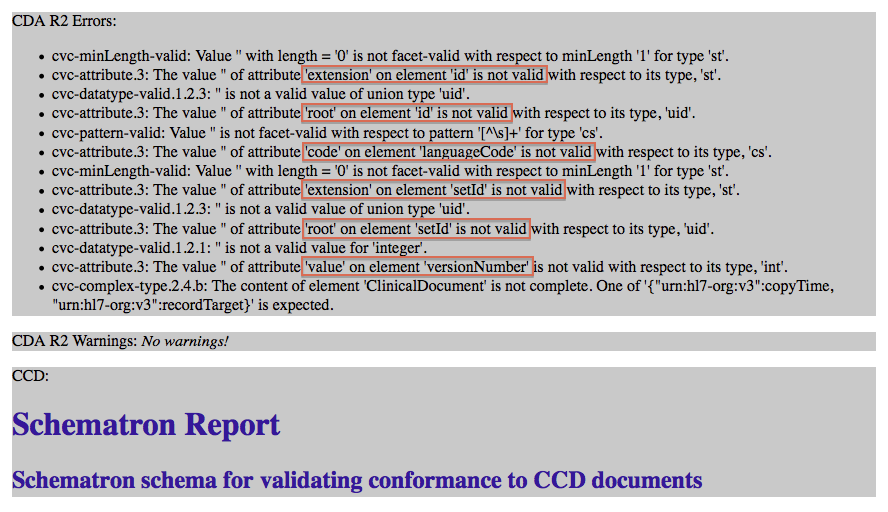
As you can see above, the validation has failed because we are still missing five required values in our header.
Populate the CDA header [top]
Although our CDA template contains all the mandatory attributes for a CDA header, the user-specific attributes and elements have been left blank:

We need to fill these elements/attributes with the appropriate data.
For the purposes of this tutorial, we are going to break this process down into several steps below:
- Create a new
FillHeader()function, in the local fillheader.lua module. - Add code to fill in the empty header attributes.
- Add code to fill in the empty header elements.
- Review
FillHeader()results.
Create a new FillHeader() function
In this step, we will create a function called FillHeader() that will eventually be responsible for filling in all our missing header information. Correctly building this type of “fill” function is at the core of our CDA process, so we will walk through it carefully.
- To create the new
FillHeader()function, add the following lines in the fillheader.lua module:

- To execute the new function, add the following lines to the
main()function:

What’s with the local variable? We assigned the ‘Doc.ClinicalDocument’ element to the CD variable because this will make our code more concise whenever we call a “fill” function like FillHeader().
Here are copy-and-paste versions of FillHeader() and main(), should you need them:
local setText = node.setText -- Fill out empty attributes/elements in the header -- all the values here are customer specific, you will -- need to customise them to suit your requirements function FillHeader(CD) return CD end
function main()
local Doc = cda.new()
local CD = Doc.ClinicalDocument
-- CDA Header
FillHeader(CD)
net.http.respond{body=tostring(Doc)}
   -- TEST CODE: write CDA to file (in Iguana install dir)
   if iguana.isTest() then
      -- unformatted xml
      local f = io.open('cda_xml.xml','w+')
      f:write(tostring(Doc))
      f:close()
      -- formatted with xsl stylesheet
      f = io.open('cda_web.xml','w+')
      f:write('<?xml-stylesheet type="text/xsl" href="WebViewLayout_CDA.xsl"?>\n')
      f:write(tostring(Doc))
      f:close()
   end
end
Add code to fill in the empty header attributes
So far, we have an empty FillHeader() function. Let’s start building it up by adding code that will populate in our empty header attributes.
About Order
Before we start, let’s review an important concept: CDA elements and attributes are order sensitive. If we mess up the order, our resulting CDA document will fail NIST validation. That said, because these particular header fields already exist in the correct order (thanks to our underlying header template), we are able to populate them in any order we like. Understanding this concept will be particularly important later on in the tutorial, when we start adding new elements to our existing CDA structure. When we add new elements, they must be always be added in the correct order or our document will fail.
About Mapping
As we mentioned at the beginning of this tutorial, we are going to populate our CDA document by manually entering the data directly into the code. In most real-life scenarios, you will want to automate some of this process (or else you will be stuck hard-coding data for every patient/event and every different CDA document). To assist you with this, we are going to start including a handy table that lists not only the values required for the associated exercise, but how to fill out similar data automatically.
For example, this table lists the attributes we are about to update manually in our exercise below. We used the third column to provide tips on how you might perform this automatically:
| Attribute | Tutorial Data | Alternative Method |
|---|---|---|
| id.root | hard-coded string: ‘2.16.840.1.113883.19.5.99999.2’ | change/map/generate value |
| id.extension | hard-coded string: ‘TT998’ | map/generate value |
| setId.root | hard-coded string: ‘2.16.840.1.113883.19.7’ | change/map/generate value (optional attribute) |
| setId.extension | hard-coded string: ‘BB35’ | probably mapped or generated (optional attribute) |
| versionNumber.value | hard-coded number: 2 | change/map/generate value (optional attribute) |
| languageCode.code | lookup description: ‘English – US’, returns code: ‘en-US’ | change/map/generate description |
Look for this useful information throughout the tutorial!
Adding Code
Ready? Let’s start adding code the FillHeader() that will fill in the following empty attributes:

As you can see in the steps below, we recommend that you take advantage of Iguana’s auto-completion feature as it will make this process much faster and easier!
- Let’s tackle the missing ‘id’ attributes first. Start by typing “CD”, then use auto-completion to find the desired attributes:

- Manually enter the following values for the two ‘id’ attributes:
- id.root = ‘2.16.840.1.113883.19.5.99999.2’
- id.extension = ‘TT998’
- Follow the same simple process for the other hard-coded attributes, assigning the following values:
- setID.extension = ‘TT998’
- setID.root = ‘2.16.840.1.113883.19.7’
- setID.extension = ‘BB35’
- versionNumber.value = 2
- Now let’s finish up by adding code for the last missing attribute, ‘languageCode’. Instead of manually entering this value, we are going to use one of the CDA API’s functions to look up the appropriate value. Start by typing “CD” and using auto-completion to build the following line of code:

- Using auto-completion to apply the correct syntax, we are going to call the ‘cda.codeset’ module and apply the appropriate lookup table. In this case, we want the value for ‘English – US’:

- As you can see in the annotations, the correct code is returned:

We’ll go into more detail about the CDA API’s useful lookup feature on the next page in the tutorial. - Save a commit to record your work.
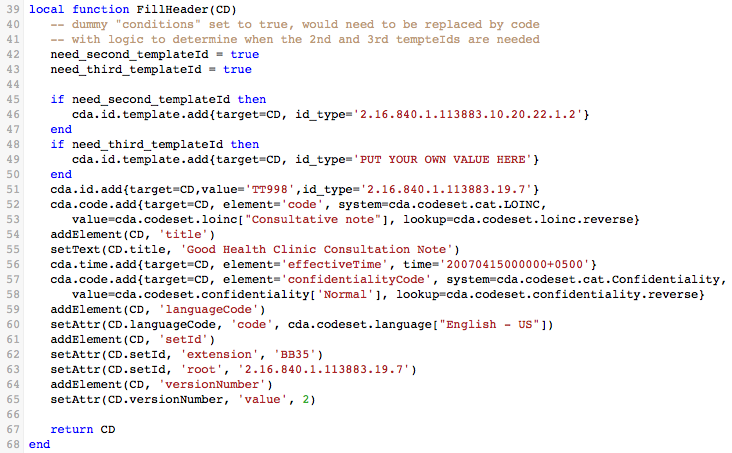
Finished! Your FillHeader() function should look like this:

As you can see in the accompanying annotations, the missing header attributes are now populated:

Here is a copy-and-paste version of the FillHeader() function so far, should you need it:
-- Fill out some root elements in the document
-- all the values here are customer specific, you will
-- need to customise them to suit your requirements

local function FillHeader(CD)
   -- set the attributes
   CD.id.root = '2.16.840.1.113883.19.5.99999.2'
   CD.id.extension = 'TT998'
   CD.setId.root = '2.16.840.1.113883.19.7'
   CD.setId.extension = 'BB35'
   CD.versionNumber.value = 2
   CD.languageCode.code = cda.codeset.language['English - US']

   return CD
end
Add code to fill in the empty header elements
Let’s keep building up the FillHeader() function with code that will populate our header’s empty elements.
About “Shortcuts”
Before we dive in, let’s take a step back and review another useful technique: using local variables to create function “shortcuts”.
In general, there are two ways to call a function: using Lua Object-Oriented (OO) style syntax, or using straight-up functional syntax. For example, we could apply something like the setText() function in two ways:
![]()
That said, we can improve performance considerably by storing our desired function in a local variable, then simply using that variable as a “shortcut” in the rest of our script:

Tip: Want to learn more about this technique? Check out “Lua Performance Tips” by Roberto Lerusalimschy for an explanation of why this practice is far more efficient.
Some useful shortcuts
For the purposes of this tutorial, we are going to show you a couple of local variable “shortcuts” that represent some regularly-used functions.
- There is a shortcut for the
addElement()function in the main module:

- There is a shortcut for the
setText()function in the fillheader.lua module that we were just working on:

Note: We will use the shortcut when we add the header data below - If you inspect the other modules you will see that they also have shortcuts, for example the fillallergies.lua module:

Add the missing data
Now we are ready fill in the following empty elements:

| Element | Tutorial Data | Alternative Method |
|---|---|---|
| title | string: ‘Good Health Clinic Consultation Note’ | substitute your own title or map/generate |
| effectiveTime | string: ‘20070415000000+0500’ | probably mapped or generated |
| code | lookup description: ‘Consultative note’, returns code: ‘11488-4’ | change/map/generate description |
| confidentialityCode | lookup description: ‘Normal’, returns code: ‘N’ | change/map/generate description |
- Let’s start by populating the ‘title’ element. Because it is a text element, we will use the CDA API’s ‘cda.xml’ module. Among other useful features, this module includes the
node.setText()function. We’ve already created a shortcut for this function, so simply start typing “setText” and let auto-completion guide you through the rest:

Here is the completed function:

Warning: When setting an element that only contains text, always use the
setText()function as it encodes special characters (e.g., <>&”) correctly. Do not usesetInner()because it does not encode special characters, and this will cause errors in the generated XML. You should only usesetInner()when you are setting a text element that contains either XML or HTML. - Let’s fill in the ‘effectiveTime’ element using the CDA API’s ‘cda.time’ module. Use auto-completion to check for available functions:

As you can see above, there is both an “add” and “set” option. Because the element already exists, we will use thecda.time.setfunction to fill it out. The time zone defaults to UTC (GMT), to change zone you just add an increment/decrement, e.g., +500 for EST.Here is the completed function:

Note: Our “set” functions are smart. They will fill all the attributes in the element and automatically create any missing attributes. For more information on the available “set” functions, check out our CDA API Guide.
Tip: Originally we used the dateparse module for fuzzy date matching to recognize various common date formats. But later it was removed for performance reasons (it increases processing time by about 50%). Please contact us at support@interfaceware.com if you want more information.
- Now we are ready to fill in the ‘code’ element using the CDA API’s ‘cda.code’ module. In this example, we want to use the LOINC “Consultative Note” code. Again, because we are updating an existing (albeit empty) element, we will choose the “set” option:

- Continue using auto-completion’s suggestions to assign the following values:
- target = CD.code
- system = LOINC
- value = “Consultative note”
- lookup = cda.codeset.loinc.reverse
- For ease of use, let’s split this code onto two lines so that its corresponding annotations won’t disappear off the screen. The final code should look like this:

Note: The order of the parameters does not matter. - Finally, let’s repeat the last few steps to complete the ‘confidentialityCode’ element. This is another CDA-specific code datatype, so once again we will use auto-completion and
cda.code.setto assign the following values:- target = CD.confidentialityCode
- system = Confidentiality
- value = ‘Normal’
- lookup = cda.codeset.confidentiality.reverse
- Split the long line of code into two manageable lines, resulting in the following:

Note: Once again the order of the parameters does not matter.
Finished! Now the FillHeader() function should look like this:

As you can see in the accompanying annotations, the missing elements are now filled in:

Here is a copy-and-paste version of the complete fillheader.lua module, should you need it:
local setText = node.setText
-- Fill out empty attributes/elements in the header
-- all the values here are customer specific, you will
-- need to customise them to suit your requirements

function FillHeader(CD)
   -- set the attributes
   CD.id.root = '2.16.840.1.113883.19.5.99999.2'
   CD.id.extension = 'TT998'
   CD.setId.root = '2.16.840.1.113883.19.7'
   CD.setId.extension = 'BB35'
   CD.versionNumber.value = 2
   CD.languageCode.code = cda.codeset.language["English - US"]

   -- set the elements
   setText(CD.title, 'Good Health Clinic Consultation Note')
   cda.time.set{target=CD.effectiveTime, time='20070415000000+0500'}
   cda.code.set{target=CD.code, system=cda.codeset.cat.LOINC,
      value=cda.codeset.loinc["Consultative note"], lookup=cda.codeset.loinc.reverse}
   cda.code.set{target=CD.confidentialityCode, system=cda.codeset.cat["HL7 Confidentiality"],
      value=cda.codeset.confidentiality['Normal'], lookup=cda.codeset.confidentiality.reverse}

   return CD
end
Reviewing “Lookup”
Before we go any further, let’s review some questions you might have about the lookup feature that several of the CDA API’s code-related modules implement:
Does the cda.code.set function really need to use a lookup table? Good question! Strictly speaking, we don’t need the ‘lookup’ parameter. Because we know the code system (‘system’) and the code description (‘value’), we actually have enough information to identify the lookup table. That said, the coding required to do this not trivial and, as it stands right now, we have not implemented this feature in our CDA API. We decided that passing the lookup table as the final parameter was an excellent compromise.
The ‘value’ parameter looks up the code using the ‘description’ parameter, and the ‘lookup’ parameter is a “lookup table”. How does that work? Yes it can be puzzling, but once you master this concept, you can repeat the same pattern for every code lookup you encounter!
In a nutshell:
- The ‘value’ parameter is simply a string containing the appropriate code value. For example, we used “11488-4” in this tutorial.
- The ‘lookup’ parameter contains the name of the table that we will use to identify the ‘description’ for the specified code.
In the original procedure, we used a lookup table to find the code simply because this is far more reliable than trying to remember codes like “11488-4” (particularly when you have the Iguana auto-completion to help you). As you can see in some sample code below, the value for displayName is the same in both cases:

So do all the “set” functions need a lookup parameter? No! A lookup parameter is only used with the four code-related “add” and “set” functions: cda.code.add, cda.code.set, cda.code.simple.add, and cda.code.simple.set.
How do I know which lookup table to use? The answer is simple! Every code table (cda.codeset.xxx) has a corresponding “.reverse” lookup table (cda.codeset.xxx.reverse). You can see these in the cda.codeset module:

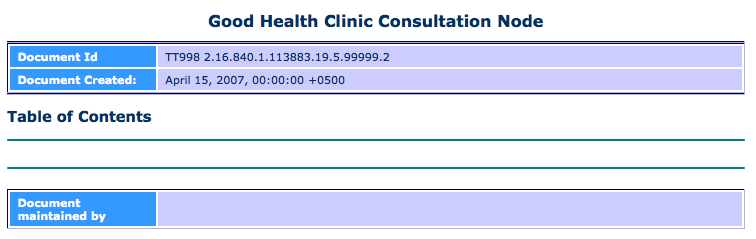
Review FillHeader() results
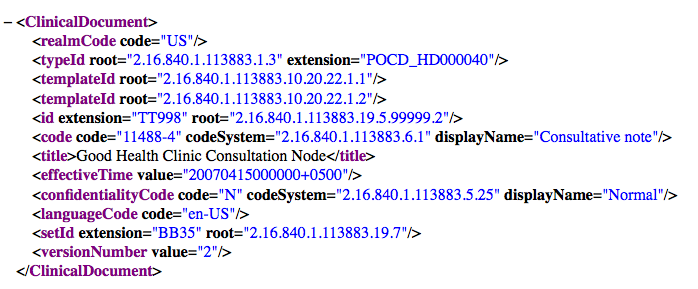
Let’s have a look at what we’ve created! Simply browse to the Iguana working directory and open the cda_web.xml file in your web browser. You should see something like this:
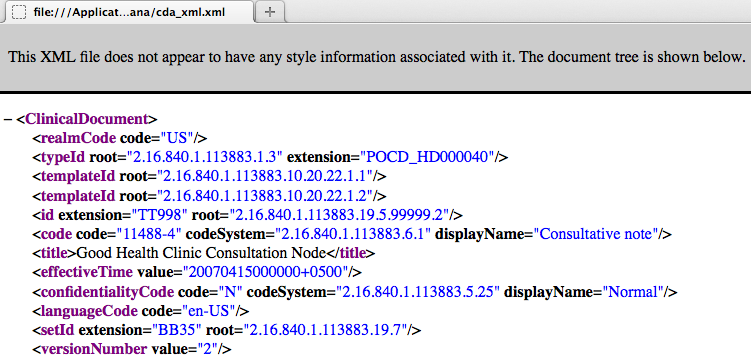
If you want to check out the raw XML (including the header’s new metadata), open the cda_xml.xml file:
Validate the CDA with NIST
Now that we have filled out our CDA header’s empty attributes and elements, let’s use the NIST Validation Tool (or the Lantana validation tool) to check the cda_xml.xml file for errors.
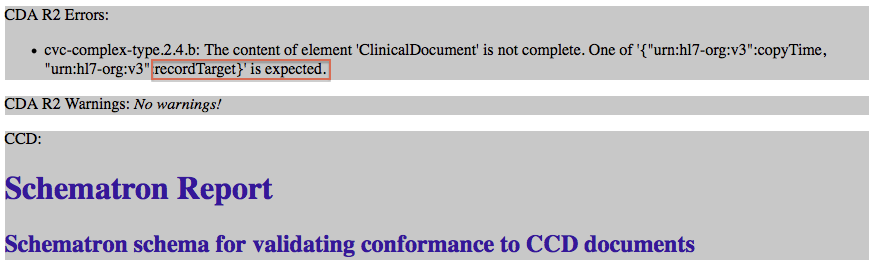
As expected, the previous errors about empty attributes/elements are all gone! However, the NIST report says that the patient element (‘recordTarget’) is missing:
Add an ‘author’ element [top]
For the last few steps, we’ve practiced using several “set” functions to populate elements/attributes that already exist in our CDA document’s header. Now we are going to start using “add” functions to create and append new elements to the header. For the purposes of this tutorial, we are going to start with the ‘author’ element as it is fairly simple.
About Order
Earlier, we explained that CDA elements/attributes are order sensitive. If the elements in your CDA document are in the wrong order, it will fail validation.
This was less of an issue when we were filling in elements/attributes that were already laid out correctly in our header’s structure. Now we are venturing into new territory: adding entirely new elements. From this point on, we must make sure that we add things in the correct order.
The observant reader may notice that we are about to break this rule! In real life, we need to append the ‘patient’ element before the ‘author’ element. For the purposes of this tutorial, we are going to do the easier element first. Have no fear, we will fix this deliberate mistake later.
Adding Code
To add author information to our header, we are going to create and append a new, empty element here:

Once we’ve added the empty node, we will create a new “fill” function called FillAuthor() and build up its code using several CDA API modules. This new function will populate our final ‘author’ element with the desired attributes/data.
Note: We will repeat this same pattern (adding an element, then creating/calling a related “fill” function) every time we add a new element to our CDA. What’s more, we will use exactly the same method for populating the CDA body!
Step 1: Create the new, empty element
Remember when we showed you several “shortcuts” to make our lives easier? Now we are going to use the ‘addElement’ shortcut in the main module to create, name, and append our new element:

- Add the following lines of code to the
main()function:

- Click on the
trace(CD)annotation to see the new, empty element appended at the end of our header:


Step 2: Create a “fill” function to populate the new element
As we did with FillHeader(), we are going to build a new function called FillAuthor(). This function, when executed, will fill in our ‘author’ element with the desired values:
- Add the following lines of code to fillstakeholders.lua local module:

- Add the following line of code in the
main()function:

In themain()function, we could have used the following line of code instead:

This is an equivalent statement, but less concise – in the end comes to your programming style.
Step 3: Add code to FillAuthor()
Now we are ready to build up the FillAuthor() function! As we did with FillHeader(), we are going to leverage the CDA API’s various modules and functions to add the desired data:
| Sub-Element/Attribute | Tutorial Data | Alternative Method |
|---|---|---|
| time | hard coded string: ‘20070415000000+0500’ | mapped or generated |
| assignedAuthor.id.extension | hard coded string: ‘99999999’ | change/map/generate value |
| assignedAuthor.id.root | lookup description: ‘National Provider Identifier’, returns code: ‘2.16.840.1.113883.4.6‘ | change/map/generate value |
| assignedAuthor.code.code | lookup description: ‘Allopathic & Osteopathic Physicians’, returns code: ‘200000000X‘ | change/map/generate value |
| assignedAuthor.code.codeSystem | lookup description: ‘Provider Codes’, returns code: ‘2.16.840.1.113883.6.101‘ | change/map/generate value |
| assignedAuthor.code.displayName | reverse-lookup code: ‘2.16.840.1.113883.6.101‘, returns description:‘Provider Codes’ | change/map/generate value |
| assignedAuthor.address.streetAddressLine | hard coded string: ‘1002 Healthcare Drive’ | change/map/generate value |
| assignedAuthor.address.city | hard coded string: ‘Portland’ | change/map/generate value |
| assignedAuthor.address.state | hard coded string: ‘OR’ | change/map/generate value |
| assignedAuthor.address.postalCode | hard coded string: ‘99123’ | change/map/generate value |
| assignedAuthor.address.country | hard coded string: ‘US’ | change/map/generate value |
| assignedAuthor.telecom.use | lookup description: ‘Work’, returns code: ‘WP‘ | change/map/generate value |
| assignedAuthor.telecom.value | hard coded string: ‘(555)555-1002’ | change/map/generate value |
| assignedAuthor.assignedPerson.name.given | hard coded string: ‘Henry’ | change/map/generate value |
| assignedAuthor.assignedPerson.name.family | hard coded string: ‘Seven’ | change/map/generate value |
Let’s start by adding a ‘time’ sub-element to the ‘author’ element:
- We can leverage the CDA API’s ‘cda.time’ module for this action. As we did in previous steps, start typing “cda.time” and use auto-completion to access the available options:

As you can see, there is an “add” and “set” function. Because this element does not yet exist, we must use “add” to create it.Our “add” functions take similar parameters as “set” functions that we used earlier. The only difference is that in this case, thetargetparameter refers to the element that will become the root (or parent). We want the ‘author’ element to be the target. - Manually enter the following values to complete the function:
- target = A
- element = ‘time’
- time = ‘20070415000000+0500’
Here is the completed function call and the resulting changes to its annotations:

Before:
![]()
After:
![]()
We also want to add an ‘assignedAuthor’ sub-element to our ‘author’ parent element. We need to create ‘assignedAuthor’ from scratch, much like we did with the ‘author’ element itself. Adding additional elements to a parent element’s node tree is very common practice. We treat this process in much the same way as we do when creating a parent element in main(): create the sub-element, then refer to it using a local variable.
- Add the following line of code to the
FillAuthor()function to create and append the new sub-element to our parent element:

Here is the resulting annotation:

- Using auto-completion, add the following sub-elements to ‘assignedAuthor’ using the following “add” functions and values:

Here are the resulting annotations:
Before:

After:

- Now let’s add one final layer to our node tree. Add the following code to append and populate an ‘assignedPerson’ sub-element to ‘assignedAuthor’:

Here are the resulting annotations:

- Save a commit to record your work.
Finished! The completed FillAuthor() function should look like this:

Here are the resulting annotations for the completed ‘author’ parent element:

Here are copy-and-paste versions of FillAuthor() and main(), should you need them:
function FillAuthor(A)
   cda.time.add{target=A, element='time', time='20070415000000+0500'}
   local AA = addElement(A, 'assignedAuthor')
   cda.id.add{target=AA, value='99999999', id_type=cda.codeset.cat["National Provider Identifier"]}
   cda.code.add{target=AA, element='code', system=cda.codeset.cat["Provider Codes"],
      value=cda.codeset.providerCodes["Allopathic & Osteopathic Physicians"],
      lookup=cda.codeset.providerCodes.reverse}
   cda.demographic.address.add{target=AA, street='1002 Healthcare Drive', city='Portland',
      state='OR', zip='99123', country='US'}
   cda.demographic.phone.add{target=AA, phone='(555)555-1002', use=cda.codeset.address.Work}
   local AP = addElement(AA, 'assignedPerson')
   cda.demographic.name.add{target=AP, given='Henry', family='Seven'}

   return A
end
function main()
   local Doc = cda.new()
   local CD = Doc.ClinicalDocument

   -- CDA Header
   FillHeader(CD)
   local A = addElement(CD, 'author')
   trace(CD)  -- view the new author element
   FillAuthor(A)

   net.http.respond{body=tostring(Doc)}


   -- TEST CODE: write CDA to file (in Iguana install dir)
   if iguana.isTest() then
      -- unformatted xml
      local f = io.open('cda_xml.xml','w+')
      f:write(tostring(Doc))
      f:close()
      -- formatted with xsl stylesheet
      f = io.open('cda_web.xml','w+')
      f:write('<?xml-stylesheet type="text/xsl" href="WebViewLayout_CDA.xsl"?>\n')
      f:write(tostring(Doc))
      f:close()
   end
end
Review and Validate
At this point, let’s use the NIST Validation Tool (or the Lantana validation tool) to check our changes to the cda_xml.xml file.
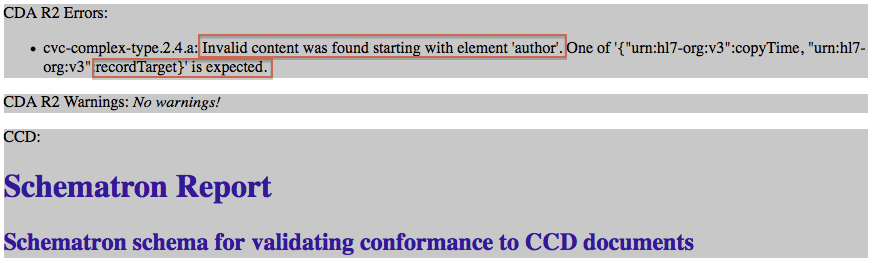
As expected, we get an error warning us that the patient information (‘recordTarget’) is expected before the ‘author’ element:
Add a ‘patient’ element [top]
Our next task is to add a brand new ‘recordTarget’ element to the header that will capture specific patient information. We will follow exactly the same steps as we did for the ‘author’ element, but because CDA requires such a large volume of content for the ‘recordTarget’ element, we are going to provide you with some pre-built code. Regardless, in real-life scenarios, you would still implement the same process:
- Create and append the new element (‘recordTarget’) to the header.
- Create a “fill” function (
FillPatient()) to populate the element correctly. - Use the following tools to build out the “fill” function and develop the element’s node tree:
- CDA API modules and functions
- addElement and addAttr variable shortcuts
- auto-completion
- Test the results for errors.
Don’t forget! We need to add the ‘recordTarget’ element before the author element:

The list of required patient information is very long. For the sake of brevity, we are going to skip the usual table and just provide a snapshot of the final results. You will need to make sure that your final code produces this data:

Adding Code
We have already shown you how to create “fill” functions to both add and populate elements. All the remaining “fill” functions follow a similar pattern, so there is no point in making you build them up from scratch. Because ‘recordTarget’ is such an extensive element, we are going to take this opportunity to simply provide you with the completed script. Then we’ll go back and add any missing code to finish the process.
- If you were creating the CDA from scratch you would need to create the
FillPatient()function, however in this case it is already supplied in the fillpatient.lua module. - Notice that we still haven’t actually created/appended the ‘recordTarget’ parent element. Add the following lines of code to the
main()function to complete this action:
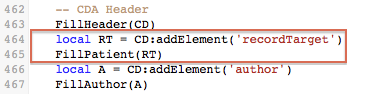
Remember to add it before the “author” code! - Click on the associated annotation to see that the patient information has been successfully added:


Finished! Now let’s quickly review all that pre-built FillPatient() code that you’ve just added to your project.
Patient information consists of an extensive node tree with several elements/attributes. To simplify this, we’ve broken down the code by creating four local “Fill” functions. This is standard programming practice for managing complexity, making it much easier to find/update code down the road.
Note: Yes, it’s true! Lua allows you to create local functions nested within a function.
We created these four functions at the start of the FillPatient() function:

At the end of the FillPatient(), we call these functions fill in the last four elements:

This is repeating exactly the same process that we used before to add elements, just on a slightly larger scale. Use addElement() to create the element and then use a “Fill” function to develop and populate its node tree. The only difference is that the four “fill” functions are local to the FillPatient() function.
Wait, why did we make these functions local to FillPatient()?
- Efficiency: By making these four functions local, they run up to 30% faster (remember Roberto’s performance tips article).
- Scope: We can make these local because they are only called from within
FillPatient().
Tip: We use the exact same technique with other complex elements (FillEncounters(), FillProblemList(), and so on).
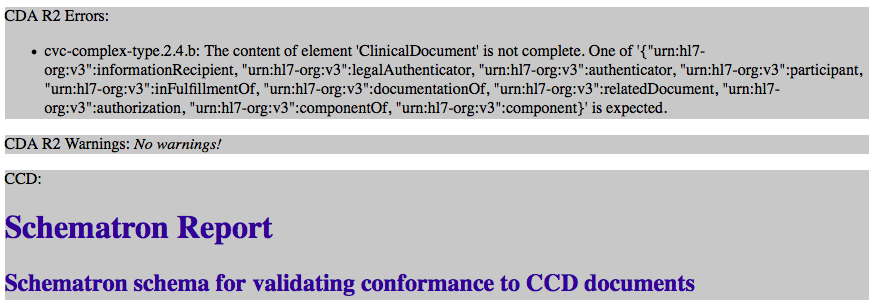
Review and Validate
At this point, let’s use the NIST Validation Tool (or the Lantana validation tool) to check our changes to the cda_xml.xml file.
As you can see below, we get an error warning us that the ‘custodian’ element is missing:
Add a ‘custodian’ element [top]
Guess what? This is the last thing we need to complete our CDA document’s header! To add the ‘custodian’ element, we will follow exactly the same steps to create, append, and populate the new element:

| Attribute | Example Data | Live Data |
|---|---|---|
| assignedCustodian.representedOrganization.id.extension | hard coded string: ‘99999999′ | change/map/generate value |
| assignedCustodian.representedOrganization.id.root | hard coded string: ‘2.16.840.1.113883.4.6′ | change/map/generate value |
| assignedCustodian.representedOrganization.name | hard coded string: ‘Community Health and Hospitals‘ | change/map/generate value |
| assignedCustodian.representedOrganization.telecom.use | hard coded string: ‘WP’ | change/map/generate value |
| assignedCustodian.representedOrganization.telecom.value | hard coded string: ‘tel:(555)555-1002‘ | change/map/generate value |
| assignedCustodian.representedOrganization.addr.use | hard coded string:’WP’ | change/map/generate value |
| assignedCustodian.representedOrganization.addr.streetAddressLine | hard coded string: ‘1002 Healthcare Drive‘ | change/map/generate value |
| assignedCustodian.representedOrganization.addr.city | hard coded string: ‘Portland’ | change/map/generate value |
| assignedCustodian.representedOrganization.addr.state | hard coded string: ‘OR’ | change/map/generate value |
| assignedCustodian.representedOrganization.addr.postalCode | hard coded string: ‘99123’ | change/map/generate value |
| assignedCustodian.representedOrganization.addr.country | hard coded string: ‘US’ | change/map/generate value |
Adding Code
A pre-built FillCustodian() function is included in the fillstakeholders.lua local module, so there is no need to develop it. Simply add the following lines to your main() function. As with the others, this will create/append the ‘custodian’ element and call the FillCustodian() function to populate it:

Let’s take a quick look at the FillCustodian() function. This is a very simple chunk of code! It uses addElement to create two sub-elements. It also uses several of the CDA API’s “add” functions to populate them with the required values:

Here are the resulting annotations:

Review and Validate
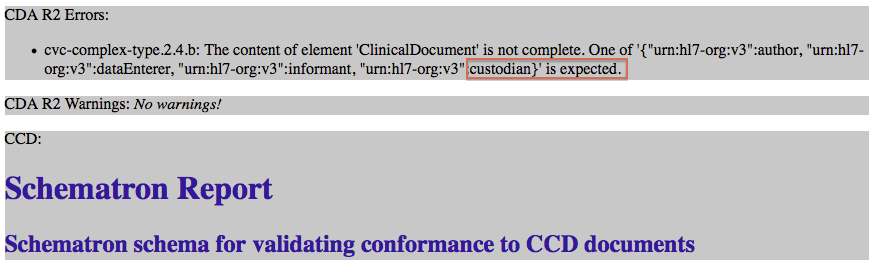
At this point, let’s use the NIST Validation Tool (or the Lantana validation tool) to check our completed header in the cda_xml.xml file.
This time we get a rather confusing validation error! This is actually telling us that something is missing, but it doesn’t seem to know what…
Add the CDA body [top]
Now we need to create the body for our CDA document and append it underneath our header. Our CDA body section will be composed of a ‘component‘ element that contains a ‘structuredBody’ sub-element.

- Add the following lines of code to the
main()function:

- That’s it! Your shiny new CDA body should look like this in the resulting annotations:

Here is a copy-and-paste version of the entire main() function, should you need it:
function main(Data)
   local Doc = cda.new()
   local CD = Doc.ClinicalDocument

   -- CDA Header
   FillHeader(CD)
   local RT = CD:addElement('recordTarget')
   FillPatient(RT)
   local A = CD:addElement('author')
   FillAuthor(A)
   local C = CD:addElement('custodian')
   FillCustodian(C)

   -- CDA Body
   local Body = CD:addElement('component')
   local SB = Body:addElement('structuredBody')

   net.http.respond{body=tostring(Doc)}

   -- TEST CODE: write CDA to file (in Iguana install dir)
   -- unformatted xml
   if iguana.isTest() then
      local f = io.open('cda_xml.xml','w+')
      f:write(tostring(Doc))
      f:close()
      -- formatted with xsl stylesheet
      f = io.open('cda_web.xml','w+')
      f:write('\n')
      f:write(tostring(Doc))
      f:close()
   end
end
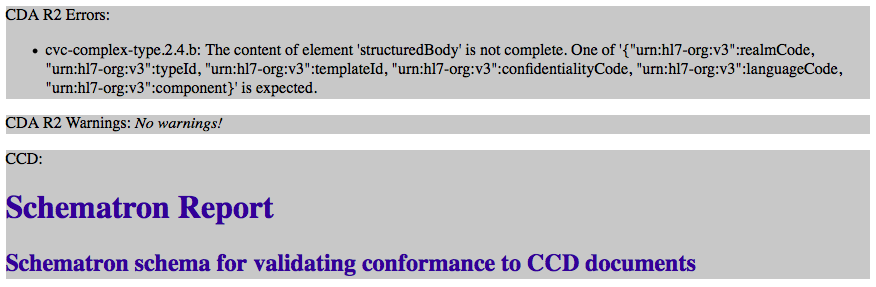
Review and Validate
Use the NIST Validation Tool (or the Lantana validation tool) to check our new changes to the cda_xml.xml file.
The confusing error message from our previous step is gone! Now the report simply confirms that our CDA body is not complete:
Populate the CDA body [top]
To complete our ‘structuredBody’ element, we will add an ‘encounters’ element and a ‘problems’ element:

Adding this information follows the same process as before: create and append the new elements, create and call their corresponding “fill” functions, then use the CDA API to build the code that develops the node tree.
The ‘structureBody’ element contains even more values than our header’s ‘recordTarget’ element, so the channel already includes their corresponding pre-built “fill” functions with all the correct values in place. That said, we will take this opportunity to review how they implement two new techniques: the addAttr() function and the setInner() function.
Before we dive into those topics, let’s finish up the code. Add the following lines to the main() function to create the two sub-elements and call their respective “fill” functions:

Done! Here are the resulting annotations:

Here is a copy-and-paste version of the completed main() function, should you need it:
function main(Data)
   local Doc = cda.new()
   local CD = Doc.ClinicalDocument

   -- CDA Header
   FillHeader(CD)
   local RT = CD:addElement('recordTarget')
   FillPatient(RT)
   local A = CD:addElement('author')
   FillAuthor(A)
   local C = CD:addElement('custodian')
   FillCustodian(C)

   -- CDA Body
   local Body = CD:addElement('component')
   local SB = Body:addElement('structuredBody')
   local COM = SB:addElement('component')
   FillEncounters(COM)
   COM = SB:addElement('component')
   FillProblemList(COM)

   net.http.respond{body=tostring(Doc)}

   -- TEST CODE: write CDA to file (in Iguana install dir)
   -- unformatted xml
   if iguana.isTest() then
      local f = io.open('cda_xml.xml','w+')
      f:write(tostring(Doc))
      f:close()
      -- formatted with xsl stylesheet
      f = io.open('cda_web.xml','w+')
      f:write('n')
      f:write(tostring(Doc))
      f:close()
   end
end
About setAttr()
Similar to the CDA API’s other “set” functions, our setAttr() function is smart. It will populate an existing attribute or append and populate a missing attribute, all in one simple step. Let’s have a look at this in action:
At the end of the FillParticipant() function in FillEncounters(), notice the three calls to setAttr():

As you can see, these calls have produced three fully-completed attributes in the resulting annotations:

About setInner()
The setInner() function is a handy way to to add XML or HTML content directly to a text element that uses an ED datatype. Encapsulated data (ED) is the way that HL7 (and hence CDA) transmits data in formats not defined by HL7. It is often used to encapsulate “human readable” content within a CDA. This includes things like HTML, images, video, audio, waveforms, genetic sequences, multimedia, etc.
In this case, we are simply using this technique to store an encounter as a “human readable” XML table in the FillEncounters() function:

We also use it to store multiple problems as a “human readable” XML list in the FillProblemList() function in the fillproblemlist.lua local module:

You might consider it a stretch to think that XML content is “human readable information”, but when it’s rendered in a web browser, it looks pretty great!

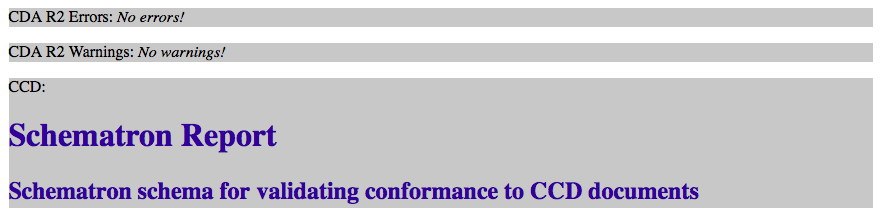
Review and Validate
At this point, let’s use the NIST Validation Tool (or the Lantana validation tool) to check our changes to the cda_xml.xml file. Since our CDA is now complete, there should be no errors!
Review the final document [top]
Our example CDA is complete! Let’s marvel at our handiwork:
- Save a commit to record your work.
- From the Dashboard, click the Start button to run the channel.If your channel is already running, you may have to restart it. Check to make sure that Iguana is using the commit that you just created by hovering over the channel’s HTTPS component:

- While still hovering over the HTTPS component, click the URL path provided. This will launch the resulting CDA document in your web browser:

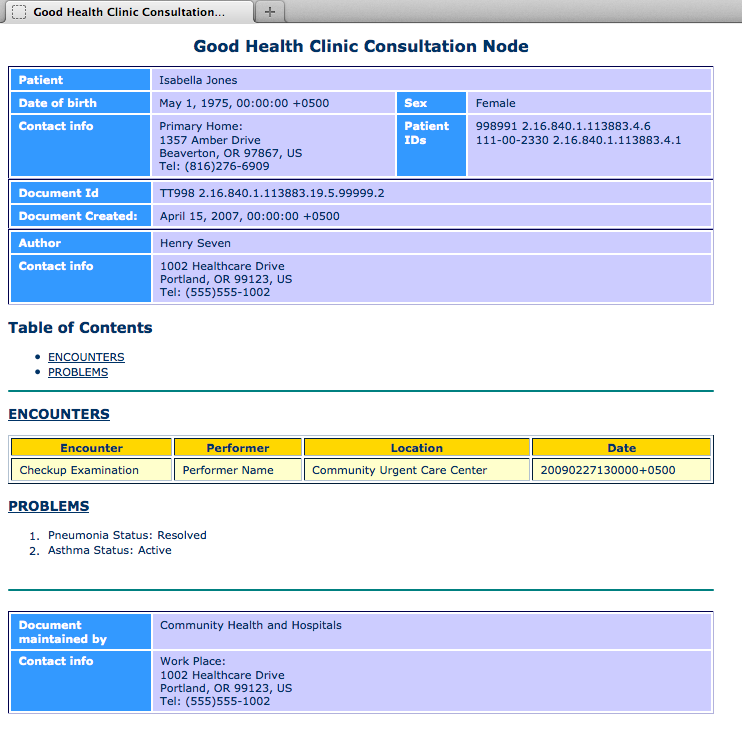
The look-and-feel may vary depending on which browser you use, but the following content should appear: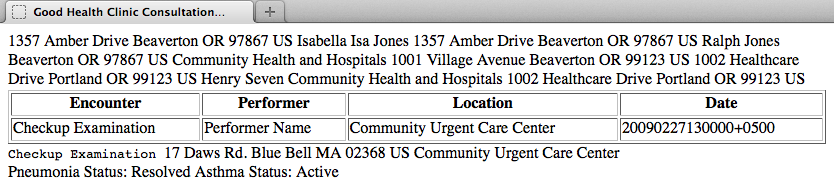
- To view a nicely-formatted version, browse to the Iguana working directory and open the cda_web.xml file in your browser:
- You can also view the raw XML by opening the corresponding cda_xml.xml file in either a browser or a text editor:
Great job! You did it!
Customize the CDA header template [top]
Though our template contains the common header attributes and elements required by most CDAs, it may not match your exact requirements. Don’t panic! It is really easy to customize the template to meet your needs.
Depending on your requirements, you may need to add/remove elements or change the content. We are going to cover three scenarios, but there are many other possibilities for customization. Don’t be afraid to get creative!
- Basic Scenario: Static Content Changes
- Advanced Scenario: Use Multiple Templates
- Advanced Scenario: Dynamic Header Content
Our header template is implemented using table called CdaSchema this table resides in our CDA API’s ‘cda’ module:

As you probably noticed there is a second template called CdaSchemaMin we will have more to say about multiple schema-templates below.
1. Basic Scenario: Static Content Changes
If the header is the same for all your CDA documents but different from our supplied template, simply make a single “static” change. The disadvantage of this approach is that it doesn’t work for multiple CDA types that need different schema-templates.
For example, our template comes with two ‘templateID’ elements. You may only need one ‘templateID’ element with different value for the root attribute. Simply open up ‘cda’ module and make the content change:
Before:

After:

What if you actually need additional ‘templateID’ elements? Simply copy and paste to create extra ones.
Another common fix? The last two elements (‘setId’ and ‘versionNumber’) are optional. If you do not need them in your CDA documents, simply delete them from the template.
2. Advanced Scenario: Use Multiple Templates
If you need different heaters for different CDA documents then you can use multiple templates or try the third option Dynamic Header Content.
- Create several templates (for example,
CdaSchema1,CdaSchema2etc.) - Use some simple programming logic in your main script to choose the appropriate template
Note: This is demonstrated in the third option (below) where
main()calls thecda.newMin()function (which uses theCdaSchemaMintemplate) as opposed to thecda.new()function (which uses theCdaSchematemplate)
The advantage of this approach is that you can keep the schema-templates simple, by only including the header information required for each CDA document type. The disadvantage is that you can end up with a large number of templates.
3. Advanced Scenario: Dynamic Header Content
If you need different heaters for different CDA documents then you can use dynamic header content or try the second option Use Multiple Templates.
- Use the stripped-down CdaSchemaMin template:

- Then append the header fields you need in your main script’s
FillHeader()function:
- If you would like to use try this approach, then please use the “Dynamic Minimal CDA” on our CDA Templates page which contains the code shown above.
The advantage of this approach is that you only need a one schema-template for all CDA document types. The disadvantage is that the FillHeader() function can become very complex.
Tip: The second and third options address the “complexity” of multiple CDA document types by changing the place in the code where that complexity is handled. The second option uses multiple schema-templates to create headers for multiple CDA types, whereas the third option uses the FillHeader() function to create different headers.
It’s up to you to decide which approach is a better match for your needs.
Create a completely new template
Alternatively you could take a different approach and include all (or most of) the elements and attributes you need in your template. This way the structure of your CDA is very clearly defined, and all you need to do is plug in the data. This approach is different from what we did in this tutorial, but it could be an approach that suits your needs.
Note: We are less fond of this approach as it goes against our preference for minimalism.
What do we suggest?
It seems likely that a simple static change to the template will be enough to meet most requirements. However, because our approach is flexible, we are confident that any requirements (or change in requirements) can easily be met.
Need help figuring this out? Feel free to contact support at support@interfaceware.com.
Create a new “set” or “add” function [top]
As you can see from the CDA API Guide some of the “add” functions do not have a corresponding “set” function. This is part of our intentional minimalist approach, where we only created the “set” functions we actually needed. However it is very easy to create a new “set” or “add” function if you need one.
So when would you need to do this? How about if you need to process a CDA (rather than building one from scratch) and want to add or modify some elements. Or if you have a custom CDA that uses an element that is not included in our templates (though this should be unlikely as we have included all the standard CDA elements).
We chose to create a new cda.id.set() function, because it is a simple example. Also we use two ids in the <patientrole> element of the CDA, so we can demonstrate how to update both of them.
This is the result:

It is very similar to cda.id.add(), which we modified:

This is our new cda.id.set() function:
All we needed to do was change the target parameter to point to the element to be changed (rather than the parent element), and change the check() to point to the new help table.

Here is the code from the main module that calls cda.id.set() to change both of the ids:

Creating a new add function is also simple, just modify a similar add function.
Here is the code so you can try it.
The cda.id.set() function from the cda.id module (including partially completed help):
local cdaIdSetHelp = {
   title="cda.id.set",
   usage=[[cda.id.set{target=<{ELEMENT}>, value=<EXTENSION>, id_type=<ROOT>} ]],
   description=[[CHANGE DESCRIPTION]],
   returns={"A parsed tree representing the populated XML element"},
   parameters={
      [1]={['parameter']='target',['description']='The element to be updated'},
   },
   optional_parameters={
      [1]={['parameter']='value',['description']='The extension (or specific value) of the ID'},
      [2]={['parameter']='id_type',['description']='The root identifier (object ID) of the desired ID'},
   },
   examples={[[CHANGE EXAMPLES]]}
}

function cda.id.set(I)
   check(I, cdaIdSetHelp) -- modified

   local Id = I.target    -- modified
   if I.id_type then
      if I.value then
         Id:setAttr('extension', I.value)
      end
      Id:setAttr('root', I.id_type)
   end

   return Id
end

cda.help.set{func=cda.id.set, info=cdaIdSetHelp}
The modified FillPatient() function:
local function FillPatient(RT)
   local function FillGuardian(G)
      cda.code.add{target=G, element='code', system=cda.codeset.cat["HL7 Role Class"],
         value=cda.codeset.personalRelationshipRole.Parent, lookup=cda.codeset.personalRelationshipRole.reverse}
      cda.demographic.address.add{target=G, use=cda.codeset.address.Home,
         street='1357 Amber Drive', city='Beaverton', state='OR', zip='97867', country='US'}
      cda.demographic.phone.add{target=G, phone='(816)276-6909', use=cda.codeset.address.Home}
      local GP = addElement(G, 'guardianPerson')
      cda.demographic.name.add{target=GP, given='Ralph', family='Jones'}

      return G
   end

   local function FillBirthPlace(B)
      local P = addElement(B, 'place')
      cda.demographic.address.add{target=P, city='Beaverton', state='OR', zip='97867', country='US'}

      return B
   end

   local function FillLanguageCommunication(L)
      cda.code.simple.add{target=L, element='languageCode', value=cda.codeset.language['English - US']}
      cda.code.add{target=L, element='modeCode', system=cda.codeset.cat["LanguageAbilityMode"],
         value=cda.codeset.proficiencyLevel["Good"], lookup=cda.codeset.proficiencyLevel.reverse}
      cda.value.add{target=L, element='preferenceInd', datatype='BL', value='true'}
      return L
   end

   local function FillProviderOrganization(O)
      cda.id.add{target=O, id_type=cda.codeset.cat["National Provider Identifier"]}
      cda.demographic.name.simple.add{target=O, name='Community Health and Hospitals'}
      cda.demographic.phone.add{target=O, phone='(555)555-5000', use=cda.codeset.address.Work}
      cda.demographic.address.add{target=O, use=cda.codeset.address.Work,
         street='1001 Village Avenue', city='Beaverton', state='OR', zip='99123', country='US'}

      return O
   end

   -- original code to add the ids
   local PR = addElement(RT, 'patientRole')
   cda.id.add{target=PR, value='998991', id_type='2.16.840.1.113883.4.6'} -- dummy OID change or map value
   cda.id.add{target=PR, value='111-00-2330', id_type=cda.codeset.cat.SSN}

   --------------------------------
   -- code to set (change) the ids
   --------------------------------

   trace(PR) -- inspect the ids before changing
   -- set first id
   cda.id.set{target=PR.id, value='Use the new cda.id.set', id_type='to change the first id'}
   -- set second id
   cda.id.set{target=PR:child("id", 2), value='and to ', id_type='change the second id'}
   trace(PR)-- inspect the ids after changing

   cda.demographic.address.add{target=PR, use=cda.codeset.address.Home, street='1357 Amber Drive',
      city='Beaverton', state='OR', zip='97867', country='US'}
   cda.demographic.phone.add{target=PR, phone='(816)276-6909', use=cda.codeset.address.Home}
   local P = addElement(PR, 'patient')
   cda.demographic.name.add{target=P, given='Isabella', nickname='Isa',
      family='Jones', use=cda.codeset.nameUses.Legal}
   cda.code.add{target=P, element='administrativeGenderCode', system=cda.codeset.cat["HL7 AdministrativeGender"],
      value=cda.codeset.sex.Female, lookup=cda.codeset.sex.reverse}
   cda.time.add{target=P, element='birthTime', time='19750501000000+0500'}
   cda.code.add{target=P, element='maritalStatusCode', system=cda.codeset.cat["HL7 Marital status"],
      value=cda.codeset.marriage.Married, lookup=cda.codeset.marriage.reverse}
   cda.code.add{target=P, element='religiousAffiliationCode', system=cda.codeset.cat.ReligiousAffiliation,
      value=cda.codeset.religion.Atheism, lookup=cda.codeset.religion.reverse}
   cda.code.add{target=P, element='raceCode', system=cda.codeset.cat["HL7 Race and Ethnicity"],
      value=cda.codeset.race.White, lookup=cda.codeset.race.reverse}
   cda.code.add{target=P, element='ethnicGroupCode', system=cda.codeset.cat["HL7 Race and Ethnicity"],
      value=cda.codeset.ethnicGroup["Not Hispanic or Latino"],
      lookup=cda.codeset.ethnicGroup.reverse}

   local G = addElement(P, 'guardian')
   FillGuardian(G)
   local BP = addElement(P, 'birthplace')
   FillBirthPlace(BP)
   local LC = addElement(P, 'languageCommunication')
   FillLanguageCommunication(LC)
   local PO = addElement(PR, 'providerOrganization')
   FillProviderOrganization(PO)

   return RT
end
Review what you’ve learned [top]
What is the number one thing that we want you to take away from this tutorial? Despite the seemingly complex nature of CDA documents, our method produces a very simple, repeatable process for creating any CDA document.Let’s quickly review that process right now, to make sure you get the full picture:
Step 1: Customize the CDA header template
You can customize our CDA header template to match your specific needs at any time!
Techniques:
- Make static changes that will affect all your CDA documents
- Use multiple templates for different CDA documents
- Make dynamic changes that can be tailored to meet different CDA requirements
Reference: Customize the CDA header template.
Step 2: Create an empty CDA
Create an empty CDA document with a pre-built header using only a few simple lines of code.
Techniques:
- Use
cda.new()to create the empty CDA document - When using multiple schema-templates, use multiple
cda.newXxx()functions to create different empty CDA documents
Reference: Create a blank CDA document.
Step 3: Populate the user-specific header attributes/elements
This is a simply a process of plugging data into the empty attributes and elements using the CDA API’s handy functions.
Note: If you used a “minimal template” with no empty header fields then this step is not required. You can simply append elements/attributes in the next step.
Techniques:
- Update existing attributes:
- Usually you will use Lua “dot syntax” to assign values:
CD.id.extension = 'TT998' - You can also use
setAttr(), but it is less concise:setAttr(CD.id, 'extension', 'TT998')
- Usually you will use Lua “dot syntax” to assign values:
- Update existing elements:
- Usually you will use an CDA API “set” function to set all the attributes for an element with a single function call:
cda.time.set{target=CD.effectiveTime, time='20070415000000+0500'} - If an element (i.e.,
setId) does not have a “set” function, you can assign values to its attributes individually:- Usually you will use Lua “dot syntax” to assign values:
CD.setId.extension = 'BB35' - You can also use
setAttr(): setAttr(CD.setId, 'extension', 'BB35') - Alternatively, you could create a new “set” function like
cda.id.setid.set()
- Usually you will use Lua “dot syntax” to assign values:
- You can also add attributes to an element individually with
setAttr(): setAttr(CD.id, 'extension', 'TT998') - Use
setText()to set a text element:setText(CD.title, 'Good Health Clinic Consultation Note')
- Usually you will use an CDA API “set” function to set all the attributes for an element with a single function call:
Reference: Populate the CDA header
Step 4: Append the remaining header elements in the correct order
Use the CDA API’s “add” functions (or a combination of addElement() + setAttr()) to append the elements used in your CDA. At a minimum. you will need to add the required header elements: ‘recordTarget’, ‘author’, and ‘custodian’.
Note: If you extended your template to include all the necessary header elements then this step is not required. Instead you would have filled in the elements and attributes in the previous step.
Techniques:
- Use a CDA API “add” function:
cda.time.add{target=A, element='time', time='20070415000000+0500'} - You can also build elements “manually”, step by step:
- Use
addElement()to append the element:addElement(CD, 'languageCode') - Use
setAttr()to create and set each attribute:setAttr(CD.languageCode, 'code', cda.codeset.language["English - US"])
- Use
- Building an element “manually” has two common applications:
- When you only want to use a subset of the attributes available in an element
- When the CDA API does not contain an “add” function for the element you are adding. For example, there is no “add” for the
setIdelement!- Use
addElement()andsetAttr()is a simple workaround - Alternatively, you could create a new “add” function like
cda.id.setid.add()
- Use
Reference:
Step 5: Add the CDA body
The CDA document’s body is composed of a ‘component’ element containing a ‘structuredBody’ sub-element. Use addElement() to append these.
Note: If you extended your template to include all the necessary body elements then this step is not required.
Techniques:
- Two calls to
addElement()are needed:- Append the ‘component’ element:
local Body = CD:addElement('component') - Append the ‘structuredBody’ element:
local SB = Body:addElement('structuredBody')
- Append the ‘component’ element:
Reference: Add the CDA body
Step 6: Develop the CDA body in the correct order
Use the CDA API “add” functions (or a combination of addElement() + setAttr()) to develop and populate the body elements/attributes required in your CDA document.
Note: If you customized the CDA header template to include all the necessary body elements, then adding elements not required. Instead, simply fill the elements/attributes in the same manner as Step 3.
Techniques:
- Use the same techniques as Step 4.
- Use
setInner()to add XML (or HTML, audio, video, images etc) content directly to a CDA “encapsulated text” (ED) element
Reference: Populate the CDA body
Performance Tuning
After profiling the code two major changes were made, for about a 60% reduction in execution time:
- Fuzzy date parsing using dateparse module was removed, for about 33% percent improvement.
- Functions were stored in local variables, for a further 28% improvement: See “Lua Performance Tips” by Roberto Lerusalimschy for an explanation.
Please contact us at support@interfaceware.com if you need more information.
What’s Next?
Now that you have a better understanding of how our CDA process works, we recommend that you take a moment to browse our CDA API Guide to get better acquainted with all the tools at your disposal. When you are ready to start developing your own CDA documents, we also offer some additional resources:
- If you forget any of this basic process, we have a very brief CDA Cheat Sheet that summarizes the steps at a glance.
- Leverage the code that we provided in this tutorial to build a similar CDA document of your own.
- We also provide a useful bucket of CDA templates that represent various CDA document types. Feel free to use these completed scripts as a basis for your own CDA documents!
- Innovate! Think outside the box! And let us know what you come up with.
MoreInformation [top]
- Source code for the main module on github
- Source code for the cda.lua module on github
- Source code for the other cda modules on github
- API documentation for xml, iguana
- Dehydrating and rehydrating HL7 messages
- Articles in our CDA section
- Our approach to CDA Solutions
- What is a CDA Document?
- CDA – Generate a document using the code from the builtin Iguana Protocols repository
- CDA: Consume Document
- Create CCDA with Validation
- CDA Cheat Sheet
- The CDA API guide