Limiting Access to the Log Directory
Contents
If you are using Iguana to transmit messages containing confidential patient data, you can modify the permissions on the log directory to ensure that the files containing log messages cannot be accessed by people who are not authorized to view them.
To limit access to the log directory when Iguana is running on Linux:
- Log into your Linux system as a user that is authorized to change permissions (such as root).
- Set your current directory to be the directory in which Iguana is installed.
- Run the following command:
chmod 700 logs
This will disable read, write and execute access for everyone except the owner of the Iguana log directory.
Note: To change the directory owner, use the chown and chgrp commands. See the man pages of your Linux distribution for specific instructions.
To limit access to the log directory when Iguana is running on Windows:
- In Windows Explorer, locate the folder in which Iguana is installed (for example, C:\Program Files\iNTERFACEWARE\Iguana).
- Right-click the logs directory. From the popup menu that appears, select Properties.
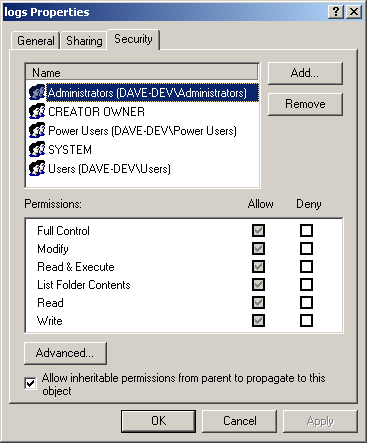
- Click the Security tab to display the security options for the logs directory:

- From the top pane of the Properties window, select a user for which you want to limit access. (If the user is not listed in this pane, click Add to add the user to the list.)
- In the lower pane of the Properties window, in the Deny column, select the permissions that you want to disallow for that user.
- Click Apply to apply your changes.
- Repeat the above three steps for all users for which you want to limit permissions.
- When you are finished, click OK to close the Properties window.
Note: For maximum security, deny access to all users except:
- The user under which the Iguana server is running;
- Any other users that absolutely have to access the directory, such as the user that runs system backups.
Continue: Log Age and Logging Performance
