Add an 'author' element
Contents
For the last few steps, we’ve practiced using several “set” functions to populate elements/attributes that already exist in our CDA document’s header. Now we are going to start using “add” functions to create and append new elements to the header. For the purposes of this tutorial, we are going to start with the ‘author’ element as it is fairly simple.
About Order
Earlier, we explained that CDA elements/attributes are order sensitive. If the elements in your CDA document are in the wrong order, it will fail validation.
This was less of an issue when we were filling in elements/attributes that were already laid out correctly in our header’s structure. Now we are venturing into new territory: adding entirely new elements. From this point on, we must make sure that we add things in the correct order.
The observant reader may notice that we are about to break this rule! In real life, we need to append the ‘patient’ element before the ‘author’ element. For the purposes of this tutorial, we are going to do the easier element first. Have no fear, we will fix this deliberate mistake later.
Adding Code
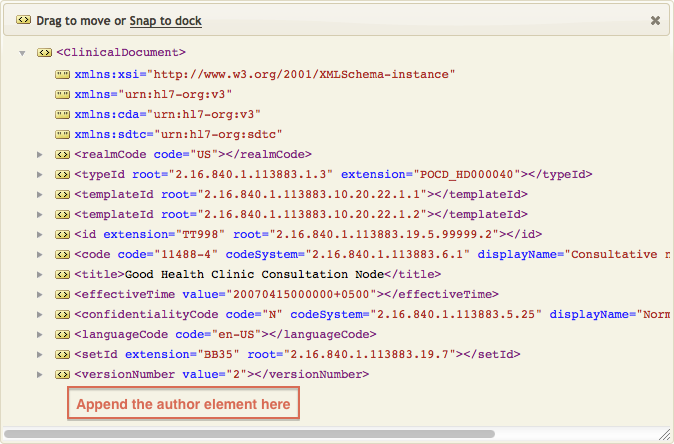
To add author information to our header, we are going to create and append a new, empty element here:
Once we’ve added the empty node, we will create a new “fill” function called FillAuthor() and build up its code using several CDA API modules. This new function will populate our final ‘author’ element with the desired attributes/data.
Note: We will repeat this same pattern (adding an element, then creating/calling a related “fill” function) every time we add a new element to our CDA. What’s more, we will use exactly the same method for populating the CDA body!
Step 1: Create the new, empty element
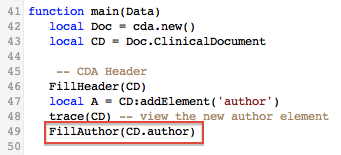
Remember when we made several “shortcuts” to make our lives easier? Now we are going to use the ‘addElement’ shortcut to create, name, and append our new element:

- Add the following lines of code to the
main()function: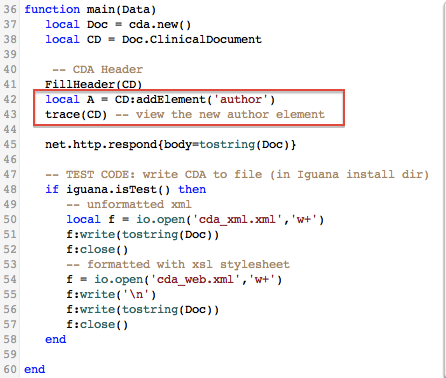
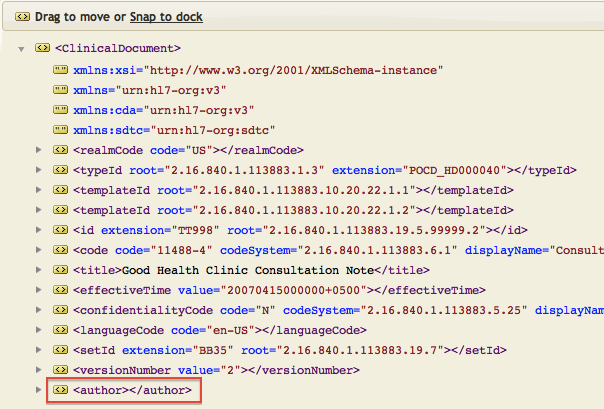
- Click on the
trace(CD)annotation to see the new, empty element appended at the end of our header:
Step 2: Create a “fill” function to populate the new element
As we did with FillHeader(), we are going to build a new function called FillAuthor(). This function, when executed, will fill in our ‘author’ element with the desired values:
- Add the following lines of code to your script:
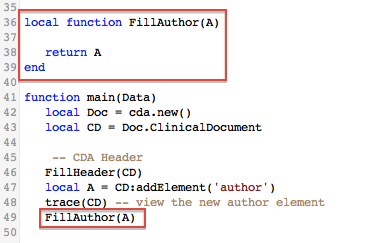 In the
 main()function, we could have used the following line of code instead: This is an equivalent statement, but far less concise.
Step 3: Add code to FillAuthor()
Now we are ready to build up the FillAuthor() function! As we did with FillHeader(), we are going to leverage the CDA API’s various modules and functions to add the desired data:
| Sub-Element/Attribute | Tutorial Data | Alternative Method |
|---|---|---|
| time | hard coded string: ‘20070415000000+0500’ | mapped or generated |
| assignedAuthor.id.extension | hard coded string: ‘99999999’ | change/map/generate value |
| assignedAuthor.id.root | lookup description: ‘National Provider Identifier’, returns code: ‘2.16.840.1.113883.4.6‘ | change/map/generate value |
| assignedAuthor.code.code | lookup description: ‘Allopathic & Osteopathic Physicians’, returns code: ‘200000000X‘ | change/map/generate value |
| assignedAuthor.code.codeSystem | lookup description: ‘Provider Codes’, returns code: ‘2.16.840.1.113883.6.101‘ | change/map/generate value |
| assignedAuthor.code.displayName | reverse-lookup code: ‘2.16.840.1.113883.6.101‘, returns description:‘Provider Codes’ | change/map/generate value |
| assignedAuthor.address.streetAddressLine | hard coded string: ‘1002 Healthcare Drive’ | change/map/generate value |
| assignedAuthor.address.city | hard coded string: ‘Portland’ | change/map/generate value |
| assignedAuthor.address.state | hard coded string: ‘OR’ | change/map/generate value |
| assignedAuthor.address.postalCode | hard coded string: ‘99123’ | change/map/generate value |
| assignedAuthor.address.country | hard coded string: ‘US’ | change/map/generate value |
| assignedAuthor.telecom.use | lookup description: ‘Work’, returns code: ‘WP‘ | change/map/generate value |
| assignedAuthor.telecom.value | hard coded string: ‘(555)555-1002’ | change/map/generate value |
| assignedAuthor.assignedPerson.name.given | hard coded string: ‘Henry’ | change/map/generate value |
| assignedAuthor.assignedPerson.name.family | hard coded string: ‘Seven’ | change/map/generate value |
Let’s start by adding a ‘time’ sub-element to the ‘author’ element:
- We can leverage the CDA API’s ‘cda.time’ module for this action. As we did in previous steps, start typing “cda.time” and use auto-completion to access the available options:
 As you can see, there is an “add” and “set” function. Because this element does not yet exist, we must use “add” to create it.Our “add” functions take similar parameters as “set” functions that we used earlier. The only difference is that in this case, the
 targetparameter refers to the element that will become the root (or parent). We want the ‘author’ element to be the target. - Manually enter the following values to complete the function:
- target = A
- element = ‘time’
- time = ‘20070415000000+0500’
Here is the completed function and the resulting changes to its annotations:

Before:

After:

We also want to add an ‘assignedAuthor’ sub-element to our ‘author’ parent element. We need to create ‘assignedAuthor’ from scratch, much like we did with the ‘author’ element itself. Adding additional elements to a parent element’s node tree is very common practice. We treat this process in much the same way as we do when creating a parent element in main(): create the sub-element, then refer to it using a local variable.
- Add the following line of code to the
FillAuthor()function to create and append the new sub-element to our parent element: Here is the resulting annotation:
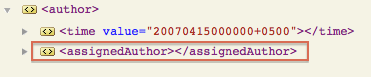
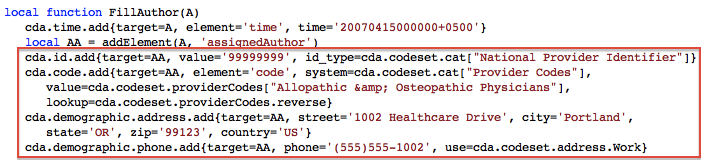
- Using auto-completion, add the following sub-elements to ‘assignedAuthor’ using the following “add” functions and values:
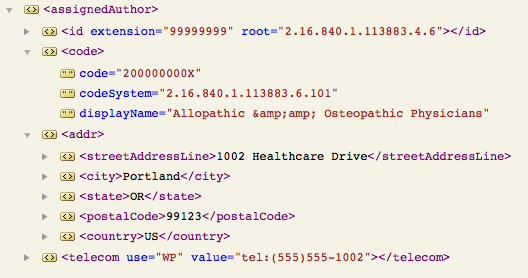
 Here are the resulting annotations:Before:
 After:
- Now let’s add one final layer to our node tree. Add the following code to append and populate an ‘assignedPerson’ sub-element to ‘assignedAuthor’:
 Here are the resulting annotations:
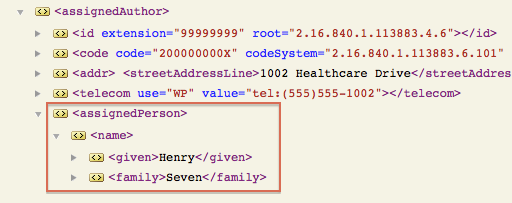
- Commit a milestone to save your work.
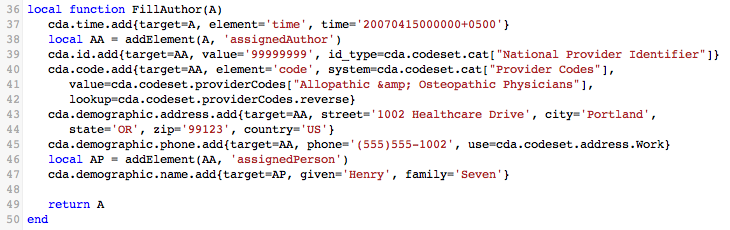
Finished! The completed FillAuthor() function should look like this:
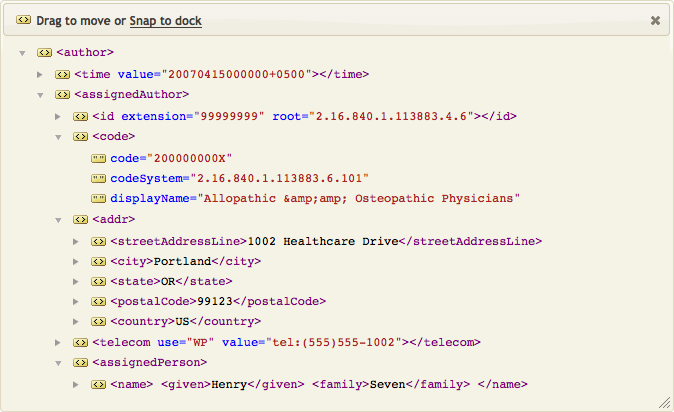
Here are the resulting annotations for the completed ‘author’ parent element:
Here is a copy-and-paste version of the entire script so far, should you need it:
-- The main function is the first function called from Iguana.
-- The Data argument will contain the message to be processed.
-- Note: main() is the last function at the end of this code.

local cda = require 'cda'

require 'cda.xml'
require 'cda.null'
require 'cda.codeset'

local addElement = node.addElement
local setAttr = node.setAttr
local setInner = node.setInner
local setText = node.setText

local function FillHeader(CD)
   -- set the attributes
   CD.id.root = '2.16.840.1.113883.19.5.99999.2'
   CD.id.extension = 'TT998'
   CD.setId.root = '2.16.840.1.113883.19.7'
   CD.setId.extension = 'BB35'
   CD.versionNumber.value = 2
   CD.languageCode.code = cda.codeset.language["English - US"]

      -- set the elements
   setText(CD.title, 'Good Health Clinic Consultation Note')
   cda.time.set{target=CD.effectiveTime, time='20070415000000+0500'}
   cda.code.set{target=CD.code, system=cda.codeset.cat.LOINC,
      value=cda.codeset.loinc["Consultative note"], lookup=cda.codeset.loinc.reverse}
   cda.code.set{target=CD.confidentialityCode, system=cda.codeset.cat.Confidentiality,
      value=cda.codeset.confidentiality['Normal'], lookup=cda.codeset.confidentiality.reverse}

   return CD
end

local function FillAuthor(A)
   cda.time.add{target=A, element='time', time='20070415000000+0500'}
   local AA = addElement(A, 'assignedAuthor')
   cda.id.add{target=AA, value='99999999', id_type=cda.codeset.cat["National Provider Identifier"]}
   cda.code.add{target=AA, element='code', system=cda.codeset.cat["Provider Codes"],
      value=cda.codeset.providerCodes["Allopathic & Osteopathic Physicians"],
      lookup=cda.codeset.providerCodes.reverse}
   cda.demographic.address.add{target=AA, street='1002 Healthcare Drive', city='Portland',
      state='OR', zip='99123', country='US'}
   cda.demographic.phone.add{target=AA, phone='(555)555-1002', use=cda.codeset.address.Work}
   local AP = addElement(AA, 'assignedPerson')
   cda.demographic.name.add{target=AP, given='Henry', family='Seven'}

   return A
end

function main(Data)
   local Doc = cda.new()
   local CD = Doc.ClinicalDocument

    -- CDA Header
   FillHeader(CD)
   local A = CD:addElement('author')
   trace(CD) -- view the new author element
   FillAuthor(CD.author)

   net.http.respond{body=tostring(Doc)}

   -- TEST CODE: write CDA to file (in Iguana install dir)
   if iguana.isTest() then
      -- unformatted xml
      local f = io.open('cda_xml.xml','w+')
      f:write(tostring(Doc))
      f:close()
      -- formatted with xsl stylesheet
      f = io.open('cda_web.xml','w+')
      f:write('\n')
      f:write(tostring(Doc))
      f:close()
   end
end
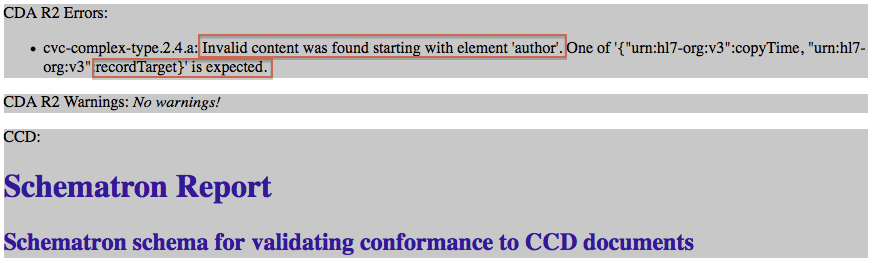
Review and Validate
At this point, let’s use the NIST Validation Tool (or the Lantana validation tool) to check our changes to the cda_xml.xml file.
As expected, we get an error warning us that the patient information (‘recordTarget’) is expected before the ‘author’ element: