Mapping: PID Data
Contents
The MapPatient() function handles the mapping of data from the PID segment.
It looks like this:

This function maps data from the message’s PID segment to a database table row, represented by the table node tree variable T.
For example, this statement takes the third field of the PID segment, locates its first sub-field, locates that sub-field’s first sub-sub-field, and assigns that to the Id field of the database table T.

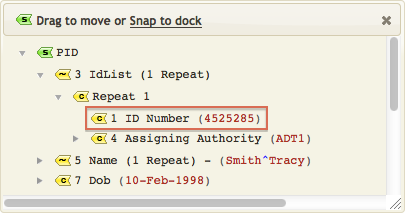
As you can see PID[3][1][1] is the Patient Id Number from the HL7 message:

One of the most useful features of the Iguana Translator is that it provides auto-completion capabilities that make it much easier to create statements such as the above. To show how auto-completion works, remove the above statement from the script, then start to type it in again.
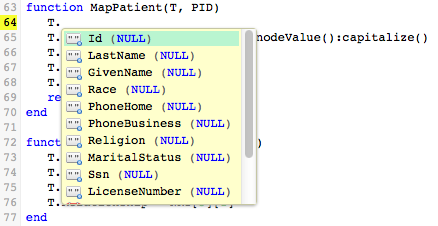
When you type “T.“, the Iguana Translator displays a list of fields to choose from:

When you select Id, the code is automatically updated to include the T.Id field:

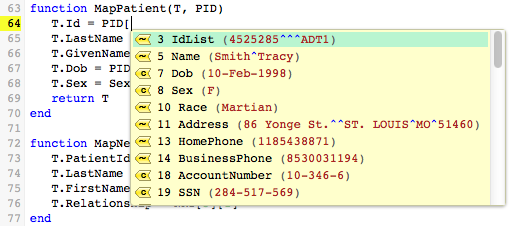
Now, if you continue typing “= PID[“, another list appears, for the fields that are defined in the PID segment. This list includes the values of the fields, as obtained from the sample data:

When you select field 3, Patient Identifier List, a list of the available sub-fields is displayed. In this case, there is only one sub-field. As before, the value of this sub-field is displayed:

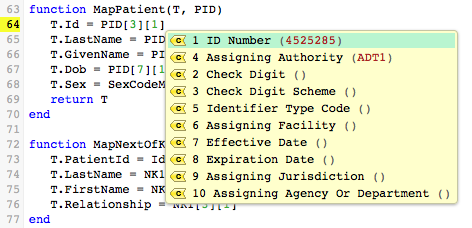
When you select Repeat 1, yet another list appears, this time of the sub-sub-fields defined for sub-field 1 of PID field 3:

From this list, you can see that the sample data contains values for sub-sub-fields 1 and 4. When you select sub-sub-field 1, ID Number, the mapping statement is complete:

As you can see this is an exact reconstruction of the statement that you originally removed. The Iguana Translator allows you to recreate this statement without having to know how the PID segment is structured. And, if a field or sub-field of the PID segment has a value defined in the sample data, this value is displayed as part of the list from which you are choosing. This makes it easier to determine what fields need to be mapped.
Note: If you know the your sample data values you can use deep auto-completion (see bottom of page) by just typing in “.data“, and choosing the correct field in a single step (instead of the three steps needed above). This nifty technique can be a great time-saver.
In this case typing “45” (the first two digits of the ID Number) is enough to identify the desired field:

The rest of the mapping statements in MapPatient() perform similar mapping operations.
The statement that maps data to the LastName field uses two useful methods :nodeValue() and :capitalize():

To understand what this statement does, first note that the value contained in PID[5][1][1][1] is stored in the Iguana Translator’s internal storage format; this internal format is a node. The :nodeValue() function converts this node to a Lua string.
When the node is converted to a string, you can use functions from the stringutil module (included in this script) or the Lua string library to transform the value of a field. In this example, capitalize() is called (which is defined in the stringutil module). This converts the first character of the string to uppercase (capital) letters, and the rest of the string to lowercase (small) letters.
Note: In Lua, the statement T.LastName = PID[5][1][1][1]:S():capitalize() takes advantage of the Lua “OO style syntax”
This means that in Lua the following statements are equivalent:
List[i].functionName(List[i])
List[i]:functionName()
Which means that the following statements are equivalent:
-- easier way
T.LastName = PID[5][1][1][1]:S():capitalize()

-- more complicated way
local stringval = PID[5][1][1][1].S(PID[5][1][1][1])
T.LastName = stringval.capitalize(stringval)
As you can see, using Lua’s : syntax feature makes it easier to write statements that transform data.
The statement that maps date of birth uses a date formatting function :D():

This statement takes the value stored in PID[7][1], in the Iguana Translator’s internal node format, and uses the node.D() function (included in the dateparse module) to convert the date and time to the date-time format that the database is expecting.
Finally, this statement takes the value stored in PID[8] and uses the SexCodeMap table to convert it.

This map is defined in the script:

If PID[8] contains M or m, it is converted to Male. Similarly, F and f are converted to Female.
Next Step?
Now you understand how MapPatient() maps the PID segment data. Next we will look at how MapNextOfKin() is used to map the data for next of kin.
