Create an HL7 translation
Contents
For this example we use the Filter component in the Sender channel. This allows us to reset the queue and resubmit messages to the Sender channel. Later we will resubmit messages to debug a filtering error. If we had used the Filter component of the Catcher channel we would not be able to resubmit messages using the queue. This page on the Iguana message queue explains why.
Edit the the Filter component of the Sender channel and change the main module to look like this:
![]()
The main function is passed an HL7 message in a string variable. In production this would be coming from the queue; in our test environment it’s coming from the sample data.
So lets start by adding an hl7.parse statement, as you begin typing the auto-complete immediately kicks in:

Either click on “hl7” or keeps typing:
![]()
Then select or parse or keep typing:

If you select vmd it will fill in the code for you:

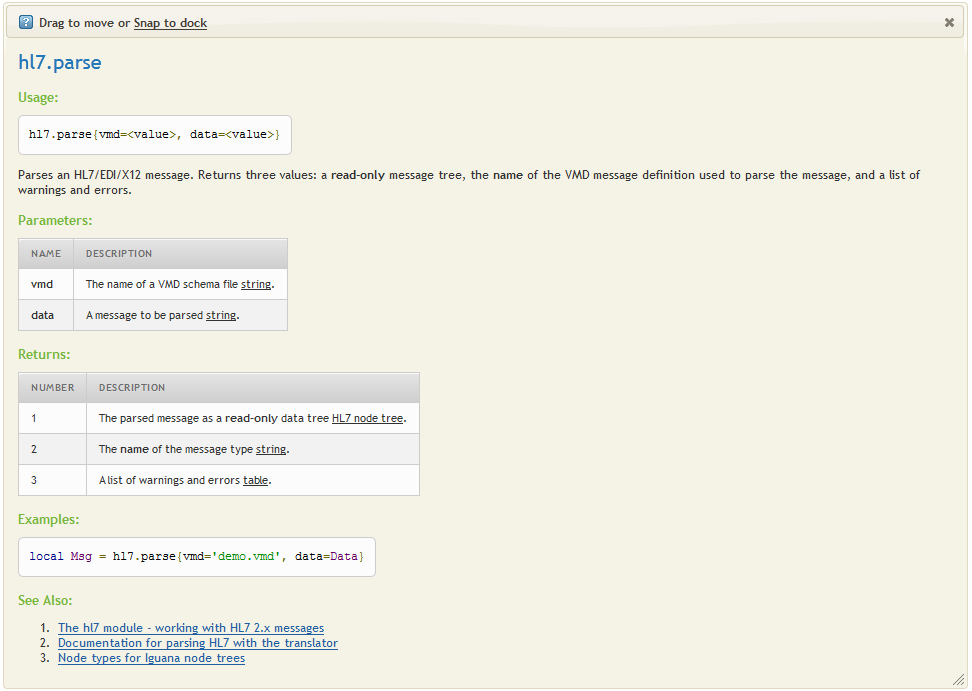
And finally you can invoke help for the function by clicking on the arrow icon, or the top menu bar:

This will open a help window for the function:
Lets have a quick look at how errors work in the editor.
Add the following code then move off the line. You should see an error like this:

Click on the dialog to expand it to see the full error message. You can also drag it to a more convenient spot on the screen:

The vmd argument for the hl7.parse{} function must be a VMD file that is part of the Translator project. These VMD schema files are edited within Chameleon. We will cover them in more depth later.
Fill in the arguments so that the screen looks like this:
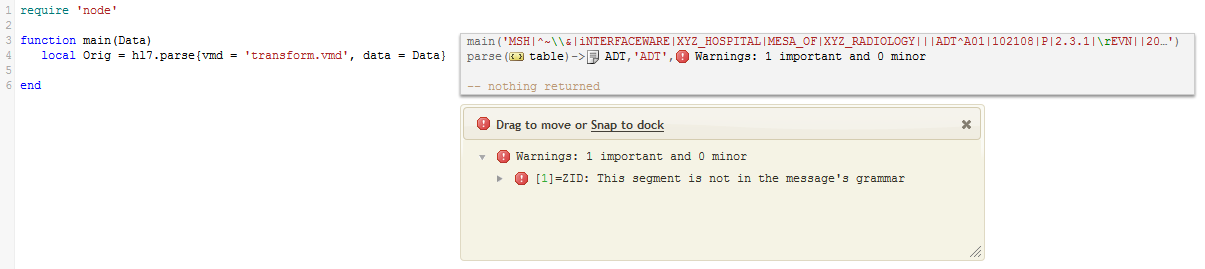
You may notice the Warnings beside the parsed table. If you look at the message you will notice that the it has a ZID segment that is not in the transform.vmd.

We will correct this later in our tutorial.
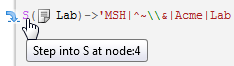
The hl7.parse{} function returns a read-only HL7 node tree. Click on the  annotation to browse the HL7 message:

To transform the message we need to be able to edit it. The Orig node tree returned by hl7.parse{} is read-only so we need to make a writable copy. We use hl7.message{} to create an empty writable node tree and copy Orig into it.
The next two lines of code show how to do this:

Notice the ‘:’ syntax? This is Lua syntax for calling methods. Lua makes it possible for us to extend the Translator by adding our own methods. More about that later.
Now we have a slight problem: we can’t see the result of the mapping. We could add a print statement but that would have a slight negative – print will create log entries when we run the channel. So instead we’ll use a clever trick with annotations. We create a dummy function called trace that does nothing; however, when we call it the, Translator will display a parameter annotation allowing us to see the result of the mapping.
This is what the code should look like:

Then just click on the argument being passed into the trace() function to see the output tree.

We recommend using a trace() function like this in every Translator project.
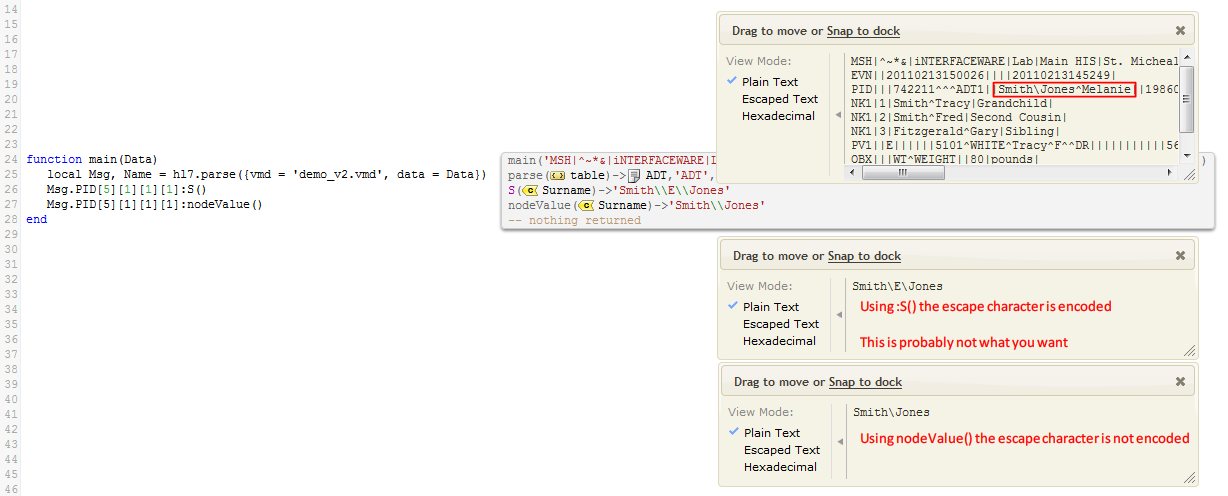
So let’s change two fields in the MSH segment. This is where the auto-completion kicks in. Take the time to experiment and see what happens when you type a few letters matching either the field names or even data.
You should be able to see how auto-completion works in the Translator:

Notice how the annotations show the full path of the data being altered and the values being assigned?
Hint: did you try auto-completion with data? If you did not you should try it now. Using data with auto-complete can take you directly to a field deep inside a message much more quickly than clicking through the message hierarchy. This can be a great feature for analysts who are more familiar with the data than with the HL7 message structure.
The last step is to push the message into the Translator queue. The queue only accepts messages in text format, so we need to convert the message from a node tree into a string before we push it into the queue. We use the node:S() method for the conversion.
First you will need to add the following required module at the very top of your editor screen:
Note: The :S() function was added to the builtin node module in Iguana 5.6.16, so you only need to require() the node module if you are working with 5.6.15 or earlier
require 'node'
Tip: Both require 'node' or require('node') are valid. We will will use require 'node' as it is easier to type.
You will need to alter your code to look like this:

It is the :S() method which converts the node tree into a string. We encourage the use of such a function in our documentation, but it’s not a built in part of the language. If you click on the S in the annotations it will jump you into the implementation of the method which is in the node module:

This is how a method or ‘node extension‘ is defined. It’s very easy to create your own extension node expressions. It’s something you should learn since it makes for much cleaner mapping code.
Note: We recommend using the built-in :nodeValue() function on on leaf nodes rather than :S(). This is because :S() will return escaped text which is not what you want for nodes.
For example if you have Maiden Name appended to the Surname and separated by a “” then this is what you will see:
If you had trouble getting your code to work then you can cheat at this point and copy-paste in the final code:
function trace(a,b,c,d) return end

function main(Data)
   local Orig = hl7.parse  {vmd='transform.vmd', data=Data}
   local Out =  hl7.message{vmd='transform.vmd', name=Orig:nodeName()}
   Out:mapTree(Orig)
   Out.MSH[3][1] = 'Acme'
   Out.MSH[4][1] = 'Lab'
   trace(Out)
   local DataOut = Out:S()
   queue.push{data=DataOut}
end
Our next step will be to commit the milestone and test the channel.